Kotlin 进阶
扩展函数/Extension functions
在软件开发中,你经常需要在不修改原始源代码的情况下更改程序的行为。例如,你可能想为来自第三方库的类添加额外的功能。
你可以通过添加扩展函数来扩展一个类。调用扩展函数的方式与调用类的成员函数完全相同,即使用点符号 .。
在介绍扩展函数的完整语法之前,你需要理解什么是接收者(receiver)。接收者就是该函数被调用时所指向的对象。换句话说,接收者是信息共享的来源或对象。
要创建一个扩展函数,先写下要扩展的类名,写个.号,再写上函数名称。记得写上函数参数和返回值类型
fun String.bold(): String = "<b>$this</b>"

fun main() {
    // "hello" is the receiver
    println("hello".bold())
    // <b>hello</b>
}
在这个例子中:
String是被扩展的类bold是扩展函数的名称.bold()函数的返回值类型是String"hello",String的实例,也是函数的接收者- The receiver is accessed inside the body by the keyword:
this. - A string template (
$) is used to access the value ofthis. - The
.bold()extension function takes a string and returns it in a<b>HTML element for bold text.
面向扩展设计
你可以在任何地方定义扩展函数,这使你能够创建“面向扩展”的设计。这种设计模式可以将核心功能与有用但非必需的特性分离开来,从而使你的代码更易于阅读和维护。
一个典型的例子是 Ktor 库中的 HttpClient 类,它用于执行网络请求。其核心功能仅由一个 request() 函数组成,该函数接收 HTTP 请求所需的所有信息:
class HttpClient {
    fun request(method: String, url: String, headers: Map<String, String>): HttpResponse {
        // 执行网络请求的核心代码
    }
}
在实际应用中,最常用的 HTTP 请求是 GET 或 POST。对于库来说,为这些常见用例提供更简短的名称(方法)是有意义的。然而,实现这些功能并不需要编写新的底层网络代码,而只需要调用特定的 request 即可。换句话说,它们是定义为独立的 .get() 和 .post() 扩展函数的绝佳选择:
fun HttpClient.get(url: String): HttpResponse =
    request("GET", url, emptyMap())

fun HttpClient.post(url: String): HttpResponse =
    request("POST", url, emptyMap())
这些 .get() 和 .post() 函数扩展了 HttpClient 类。由于它们是在 HttpClient 实例(作为接收者)上调用的,因此它们可以直接使用该类中的 request() 函数。通过使用这些扩展函数,你可以使用对应的 HTTP 方法来调用核心请求功能,这不仅简化了代码,还提升了可读性。
class HttpClient {
    fun request(method: String, url: String, headers: Map<String, String>): HttpResponse {
        println("Requesting $method to $url with headers: $headers")
        return HttpResponse("Response from $url")
    }
}

fun HttpClient.get(url: String): HttpResponse = request("GET", url, emptyMap())

fun main() {
    val client = HttpClient()

    // Making a GET request using request() directly
    val getResponseWithMember = client.request("GET", "https://example.com", emptyMap())

    // Making a GET request using the get() extension function
    // The client instance is the receiver
    val getResponseWithExtension = client.get("https://example.com")
}- Core vs. Non-essential: 这种设计哲学建议保持类的“精简(Lean)”。类内部只存放必须访问私有成员的核心逻辑,而那些基于公开 API 实现的“便利方法(Convenience methods)”则应该放在类外部作为扩展。
- Separation of Concerns (关注点分离):这样做的好处是,如果你以后想给
HttpClient增加 100 个方便的工具函数,你不需要把这个类变成一个拥有几千行代码的上帝类(God Class) - Discovery (易发现性):即便函数定义在类外面,IDE(如 IntelliJ 或 Android Studio)依然会在你输入
httpClient.时自动提示这些扩展函数,使用体验与成员函数完全一致。
这种模式在 Kotlin 的许多流行库(如 Ktor, Coil, Anko)中被广泛采用。
有限作用域函数/Scope functions
在编程中,作用域(Scope) 是指变量或对象能够被识别的区域。最常提到的作用域包括:
- 全局作用域(Global scope):可以从程序的任何地方访问的变量或对象。
- 局部作用域(Local scope):仅在定义它的代码块或函数内部才能访问的变量或对象。
在 Kotlin 中,还存在作用域函数(Scope functions),它们允许你围绕一个对象创建一个临时作用域并执行特定代码。
作用域函数能让你的代码更加简洁,因为在临时作用域内,你无需反复引用对象的名称。根据所选的作用域函数,你可以通过关键字 this(引用对象本身)或关键字 it(作为参数引用)来访问该对象。
Kotlin 总共有五种作用域函数:let、apply、run、also 和 with。
每种作用域函数都接收一个 Lambda 表达式,并返回该对象本身或 Lambda 表达式的结果。在本次导览中,我们将逐一解释每种作用域函数及其用法。
提示
You can also watch the Back to the Stdlib: Making the Most of Kotlin's Standard Library talk on scope functions by Sebastian Aigner, Kotlin developer advocate.
let 非空检查并执行闭包函数
当你需要在代码中进行null值判断并对返回值进行更多操作时,请使用let函数
现在看到下面的例子:
fun sendNotification(recipientAddress: String): String {
    println("Yo $recipientAddress!")
    return "Notification sent!"
}

fun getNextAddress(): String {
    return "sebastian@jetbrains.com"
}

fun main() {
    val address: String? = getNextAddress()
    sendNotification(address)
}这个例子中创建了一个可空String变量address,但sendNotification函数不接受可空String类型,编译器会报错:
Argument type mismatch: actual type is 'String?', but 'String' was expected.在基础教程中,你已经知道了可以给null值或null调用通过 elvis操作符?: 设置一个默认值,或者简单地使用if分支块来处理null值并执行相应的语句。但如果你想使用返回的对象呢?你可以使用if条件和else分支:
val address: String? = getNextAddress()
val confirm = if(address != null) {
    sendNotification(address)
} else { null }然而,更简洁的方式是使用let作用域函数:
val address: String? = getNextAddress()
val confirm = address?.let {
    sendNotification(it)
}- Creates variables called
addressandconfirm. - Uses a safe call for the
letscope function on theaddressvariable. - Creates a temporary scope within the
letscope function. - Passes the
sendNotification()function as a lambda expression into theletscope function. - 在
let的局部作用域中,将对象的引用重定向至it变量 - Assigns the result to the
confirmvariable.
通过这种方式,你可以处理address变量的潜在null值情况,并在后面的代码中使用confirm变量
apply 对象初始化并立即调用方法
使用apply函数在对象创建时初始化对象,而不是在对象创建完成后才修改默认值。这种方式能使你的代码更有可读性和可维护性
看到下面的例子
class Client() {
    var token: String? = null
    fun connect() = println("connected!")
    fun authenticate() = println("authenticated!")
    fun getData() : String {
        println("getting data!")
        return "Mock data"
    }
}

val client = Client()

fun main() {
    client.token = "asdf"
    client.connect()
    // connected!
    client.authenticate()
    // authenticated!
    client.getData()
    // getting data!
}尽管例子中的代码已经足够小巧,但在现实中,你在创建完对象后总要等上一小会时间才能配置和调用对象(中的属性)。不过,如果你用到了apply,你就可以在一口气完成对象实例与初始化、对象方法调用
val client = Client().apply {
    token = "asdf"
    connect()
    // connected!
    authenticate()
    // authenticated!
}

fun main() {
    client.getData()
    // getting data!
}- Creates
clientas an instance of theClientclass. - Uses the
applyscope function on theclientinstance. - Creates a temporary scope within the
applyscope function so that you don't have to explicitly refer to theclientinstance when accessing its properties or functions. - Passes a lambda expression to the
applyscope function that updates thetokenproperty and calls theconnect()andauthenticate()functions. - Calls the
getData()member function on theclientinstance in themain()function.
如你所见,当你要处理大段代码时,这个方式会很方便
run 连续执行对象方法并返回函数结果
与 apply 类似,你可以使用 run 作用域函数来初始化对象。但 run 的更佳使用场景是在代码的特定时刻初始化对象,并立即计算结果。
让我们延续之前 apply 函数的示例:这一次,你希望将 connect() 和 authenticate() 函数组合在一起,以便在每次请求时调用它们。
val client: Client = Client().apply {
    token = "asdf"
}

fun main() {
    // 使用 run 执行操作并获取结果
    val result: String = client.run {
        connect()
        // 已连接!
        authenticate()
        // 已认证!
        getData() // 这是 Lambda 的最后一行,其返回值将赋给 result
        // 正在获取数据!
    }
}
示例解析:
- 创建
client作为Client类的一个实例。 - 在
client实例上使用apply作用域函数。 - 在
apply内部创建一个临时作用域,这样在访问属性或函数时就无需显式引用client实例。 - 向
apply传递一个 Lambda 表达式来更新token属性。main()函数解析: - 创建一个
String类型的变量result。 - 在
client实例上使用run作用域函数。 - 在
run内部创建一个临时作用域,无需显式引用client实例。 - 向
run传递一个 Lambda 表达式,依次调用connect()、authenticate()和getData()。 - 将
getData()的结果赋值给result变量。
现在,你可以在后续代码中使用这个返回的result了。
💡 核心要点对比
apply:返回 对象本身(即client)。通常用于“配置对象”。run:返回 Lambda 的执行结果(即getData()的返回值)。通常用于“执行操作并计算/转换结果”。
also 返回对象自身的连续函数调用
使用 also 作用域函数可以对某个对象执行一些附加操作,然后返回该对象本身以便在代码中继续使用。这在编写日志(Logging)等副作用操作时非常有用
fun main() {
    val medals: List<String> = listOf("Gold", "Silver", "Bronze")

    val reversedLongUppercaseMedals: List<String> =
        medals
            .map { it.uppercase() }
            .filter { it.length > 4 }
            .reversed()

    println(reversedLongUppercaseMedals)
    // 输出:[BRONZE, SILVER]
}
示例解析:
- 创建
medals变量,包含一个字符串列表。 - 创建
reversedLongUppercaseMedals变量,类型为List<String>。 - 在
medals变量上使用.map()扩展函数。 - 向
.map()传递一个 Lambda 表达式,通过it关键字引用列表项,并调用.uppercase()。 - 使用
.filter()扩展函数。 - 向
.filter()传递一个 Lambda 表达式作为谓词,通过it检查项的字符长度是否大于 4。 - 使用
.reversed()扩展函数。 - 将最终结果赋值给
reversedLongUppercaseMedals变量。 - 打印该变量包含的列表。
在函数调用之间添加一些日志,以便观察 medals 变量的变化过程会非常有用。also 函数可以完美胜任这项工作:
fun main() {
    val medals: List<String> = listOf("Gold", "Silver", "Bronze")
    val reversedLongUppercaseMedals: List<String> =
        medals
            .map { it.uppercase() }
            .also { println(it) } // 打印中间状态
            // 输出:[GOLD, SILVER, BRONZE]
            .filter { it.length > 4 }
            .also { println(it) } // 打印过滤后的状态
            // 输出:[SILVER, BRONZE]
            .reversed()

    println(reversedLongUppercaseMedals)
    // 输出:[BRONZE, SILVER]
}
示例解析:
- 在
medals变量的处理链中使用了also作用域函数。 - 在
also内部创建了一个临时作用域,因此当你想将对象作为函数参数使用时,无需显式引用medals变量。 - 向
also传递一个 Lambda 表达式,通过it关键字将当前的medals状态作为参数传递给println()函数。
由于also函数会返回对象本身,它不仅适用于日志记录,还非常适合用于:
- 调试:在不改变数据流的情况下观察数据。
- 链式操作:保持调用链的连续性。
- 副作用操作:执行那些不影响代码主流程(数据转换)的其他操作。
let VS also
如果在上面的链式调用中使用 let,由于 println() 的返回值是 Unit,整个链条就会断掉(下一行接收到的将是 Unit 而不是列表)。而 also 就像是一个**“分流器”**:它让数据流过并执行一些操作,但流出的依然是原始数据。
with 无返回值的需要指定主体的连续函数调用
与其他作用域函数不同,with 不是一个扩展函数,因此它的语法有所不同。你需要将接收者对象作为参数传递给 with。
当你想要在一个对象上调用多个函数时,请使用 with 作用域函数。
请看这个示例:
class Canvas {
    fun rect(x: Int, y: Int, w: Int, h: Int): Unit = println("$x, $y, $w, $h")
    fun circ(x: Int, y: Int, rad: Int): Unit = println("$x, $y, $rad")
    fun text(x: Int, y: Int, str: String): Unit = println("$x, $y, $str")
}

fun main() {
    val mainMonitorPrimaryBufferBackedCanvas = Canvas()

    // 不使用 with 的情况:必须反复写出冗长的变量名
    mainMonitorPrimaryBufferBackedCanvas.text(10, 10, "Foo")
    mainMonitorPrimaryBufferBackedCanvas.rect(20, 30, 100, 50)
    mainMonitorPrimaryBufferBackedCanvas.circ(40, 60, 25)
    mainMonitorPrimaryBufferBackedCanvas.text(15, 45, "Hello")
    mainMonitorPrimaryBufferBackedCanvas.rect(70, 80, 150, 100)
    mainMonitorPrimaryBufferBackedCanvas.circ(90, 110, 40)
    mainMonitorPrimaryBufferBackedCanvas.text(35, 55, "World")
    mainMonitorPrimaryBufferBackedCanvas.rect(120, 140, 200, 75)
    mainMonitorPrimaryBufferBackedCanvas.circ(160, 180, 55)
    mainMonitorPrimaryBufferBackedCanvas.text(50, 70, "Kotlin")
}
上面的例子创建了一个 Canvas 类,包含三个成员函数。你可以看到,这段代码由于变量名过长而变得难以阅读。如果使用 with 函数,代码将变得非常精简:
val mainMonitorSecondaryBufferBackedCanvas = Canvas()
with(mainMonitorSecondaryBufferBackedCanvas) {
    // 在此作用域内,可以直接调用方法
    text(10, 10, "Foo")
    rect(20, 30, 100, 50)
    circ(40, 60, 25)
    text(15, 45, "Hello")
    rect(70, 80, 150, 100)
    circ(90, 110, 40)
    text(35, 55, "World")
    rect(120, 140, 200, 75)
    circ(160, 180, 55)
    text(50, 70, "Kotlin")
}
示例解析:
- 使用
with作用域函数,并将mainMonitorSecondaryBufferBackedCanvas实例作为接收者传入。 - 在
with内部创建一个临时作用域,这样在调用其成员函数时,就无需显式引用该实例名。 - 向
with传递一个 Lambda 表达式,其中包含一系列带有不同参数的成员函数调用。
由于代码变得更加易读,你犯错误的可能性也随之降低。
💡核心总结:with vs run
语法差异:
run是obj.run { ... },而with是with(obj) { ... }。使用建议:当对象不为 null 且你只想“带着(with)这个对象做一堆事”时,使用
with。如果对象可能为 null,通常配合安全调用使用obj?.run { ... }。
使用案例总结
本节涵盖了 Kotlin 中不同的作用域函数及其主要用例,旨在让你的代码更加符合惯用法(idiomatic)。你可以将下表作为快速参考手册。请记住,即使不完全掌握这些函数的底层原理,你也可以在代码中自如地使用它们。
| 函数 | 对象引用方式 | 返回值 | 典型用例 (Use case) |
|---|---|---|---|
let | it | Lambda 结果 | 在代码中执行 null 检查,并随后对返回的对象执行进一步操作。 |
apply | this | 对象本身 (x) | 在对象 创建时进行初始化。 |
run | this | Lambda 结果 | 在对象创建时进行初始化,并且 计算一个结果。 |
also | it | 对象本身 (x) | 在返回对象之前,完成一些 附加操作(如日志记录)。 |
with | this | Lambda 结果 | 对同一个对象 调用多个函数。 |
| 详情请见作用域函数 |
💡 如何快速做出选择?
虽然表格很清晰,但在实战中你可以遵循这几条简单的准则:
如果你只想配置对象(设置一堆属性),选
apply。如果你想处理可空对象(如果不是 null 才做某事),选
let。如果你想把一个对象转换成另一种结果,选
run或let。如果你只是想在链式调用里插一段逻辑(比如打印调试信息),选
also。如果你面对一个长名称的对象,想少敲几次键盘,用
with把它的作用域包裹起来。
练习
练习一
data class ProductInfo(val priceInDollars: Double?)

class Product {
    fun getProductInfo(): ProductInfo? {
        return ProductInfo(100.0)
    }
}

// Rewrite this function
fun Product.getPriceInEuros(): Double? {
    val info = getProductInfo()
    if (info == null) return null
    val price = info.priceInDollars
    if (price == null) return null
    return convertToEuros(price)
}

fun convertToEuros(dollars: Double): Double {
    return dollars * 0.85
}

fun main() {
    val product = Product()
    val priceInEuros = product.getPriceInEuros()

    if (priceInEuros != null) {
        println("Price in Euros: €$priceInEuros")
        // Price in Euros: €85.0
    } else {
        println("Price information is not available.")
    }
}将getPriceInEuros函数修改为使用?.let的单行函数:
data class ProductInfo(val priceInDollars: Double?)

class Product {
    fun getProductInfo(): ProductInfo? {
        return ProductInfo(100.0)
    }
}

// Rewrite this function
fun Product.getPriceInEuros(): Double? = getProductInfo()?.priceInDollars?.let { convertToEuros(it) }

fun convertToEuros(dollars: Double): Double {
    return dollars * 0.85
}

fun main() {
    val product = Product()
    val priceInEuros = product.getPriceInEuros()

    if (priceInEuros != null) {
        println("Price in Euros: €$priceInEuros")
        // Price in Euros: €85.0
    } else {
        println("Price information is not available.")
    }
}
练习二
在更新邮箱的同时打印日志
data class User(val id: Int, var email: String)

fun updateEmail(user: User, newEmail: String): User = user.apply {
    user.email = newEmail
}.also {
    println("Updating email for user with ID ${it.id}")
}

fun main() {
    val user = User(1, "old_email@example.com")
    val updatedUser = updateEmail(user, "new_email@example.com")
    // Updating email for user with ID: 1

    println("Updated User: $updatedUser")
    // Updated User: User(id=1, email=new_email@example.com)
}
带接收者的Lambda函数
在初级教程中,你已经学习了如何使用 Lambda 表达式。Lambda 表达式也可以拥有一个“接收者(receiver)”。在这种情况下,Lambda 表达式可以访问接收者的任何成员函数或属性,而无需每次都显式指定接收者。省去了这些额外的引用后,你的代码会变得更易于阅读和维护。
注
带接收者的 Lambda 表达式也被称为带接收者的函数字面值 (Function literals with receiver)
当你定义这种函数类型时,其语法会有所不同:
- 首先,写下你想要扩展的接收者类型。
- 接着,写一个点号
.。 - 最后,完成函数类型定义的其余部分
MutableList<Int>.() -> Unit这个函数类型的构成如下:
- 接收者类型:
MutableList<Int>。 - 函数参数:小括号
()内为空,表示没有参数。 - 返回值:
Unit,表示没有返回值。
请看这个绘制图形的示例:
class Canvas {
    fun drawCircle() = println("🟠 正在绘制圆形")
    fun drawSquare() = println("🟥 正在绘制正方形")
}

// 定义一个接受“带接收者 Lambda”的函数
fun render(block: Canvas.() -> Unit): Canvas {
    val canvas = Canvas()
    // 在 canvas 实例上调用该 Lambda 表达式
    canvas.block()
    return canvas
}

fun main() {
    // 调用 render 函数,Lambda 内部可以直接访问 Canvas 的成员
    render {
        drawCircle() // 🟠 正在绘制圆形
        drawSquare() // 🟥 正在绘制正方形
    }
}
示例解析:
Canvas类:包含两个模拟绘图操作的函数:drawCircle()和drawSquare()。render()函数:- 接收一个名为
block的参数,并返回一个Canvas实例。 block参数是一个带接收者的 Lambda 表达式,其中Canvas类作为接收者。- 函数内部创建了
Canvas实例,并将该实例作为接收者来调用block()。
- 接收一个名为
main()函数:- 调用
render()并传入一个 Lambda 表达式作为block参数。 - 在这个 Lambda 内部,程序直接调用了
drawCircle()和drawSquare()。 - 核心优势:由于这些函数是在带接收者的 Lambda 中调用的,因此可以像在
Canvas类内部编写代码一样直接调用它们,无需显式引用实例对象。
- 调用
💡 为什么使用这种模式?
构建 DSL:带接收者的 Lambda 表达式是创建 DSL(领域特定语言) 的核心工具。
精简代码:由于你可以直接访问接收者的成员函数和属性,而无需显式引用接收者(例如不需要写
it.drawCircle()),代码会变得更加精炼、易读且易于维护。
为了进一步演示这一特性,请看这个配置菜单项的示例。我们将通过构建一个简单的 DSL 来展示如何让代码结构变得像配置文件一样清晰易读。
首先,我们定义基础类。MenuItem 代表单个菜单项,而 Menu 类包含一个 item() 函数用于添加项,以及一个存储所有项的列表 items:
class MenuItem(val name: String)

class Menu(val name: String) {
    val items = mutableListOf<MenuItem>()

    // 用于向菜单中添加项的函数
    fun item(name: String) {
        items.add(MenuItem(name))
    }
}
接下来,我们编写一个名为 menu 的核心构建函数。它接受一个带接收者的 Lambda 表达式作为参数(命名为 init),这个 Lambda 的接收者类型是 Menu:
fun menu(name: String, init: Menu.() -> Unit): Menu {
    // 1. 创建 Menu 类的实例
    val menu = Menu(name)
    // 2. 在该实例上调用传入的带接收者 Lambda (init)
    menu.init()
    // 3. 返回配置好的菜单对象
    return menu
}
现在,你可以使用这个 DSL 来配置菜单,并创建一个 printMenu() 函数在控制台中打印结果:
fun printMenu(menu: Menu) {
    println("菜单名称: ${menu.name}")
    menu.items.forEach { println("  项目: ${it.name}") }
}

fun main() {
    // 使用 DSL 创建菜单
    val mainMenu = menu("主菜单") {
        // 在这里,你可以直接调用 Menu 类的 item() 函数
        item("首页")
        item("设置")
        item("退出")
    }

    // 打印菜单结构
    printMenu(mainMenu)
    // 输出:
    // 菜单名称: 主菜单
    //   项目: 首页
    //   项目: 设置
    //   项目: 退出
}
💡 为什么这种写法更优?
声明式风格:在
main函数中,我们不再是不断重复menu.item("...")这种命令式代码,而是以一种描述性的结构来定义数据。上下文感知:在
menu { ... }的大括号内,IDE 会自动提示Menu类中的可用方法(如item),因为Menu是该作用域的隐式接收者。易于维护:这种代码结构非常接近最终的逻辑层次,减少了由于显式引用对象而产生的视觉干扰(Noise)。
如你所见,使用带接收者的 Lambda 表达式极大地简化了创建菜单所需的代码。Lambda 表达式不仅在对象的设置和创建中非常有用,在**配置(Configuration)**方面也表现出色。
它们被广泛应用于为 API、UI 框架和配置构建器打造 DSL(领域特定语言),以生成精简的代码,让你能更轻松地专注于底层的代码结构和逻辑。
核心应用与生态
Kotlin 标准库示例:Kotlin 生态系统中有很多这种设计模式的例子,比如标准库中的
buildList()和buildString()函数。类型安全构建器:带接收者的 Lambda 表达式可以与 Kotlin 的类型安全构建器相结合,从而创建出在编译时(而非运行时)就能检测到类型问题的 DSL。详情简介type-safe builders
为了让你更直观地理解文中提到的 buildString,它的简化版实现其实和我们写的 menu 函数如出一辙:
// 标准库中的简化逻辑
fun buildString(action: StringBuilder.() -> Unit): String {
    val sb = StringBuilder()
    sb.action() // 在 StringBuilder 实例上执行你的代码
    return sb.toString()
}

// 使用时:
val message = buildString {
    append("Hello, ") // 直接调用 StringBuilder 的方法
    append("Kotlin DSL!")
}
lambda with receiver里不止能调用对象的方法,还可以操作对象的属性:
server {
    port = 8080
    logging {  // 这里的 logging 块也是一个 Lambda with Receiver
        level = "DEBUG"
        path = "/var/log"
    }
}
甚至把业务逻辑也耦合进去:
configureServer {
    // 这里的 this 是 Server 实例
    port = 8080

    // 因为你在闭包里,你可以写任何逻辑
    if (System.getenv("APP_ENV") == "prod") {
        enableSsl() // 调用对象的方法
    }
}
lambda with receiver的本质是一个巨大的lambda函数(或闭包函数)
练习
练习一
You have a fetchData() function that accepts a lambda expression with receiver. Update the lambda expression to use the append() function so that the output of your code is: Data received - Processed.
fun fetchData(callback: StringBuilder.() -> Unit) {
    val builder = StringBuilder("Data received")
    builder.callback()
}

fun main() {
    fetchData {
        // Write your code here
        // Data received - Processed
    }
}
fun fetchData(callback: StringBuilder.() -> Unit) {
val builder = StringBuilder("Data received")
builder.callback()
println(builder)
}
fun main() {
fetchData {
// Write your code here
// Data received - Processed append(" - Processed")
}
}练习二
You have a Button class and ButtonEvent and Position data classes. Write some code that triggers the onEvent() member function of the Button class to trigger a double-click event. Your code should print "Double click!".
class Button {
    fun onEvent(action: ButtonEvent.() -> Unit) {
        // Simulate a double-click event (not a right-click)
        val event = ButtonEvent(isRightClick = false, amount = 2, position = Position(100, 200))
        event.action() // Trigger the event callback
    }
}

data class ButtonEvent(
    val isRightClick: Boolean,
    val amount: Int,
    val position: Position
)

data class Position(
    val x: Int,
    val y: Int
)

fun main() {
    val button = Button()

    button.onEvent {
        // Write your code here
        // Double click!
    }
}
class Button {
fun onEvent(action: ButtonEvent.() -> Unit) {
// Simulate a double-click event (not a right-click)
val event = ButtonEvent(isRightClick = false, amount = 2, position = Position(100, 200))
event.action() // Trigger the event callback
}
}
data class ButtonEvent(
val isRightClick: Boolean,
val amount: Int,
val position: Position
)
data class Position(
val x: Int,
val y: Int
)
fun main() {
val button = Button()
button.onEvent {
// Write your code here
// Double click! if (amount == 2) {
println("Double click!")
}
}
}练习三
Write a function that creates a copy of a list of integers where every element is incremented by 1. Use the provided function skeleton that extends List<Int> with an incremented function.
fun List<Int>.incremented(): List<Int> {
    val originalList = this
    return buildList {
        // Write your code here
    }
}

fun main() {
    val originalList = listOf(1, 2, 3)
    val newList = originalList.incremented()
    println(newList)
    // [2, 3, 4]
}
fun List<Int>.incremented(): List<Int> {
val originalList = this
return buildList {
for (n in originalList) add(n + 1)
}
}
fun main() {
val originalList = listOf(1, 2, 3)
val newList = originalList.incremented()
println(newList)
// [2, 3, 4]
}类与接口
继承
In a previous chapter, we covered how you can use extension functions to extend classes without modifying the original source code. But what if you are working on something complex where sharing code between classes would be useful? In such cases, you can use class inheritance.
By default, classes in Kotlin can't be inherited. Kotlin is designed this way to prevent unintended inheritance and make your classes easier to maintain.
Kotlin classes only support single inheritance, meaning it is only possible to inherit from one class at a time. This class is called the parent.
The parent of a class inherits from another class (the grandparent), forming a hierarchy. At the top of Kotlin's class hierarchy is the common parent class: Any. All classes ultimately inherit from the Any class:
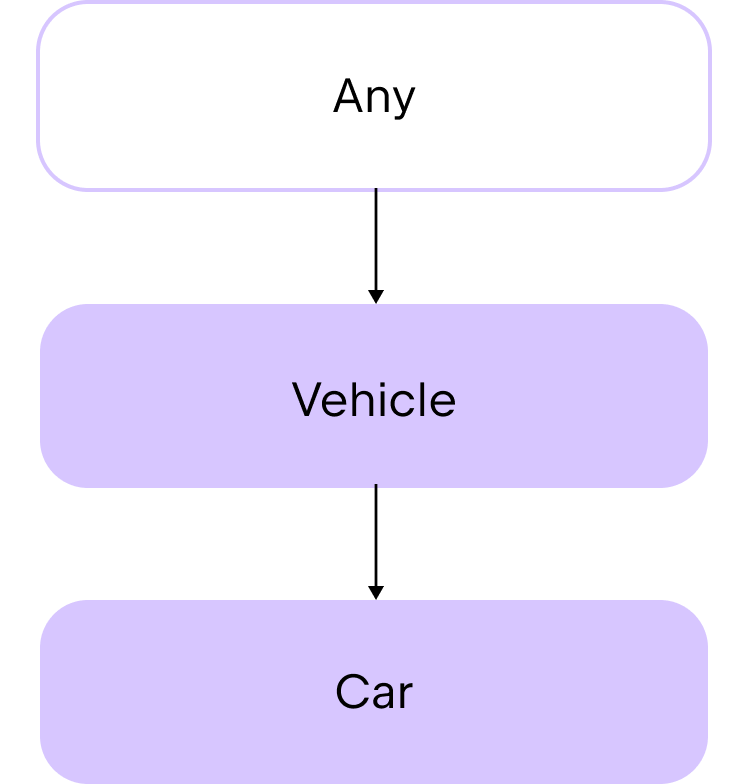
The Any class provides the toString() function as a member function automatically. Therefore, you can use this inherited function in any of your classes. For example:
val car1 = Car("Toyota", "Corolla", 4)

// Uses the .toString() function via string templates to print class properties
println("Car1: make=${car1.make}, model=${car1.model}, numberOfDoors=${car1.numberOfDoors}")
// Car1: make=Toyota, model=Corolla, numberOfDoors=4
If you want to use inheritance to share some code between classes, first consider using abstract classes.
抽象类
Abstract classes can be inherited by default. The purpose of abstract classes is to provide members that other classes inherit or implement. As a result, they have a constructor, but you can't create instances from them. Within the child class, you define the behavior of the parent's properties and functions with the override keyword. In this way, you can say that the child class "overrides" the members of the parent class.
提示
When you define the behavior of an inherited function or property, we call that an implementation.
Abstract classes can contain both functions and properties with implementation as well as functions and properties without implementation, known as abstract functions and properties.
To create an abstract class, use the abstract keyword:
abstract class AnimalTo declare a function or a property without an implementation, you also use the abstract keyword:
abstract fun makeSound()
abstract val sound: String
For example, let's say that you want to create an abstract class called Product that you can create child classes from to define different product categories:
abstract class Product(val name: String, var price: Double) {
    // Abstract property for the product category
    abstract val category: String

    // A function that can be shared by all products
    fun productInfo(): String {
        return "Product: $name, Category: $category, Price: $price"
    }
}
In the abstract class:
- The constructor has two parameters for the product's
nameandprice. - There is an abstract property that contains the product category as a string.
- There is a function that prints information about the product.
什么是抽象字段
在 C/Go 的逻辑里,变量代表内存空间。抽象一个内存空间听起来很荒谬。 但在 Kotlin 里,属性代表协议。
抽象方法:约定了子类必须实现某个动作。
抽象属性:约定了子类必须提供某个数据。
什么时候用抽象属性?
- 定义“必须拥有”的状态:比如
BaseActivity要求所有子类必须提供一个layoutId。 - 强制子类配置参数:比如 RPC 拦截器基类要求子类提供一个
serviceName。
Let's create a child class for electronics. Before you define an implementation for the category property in the child class, you must use the override keyword:
class Electronic(name: String, price: Double, val warranty: Int) : Product(name, price) {
    override val category = "Electronic"
}
The Electronic class:
- Inherits from the
Productabstract class. - Has an additional parameter in the constructor:
warranty, which is specific to electronics. - Overrides the
categoryproperty to contain the string"Electronic".
子类实现抽象属性的三种方式
- 直接给它一个固定值(字段化)
class Circle(val radius: Double) : Shape() {
    override val area = 3.14 * radius * radius // 结果存入字段,不再变动
} 2. 给它一个计算逻辑(方法化) kotlin
class Square(val side: Double) : Shape() {
override val area: Double
get() = side * side // 就像 Go 的方法一样,每次点 area 都会跑一段代码
} 3. 在构造函数里直接实现 kotlin
class SimpleShape(override val area: Double) : Shape()
// 直接在构造函数里接管父类的抽象属性
```
Now, you can use these classes like this:
fun main() {
    // Creates an instance of the Electronic class
    val laptop = Electronic(name = "Laptop", price = 1000.0, warranty = 2)

    println(laptop.productInfo())
    // Product: Laptop, Category: Electronic, Price: 1000.0
}
Although abstract classes are great for sharing code in this way, they are restricted because classes in Kotlin only support single inheritance. If you need to inherit from multiple sources, consider using interfaces.
接口
接口与类相似,但存在一些关键区别:
- 无法实例化:你不能创建接口的实例。它们没有构造函数或头部定义。
- 默认开启继承:接口的函数和属性默认是隐式可继承的。在 Kotlin 中,我们称之为“open”。
- 无需显式标记抽象:如果你没有为接口函数提供具体实现,也不需要将其标记为
abstract。
与抽象类类似,你使用接口来定义一组可供类在随后继承并实现的函数和属性。这种方法让你能够专注于接口所描述的抽象概念,而不是具体的实现细节。使用接口能让你的代码:
- 更具模块化:它隔离了不同的部分,允许它们独立演进。
- 更易于理解:将相关的函数分组成一个具有凝聚力的集合。
- 更易于测试:你可以快速将真实实现替换为模拟对象(Mock)进行测试。
要声明一个接口,请使用 interface 关键字:
interface PaymentMethod深度解析:接口 vs 抽象类
虽然两者都用于定义抽象,但有几个核心不同点:
状态存储:接口不能持有“状态”(即不能有 backing fields)。虽然接口可以声明属性,但这些属性通常是抽象的,或者只提供自定义的 getter。
多继承:在 Kotlin 中,一个类只能继承自一个父类,但可以实现多个接口。
构造函数:抽象类可以有构造函数,而接口绝对不行。
实现接口
接口支持多重继承,这意味着一个类可以同时实现多个接口。我们首先来看一个类实现单个接口的场景。
要创建一个实现接口的类,请在类头后面添加冒号 :,然后紧跟要实现的接口名称。注意:接口名称后面不需要加括号 (),因为接口没有构造函数。
class CreditCardPayment : PaymentMethod深度解析
多重继承(Multiple Inheritance):在 Kotlin 中,类只能继承自一个父类(单继承),但可以通过冒号后面用逗号分隔的方式,同时实现无限多个接口。
无括号规则:当你看到
class A : B()时,B是一个类(调用了构造函数);当你看到class A : B时,B通常是一个接口。强制实现:除非该类本身也是抽象类,否则它必须实现接口中定义的所有未赋默认值的函数和属性。
例如:
interface PaymentMethod {
    // Functions are inheritable by default
    fun initiatePayment(amount: Double): String
}

class CreditCardPayment(val cardNumber: String, val cardHolderName: String, val expiryDate: String) : PaymentMethod {
    override fun initiatePayment(amount: Double): String {
        // Simulate processing payment with credit card
        return "Payment of $$amount initiated using Credit Card ending in ${cardNumber.takeLast(4)}."
    }
}

fun main() {
    val paymentMethod = CreditCardPayment("1234 5678 9012 3456", "John Doe", "12/25")
    println(paymentMethod.initiatePayment(100.0))
    // Payment of $100.0 initiated using Credit Card ending in 3456.
}
示例解析:
PaymentMethod:是一个定义了initiatePayment()函数但没有具体实现的接口。CreditCardPayment:是一个实现该接口的类,并负责提供具体的支付逻辑。- 重写(Override):该类重写了从接口继承而来的
initiatePayment()函数。 - 实例调用:创建类的实例后,可以直接调用接口中定义的行为。
如果你需要一个类同时具备多种特质,可以实现多个接口。在类头部的冒号后面列出所有接口名称,并用逗号分隔:
class CreditCardPayment : PaymentMethod, PaymentType关键提示
接口 vs 类:请注意,实现接口时不需要在接口名后加括号
(),因为接口没有构造函数。组合优于继承:通过实现多个接口,你可以像搭积木一样为类添加功能,这比单一继承更加灵活。
例如:
interface PaymentMethod {
    fun initiatePayment(amount: Double): String
}

interface PaymentType {
    val paymentType: String
}

class CreditCardPayment(val cardNumber: String, val cardHolderName: String, val expiryDate: String) : PaymentMethod,
    PaymentType {
    override fun initiatePayment(amount: Double): String {
        // Simulate processing payment with credit card
        return "Payment of $$amount initiated using Credit Card ending in ${cardNumber.takeLast(4)}."
    }

    override val paymentType: String = "Credit Card"
}

fun main() {
    val paymentMethod = CreditCardPayment("1234 5678 9012 3456", "John Doe", "12/25")
    println(paymentMethod.initiatePayment(100.0))
    // Payment of $100.0 initiated using Credit Card ending in 3456.

    println("Payment is by ${paymentMethod.paymentType}")
    // Payment is by Credit Card
}
示例解析:
PaymentMethod:是一个定义了initiatePayment()函数但没有具体实现的接口。CreditCardPayment:是一个实现该接口的类,并负责提供具体的支付逻辑。- 重写(Override):该类重写了从接口继承而来的
initiatePayment()函数。 - 实例调用:创建类的实例后,可以直接调用接口中定义的行为。
接口属性
You can declare properties in interfaces. A property declared in an interface can either be abstract or provide implementations for accessors. Properties declared in interfaces can't have backing fields, and therefore accessors declared in interfaces can't reference them:
interface MyInterface {
    val prop: Int // abstract

    val propertyWithImplementation: String
        get() = "foo"

    fun foo() {
        print(prop)
    }
}

class Child : MyInterface {
    override val prop: Int = 29
}
接口继承
An interface can derive from other interfaces, meaning it can both provide implementations for their members and declare new functions and properties. Quite naturally, classes implementing such an interface are only required to define the missing implementations:
interface Named {
    val name: String
}

interface Person : Named {
    val firstName: String
    val lastName: String

    override val name: String get() = "$firstName $lastName"
}

data class Employee(
    // implementing 'name' is not required
    override val firstName: String,
    override val lastName: String,
    val position: Position
) : Person
解决重载冲突/Resolving overriding conflicts
当你实现多个接口时,可能会继承同一个方法的多个不同实现。Kotlin 要求你必须明确指定该类应如何处理这些冲突。
interface A {
    fun foo() { print("A") } // 带有默认实现
    fun bar()                // 抽象方法(接口中无函数体默认为 abstract)
}

interface B {
    fun foo() { print("B") } // 带有默认实现
    fun bar() { print("bar") } // 带有默认实现
}

// 类 C 仅实现 A,因此必须提供 bar() 的实现
class C : A {
    override fun bar() { print("bar") }
}

// 类 D 同时实现 A 和 B
class D : A, B {
    // 冲突解决:foo() 在 A 和 B 中都有实现,必须重写并指定调用哪一个
    override fun foo() {
        super<A>.foo() // 调用接口 A 的实现
        super<B>.foo() // 调用接口 B 的实现
    }

    // 冲突解决:虽然只有 B 实现了 bar(),但 D 仍需明确其实现方式
    override fun bar() {
        super<B>.bar() // 明确使用 B 的实现
    }
}
核心规则解析:
- 多重实现冲突:如果接口
A和B都提供了foo()的实现,类D必须重写foo()。否则,编译器不知道该运行哪一段代码。 - 消除歧义的语法:使用
super<InterfaceName>.functionName()来精确调用特定父接口的实现。 - 单一实现也要明确:在上面的例子中,虽然只有
B实现了bar(),而A中的bar()是抽象的,但由于bar()出现在多个接口中,类D仍然被要求显式重写并指定其行为。 - 抽象 vs 默认:在接口中,没有函数体的方法默认就是抽象的,不需要额外标记
abstract关键字。
JVM上的接口默认方法/JVM default method generation for interface functions
在 JVM 平台上,接口中声明的函数会被编译为 默认方法(Default Methods)。你可以通过 -jvm-default 编译选项来控制这一行为,该选项支持以下值:
enable(默认值):在接口中生成默认实现,并在子类和DefaultImpls类中包含桥接函数。使用此模式可以保持与旧版本 Kotlin 的二进制兼容性。no-compatibility:仅在接口中生成默认实现。此模式会跳过兼容性桥接函数和DefaultImpls类,非常适合全新的 Kotlin 项目。disable:跳过默认方法,仅生成兼容性桥接函数和DefaultImpls类。
如何配置?
要在 Gradle Kotlin DSL 中配置 -jvm-default 编译选项,请设置 jvmDefault 属性:
kotlin {
    compilerOptions {
        jvmDefault = JvmDefaultMode.NO_COMPATIBILITY
    }
}
为什么这很重要?
在 Kotlin 早期版本中,JVM 6/7 并不支持接口默认方法。为了实现这一功能,Kotlin 编译器会生成一个名为 DefaultImpls 的内部静态类来存放函数体。
随着 JVM 8+ 的普及,Java 接口原生支持了 default 关键字。
使用
no-compatibility:生成的字节码更加干净,直接对应 Java 的接口默认方法,且能减少生成的类文件数量。使用
enable:如果你正在开发一个库,且你的用户可能还在使用非常老旧的 Kotlin 版本调用你的接口,那么为了不让他们的代码在链接时崩溃,你需要保留那些“桥接”逻辑。
详情请见继承
※ 委托/Delegation
接口是有用,可如果接口里有太多函数,那它的子类就会变成一堆样板代码(boilerplate code)。如果你只想覆盖一部分的类行为,那你更得不停写重复代码了
样板代码/boilerplate code
Boilerplate code is a chunk of code that is reused with little or no alteration in multiple parts of a software project.
例如下面的DrawingTool接口,它有一堆函数和一个名为color的属性
interface DrawingTool {
    val color: String
    fun draw(shape: String)
    fun erase(area: String)
    fun getToolInfo(): String
}你又写了一个类,叫做Pentool,它实现了DrawingTool的所有函数和属性
class PenTool : DrawingTool {
    override val color: String = "black"

    override fun draw(shape: String) {
        println("Drawing $shape using a pen in $color")
    }

    override fun erase(area: String) {
        println("Erasing $area with pen tool")
    }

    override fun getToolInfo(): String {
        return "PenTool(color=$color)"
    }
}你想写一个和PenTool一样的行为的子类,但有一个值不同的color属性。一个方法是,写一个新的接受DrawingTool子类(比如PenTool)作为构造函数参数的类,在类里面重载color属性
class CanvasSession(val tool: DrawingTool) : DrawingTool {
    override val color: String = "blue"

    override fun draw(shape: String) {
        tool.draw(shape)
    }

    override fun erase(area: String) {
        tool.erase(area)
    }

    override fun getToolInfo(): String {
        return tool.getToolInfo()
    }
}
你会发现如果接口里有很多函数,那么这个接口的子类(的子类)就得重载很多函数,或者写很多样板代码来调用父类中已实现的方法
好在Kotlin又站起来了
在 Kotlin 中,你可以使用 by 关键字将接口的实现委托给一个类实例。例如:
class CanvasSession(val tool: DrawingTool) : DrawingTool by tool在这个例子中,tool 是 DrawingTool 接口的一个实例(例如 PenTool),接口中所有成员函数的具体实现都委派给了这个实例。
核心优势
消除样板代码:你不需要在
CanvasSession类中手动编写接口成员函数的重复实现。自动生成:编译器会自动从
tool实例中为你生成对应的实现代码。按需重写:你只需要为子类中想要修改的特定行为编写代码,其余部分则直接沿用委托对象的行为。
深度解析:为什么这比继承更聪明?
在传统的继承中,如果父类非常复杂,子类往往会继承大量不必要的负担。而通过委托,你可以灵活地将行为“外包”出去:
组合(Composition):
CanvasSession内部持有tool,它们是组合关系。透明性:对外部调用者来说,
CanvasSession依然是一个完整的DrawingTool,可以直接调用相关方法。解耦:如果你想把“画笔”换成“橡皮擦”,只需要传入不同的
tool实例即可,无需修改CanvasSession的结构。
还是上面的例子,你想修改color属性的默认值
class CanvasSession(val tool: DrawingTool) : DrawingTool by tool {
    // No boilerplate code!
    override val color: String = "blue"
}
If you want to, you can also override the behavior of an inherited member function in the CanvasSession class, but now you don't have to add new lines of code for every inherited member function.
详情请见类委托
练习
练习一
Imagine you're working on a smart home system. A smart home typically has different types of devices that all have some basic features but also unique behaviors. In the code sample below, complete the abstract class called SmartDevice so that the child class SmartLight can compile successfully.
Then, create another child class called SmartThermostat that inherits from the SmartDevice class and implements turnOn() and turnOff() functions that return print statements describing which thermostat is heating or turned off. Finally, add another function called adjustTemperature() that accepts a temperature measurement as an input and prints: $name thermostat set to $temperature°C.
abstract class // Write your code here

class SmartLight(name: String) : SmartDevice(name) {
    override fun turnOn() {
        println("$name is now ON.")
    }

    override fun turnOff() {
        println("$name is now OFF.")
    }

   fun adjustBrightness(level: Int) {
        println("Adjusting $name brightness to $level%.")
    }
}

class SmartThermostat // Write your code here

fun main() {
    val livingRoomLight = SmartLight("Living Room Light")
    val bedroomThermostat = SmartThermostat("Bedroom Thermostat")

    livingRoomLight.turnOn()
    // Living Room Light is now ON.
    livingRoomLight.adjustBrightness(10)
    // Adjusting Living Room Light brightness to 10%.
    livingRoomLight.turnOff()
    // Living Room Light is now OFF.

    bedroomThermostat.turnOn()
    // Bedroom Thermostat thermostat is now heating.
    bedroomThermostat.adjustTemperature(5)
    // Bedroom Thermostat thermostat set to 5°C.
    bedroomThermostat.turnOff()
    // Bedroom Thermostat thermostat is now off.
}
abstract class SmartDevice(val name: String) {
// abstract val name: String
// 这里不要手贱加一个abstract属性, 不然子类没法赋值
abstract fun turnOn()
abstract fun turnOff()
}
class SmartLight(name: String) : SmartDevice(name) {
override fun turnOn() {
println("$name is now ON.")
}
override fun turnOff() {
println("$name is now OFF.")
}
fun adjustBrightness(level: Int) {
println("Adjusting $name brightness to $level%.")
}
}
class SmartThermostat (name: String): SmartDevice(name) {
override fun turnOn() {
println("$name thermostat is now heating")
}
override fun turnOff() {
println("$name thermostat is now OFF")
}
fun adjustTemperature(temperature: Int) {
println("$name thermostat set to $temperature°C.")
}
}
fun main() {
val livingRoomLight = SmartLight("Living Room Light")
val bedroomThermostat = SmartThermostat("Bedroom Thermostat")
livingRoomLight.turnOn()
// Living Room Light is now ON.
livingRoomLight.adjustBrightness(10)
// Adjusting Living Room Light brightness to 10%.
livingRoomLight.turnOff()
// Living Room Light is now OFF.
bedroomThermostat.turnOn()
// Bedroom Thermostat thermostat is now heating.
bedroomThermostat.adjustTemperature(5)
// Bedroom Thermostat thermostat set to 5°C.
bedroomThermostat.turnOff()
// Bedroom Thermostat thermostat is now off.
}练习二
Create an interface called Media that you can use to implement specific media classes like Audio, Video, or Podcast. Your interface must include:
A property called
titleto represent the title of the media.A function called
play()to play the media.
Then, create a class called Audio that implements the Media interface. The Audio class must use the title property in its constructor as well as have an additional property called composer that has String type. In the class, implement the play() function to print the following: "Playing audio: $title, composed by $composer".
interface // Write your code here

class // Write your code here

fun main() {
    val audio = Audio("Symphony No. 5", "Beethoven")
    audio.play()
   // Playing audio: Symphony No. 5, composed by Beethoven
}
interface Media {
val title: String
fun play()
}
class Audio(override val title: String, val composer: String): Media {
// 好家伙, override得和class header里的参数写在一起
override fun play() {
println("Playing audio: $title, composed by $composer")
}
}
fun main() {
val audio = Audio("Symphony No. 5", "Beethoven")
audio.play()
// Playing audio: Symphony No. 5, composed by Beethoven
}练习三
You're building a payment processing system for an e-commerce application. Each payment method needs to be able to authorize a payment and process a transaction. Some payments also need to be able to process refunds.
In the
Refundableinterface, add a function calledrefund()to process refunds.In the
PaymentMethodabstract class:Add a function called
authorize()that takes an amount and prints a message containing the amount.Add an abstract function called
processPayment()that also takes an amount.
Create a class called
CreditCardthat implements theRefundableinterface andPaymentMethodabstract class. In this class, add implementations for therefund()andprocessPayment()functions so that they print the following statements:"Refunding $amount to the credit card.""Processing credit card payment of $amount."
interface Refundable {
    // Write your code here
}

abstract class PaymentMethod(val name: String) {
    // Write your code here
}

class CreditCard // Write your code here

fun main() {
    val visa = CreditCard("Visa")

    visa.authorize(100.0)
    // Authorizing payment of $100.0.
    visa.processPayment(100.0)
    // Processing credit card payment of $100.0.
    visa.refund(50.0)
    // Refunding $50.0 to the credit card.
}- 抽象类的class header参数要想被子类重载,需要加上
open修饰符 - 虽说答案里的
CreditCard并不需要写完全name参数也能继承父类的构造方法
interface Refundable {
    fun refund(amount: Double)
}

abstract class PaymentMethod(open val name: String) {
    fun authorize(amount: Double) {
        println("Authorizing payment of $amount.")
    }
    abstract fun processPayment(amount: Double)
}

// 答案里的CreditCard的class header是
// class CreditCard(name: String) : PaymentMethod(name), Refundable
class CreditCard (override val name: String): PaymentMethod(name), Refundable {
    override fun processPayment(amount: Double) {
        println("Processing credit card payment of $amount.")
    }
    override fun refund(amount: Double) {
        println("Refunding $amount to the credit card.")
    }
}

fun main() {
    val visa = CreditCard("Visa")

    visa.authorize(100.0)
    // Authorizing payment of $100.0.
    visa.processPayment(100.0)
    // Processing credit card payment of $100.0.
    visa.refund(50.0)
    // Refunding $50.0 to the credit card.
}
练习四
You have a simple messaging app that has some basic functionality, but you want to add some functionality for smart messages without significantly duplicating your code.
In the code below, define a class called SmartMessenger that inherits from the Messenger interface but delegates the implementation to an instance of the BasicMessenger class.
In the SmartMessenger class, override the sendMessage() function to send smart messages. The function must accept a message as an input and return a printed statement: "Sending a smart message: $message". In addition, call the sendMessage() function from the BasicMessenger class and prefix the message with [smart].
interface Messenger {
    fun sendMessage(message: String)
    fun receiveMessage(): String
}

class BasicMessenger : Messenger {
    override fun sendMessage(message: String) {
        println("Sending message: $message")
    }

    override fun receiveMessage(): String {
        return "You've got a new message!"
    }
}

class SmartMessenger // Write your code here

fun main() {
    val basicMessenger = BasicMessenger()
    val smartMessenger = SmartMessenger(basicMessenger)

    basicMessenger.sendMessage("Hello!")
    // Sending message: Hello!
    println(smartMessenger.receiveMessage())
    // You've got a new message!
    smartMessenger.sendMessage("Hello from SmartMessenger!")
    // Sending a smart message: Hello from SmartMessenger!
    // Sending message: [smart] Hello from SmartMessenger!
}
interface Messenger {
fun sendMessage(message: String)
fun receiveMessage(): String
}
class BasicMessenger : Messenger {
override fun sendMessage(message: String) {
println("Sending message: $message")
}
override fun receiveMessage(): String {
return "You've got a new message!"
}
}
class SmartMessenger (val messenger: Messenger): Messenger by messenger {
override fun sendMessage(message: String) {
println("Sending a smart message: $message")
messenger.sendMessage("[smart] $message")
}
}
fun main() {
val basicMessenger = BasicMessenger()
val smartMessenger = SmartMessenger(basicMessenger)
basicMessenger.sendMessage("Hello!")
// Sending message: Hello!
println(smartMessenger.receiveMessage())
// You've got a new message!
smartMessenger.sendMessage("Hello from SmartMessenger!")
// Sending a smart message: Hello from SmartMessenger!
// Sending message: [smart] Hello from SmartMessenger!}【拓展阅读】委托
委托模式已被证明是实现继承(Implementation Inheritance)的一个极佳替代方案,而 Kotlin 提供了原生支持,能够实现“零样板代码”。
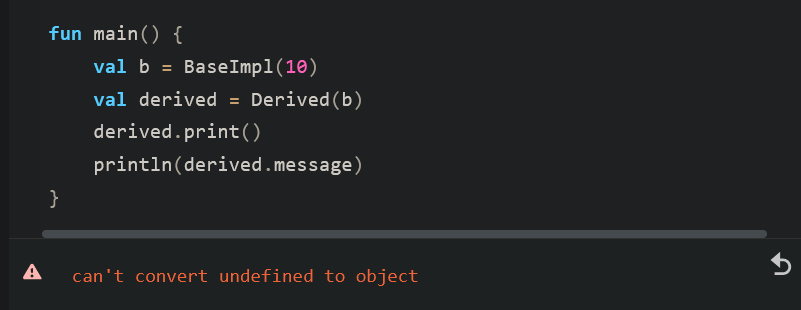
一个名为 Derived 的类可以通过将所有公共成员委托给一个指定对象,来实现 Base 接口:
interface Base {
    fun print()
}

class BaseImpl(val x: Int) : Base {
    override fun print() { print(x) }
}

// 通过 by 关键字将 Base 接口的实现委托给参数 b
class Derived(b: Base) : Base by b

fun main() {
    val base = BaseImpl(10)
    Derived(base).print() // 输出 10
}
在 Derived 的超类型列表中使用 by 子句,意味着:
- 对象
b将被内部存储在Derived对象中。 - 编译器会自动生成
Base接口的所有方法,并将这些方法的调用转发(forward) 给b
为什么说它是继承的“良药”?
组合优于继承:委托允许你在运行时动态地改变行为(只需传入不同的
Base实现),而传统的类继承在编译时就固定了行为。安全性:继承往往会暴露父类的内部细节(脆弱基类问题),而委托只暴露接口定义的公共成员,封装性更好。
多重委托:虽然 Kotlin 不支持多重类继承,但你可以通过委托同时实现多个接口,每个接口委托给不同的对象,从而实现极高的代码复用。
重载使用了委托特性的类的行为/Overriding a member of an interface implemented by delegation
在委托模式中,重写(Overrides) 的工作方式与预期一致:编译器会优先使用你在子类中定义的 override 实现,而不是委托对象中的实现。
如果你在 Derived 类中重写了 printMessage(),那么调用该方法时将打印 "abc",而不是委托对象 base 中的 10:
interface Base {
    fun printMessage()
    fun printMessageLine()
}

class BaseImpl(val x: Int) : Base {
    override fun printMessage() { print(x) }
    override fun printMessageLine() { println(x) }
}

class Derived(b: Base) : Base by b {
    override fun printMessage() { print("abc") }
}

fun main() {
    val base = BaseImpl(10)
    Derived(base).printMessage()
    Derived(base).printMessageLine()
}
内部访问限制
这是一个容易踩坑的地方:你在子类中重写的成员,并不会被委托对象内部的方法调用。委托对象只能访问它自己对接口成员的实现。
interface Base {
    val message: String
    fun print()
}

class BaseImpl(x: Int) : Base {
    override val message = "BaseImpl: x = $x"
    override fun print() { println(message) }
}

class Derived(b: Base) : Base by b {
    // This property is not accessed from b's implementation of `print`
    override val message = "Message of Derived"
}

fun main() {
    val b = BaseImpl(10)
    val derived = Derived(b)
    derived.print()
    println(derived.message)
}
核心总结
外部调用:当你从外部调用
derived.message时,你会得到Derived重写后的值。内部转发:当你调用
derived.print()时,调用被转发给了委托对象b。由于b在编写时并不知道Derived的存在,它在执行println(message)时,访问的是它自己内部定义的message。
这种设计保证了委托对象的行为是可预测的且自成体系的,但也提醒我们在使用委托时,不能像对待普通类继承那样期待“多态”在委托对象内部生效。
第二段代码无法编译
导致这个问题的根本原因与 初始化顺序(Initialization Order) 和 委托对象的存储方式 有关。
在 Kotlin 的委托机制中,当你写 class Derived(b: Base) : Base by b 时:
存储委托对象:编译器会创建一个隐藏的字段(Field)来存储传入的
b实例。生成转发方法:编译器自动生成
print()方法,其内部逻辑类似于void print() { this.b_delegate.print(); }。初始化顺序冲突:
在 JavaScript 平台或某些特定编译器优化下,如果你在
Derived中重写了val message,这个属性的初始化可能发生在BaseImpl的print()被调用之后,或者在建立委托关联的瞬间出现了“未定义”的引用。更关键的是:
BaseImpl中的print()函数试图访问message属性。虽然Derived重写了message,但BaseImpl作为委托对象,它在自己的作用域内只能看到自己的message实现。
这段代码在逻辑上揭示了委托和继承的一个本质区别:
委托不是继承:
Derived并不是BaseImpl的子类。它们是两个独立的对象。作用域隔离:当你调用
derived.print()时,执行权完全交给了BaseImpl实例。属性覆盖失效:
BaseImpl的print()方法在编译时就已经绑定到了BaseImpl.message。它完全不知道Derived类中也有一个同名的message。
核心结论: 委托对象(Delegate Object)无法访问 委托类(Delegating Class)中重写的成员。
规则总结:
外部调用:
derived.message-> 得到Derived的重写值。内部调用:
derived.print()-> 进入BaseImpl逻辑 -> 只能看到BaseImpl的值。
详情请见真 属性委托
对象
对象声明
在 Kotlin 中,你可以使用对象声明来定义一个只有一个实例的类。换句话说,你在声明这个类的同时,也创建了它的唯一实例。
当你想创建一个类作为程序的唯一引用点,或者用它来协调整个系统的行为时,对象声明非常有用。
提示
一个只有一个实例且易于访问的类被称为单例 (Singleton)。
Kotlin 对象的特性
- 延迟加载 (Lazy):对象是延迟创建的,即只有在第一次被访问时才会被创建。
- 线程安全 (Thread-safe):Kotlin 确保所有对象的创建过程都是线程安全的,你不需要手动编写复杂的同步代码来检查。
如何创建对象?
使用 object 关键字来创建对象声明:
object DoAuth {
    // 在这里添加属性或成员函数
    val provider = "Google"
    fun login() = println("使用 $provider 登录中...")
}- 定义内容:在对象名称后的花括号
{}内定义属性或成员函数。 - 无构造函数:对象不能有构造函数,因此它们不像普通类那样拥有class header(即不能通过
object Name()的方式传递参数)。
深度解析:为什么用 object 而不是普通类?
全局访问:你可以在代码的任何地方通过
DoAuth.login()直接访问它,无需先进行实例化。内存效率:由于整个程序生命周期内只有一个实例,避免了重复创建相同功能对象带来的内存开销。
语法简洁:在 Java 中实现一个线程安全的单例需要几十行代码(如双重检查锁定模式),而在 Kotlin 中只需要一个
object关键字。
fun main() {
    // 直接通过名称访问,无需实例化
    DoAuth.login()
    println(DoAuth.provider)
}
object 声明示例:认证管理
假设你想创建一个名为 DoAuth 的对象来负责身份验证逻辑:
object DoAuth {
    // 成员函数用于接收参数
    fun takeParams(username: String, password: String) {
        println("输入的认证参数 = $username:$password")
    }
}

fun main() {
    // 只有当第一次调用 takeParams() 函数时,该对象才会被创建
    DoAuth.takeParams("coding_ninja", "N1njaC0ding!")
    // 输出:输入的认证参数 = coding_ninja:N1njaC0ding!
}
示例要点:
- 单例访问:你可以直接通过
DoAuth.takeParams()调用函数,无需使用val auth = DoAuth()进行实例化。 - 延迟初始化:
DoAuth对象具有延迟加载特性,它仅在第一次被访问(即调用函数)时才会被创建。
对象继承与接口实现
object 不仅仅是静态函数的集合,它们也可以像普通类一样继承自类或实现接口。这使得单例对象可以作为某种特定策略或协议的实现者:
interface Auth {
    fun takeParams(username: String, password: String)
}

// DoAuth 实现了 Auth 接口
object DoAuth : Auth {
    override fun takeParams(username: String, password: String) {
        println("输入的认证参数 = $username:$password")
    }
}
为什么这很有用?
- 多态性:你可以编写一个接受
Auth接口作为参数的函数,然后将DoAuth这个单例传递进去。 - 契约约束:通过实现接口,你确保了单例对象遵循特定的行为标准,这在大型系统中协调不同模块的行为时非常关键。
核心总结
对象声明:使用
object关键字创建,既定义了类又创建了唯一的实例。单例 (Singleton):由于只有一个易于访问的实例,它被统称为单例。
线程安全:Kotlin 确保对象的创建过程是线程安全的,无需手动处理同步问题。
数据对象/Data objects (Kotlin 1.9.0+)
为了更方便地打印对象声明的内容,Kotlin 提供了 数据对象 (data objects)。与你在初级教程中学过的“数据类 (data classes)”类似,数据对象会自动包含额外的成员函数:toString() 和 equals()。
数据对象 vs. 数据类
- 共同点:都自动生成了美化后的
toString()。 - 不同点:数据对象不提供
copy()函数。这是因为数据对象是单例,只有一个实例,无法进行拷贝。
如何创建数据对象?
使用与普通对象声明相同的语法,只需在 object 关键字前加上 data 前缀:
data object AppConfig {
    var appName: String = "我的应用程序"
    var version: String = "1.0.0"
}

fun main() {
    // 自动调用 toString()
    println(AppConfig)
    // 输出:AppConfig (如果是普通 object,输出将是类名+哈希码,如 AppConfig@123456)

    println(AppConfig.appName)
    // 输出:我的应用程序
}
为什么需要 data object?
更友好的调试:当你打印一个普通
object时,你会得到类似com.example.MyObject@7f31245这样难以阅读的字符串。而data object会直接打印它的名称AppConfig。密封类 (Sealed Classes) 的完美搭档:在处理密封类(状态管理)时,
data object非常有用。
sealed class UIState {
    data object Loading : UIState() // 打印时显示 "Loading"
    data class Success(val data: String) : UIState()
    data class Error(val msg: String) : UIState()
}- 结构化相等:它确保了当你在集合中使用或进行比较时,
equals()和hashCode()的行为是符合直觉的。
核心总结
- 语法:
data object Name。 - 优势:自动生成
toString()、equals()和hashCode()。 - 限制:没有
copy()和componentN()函数(因为没有构造函数参数)。
详情请见数据对象
伴生对象/Companion objects
伴生对象 (Companion Objects)
在 Kotlin 中,类可以拥有一个特殊的对象:伴生对象
- 唯一性:每个类只能拥有一个伴生对象
- 延迟加载:伴生对象仅在类被第一次引用时才会被创建
- 共享性:在伴生对象中声明的所有属性或函数,在该类的所有实例之间共享
如何创建伴生对象?
在类内部使用 object 声明,并在其前面加上 companion 关键字:
class Bonger {
    companion object MyCompanion {
        fun greet() = println("来自伴生对象的问候!")
    }
}- 默认名称:伴生对象不需要必须有名字。如果你不定义名字,它的默认名称就是
Companion。 - 访问方式:你可以直接通过类名调用伴生对象的成员,就像 Java 中的静态方法一样。
fun main() {
    // 直接调用,无需实例化类
    Bonger.greet()
}
深度解析:伴生对象 vs 静态成员
虽然伴生对象的用法看起来像 Java 的 static 成员,但它们有着本质的区别:
真正的对象:伴生对象是该类的一个真实实例。这意味着它可以实现接口、扩展函数,甚至可以被赋值给变量。
访问权限:伴生对象可以访问该类的私有成员(包括私有构造函数),这使得它非常适合实现 工厂模式 (Factory Pattern)。
继承限制:虽然类可以继承,但伴生对象本身不能被子类重写(Override),不过子类可以直接访问父类的伴生对象成员。
访问伴生对象成员
要访问伴生对象的任何属性或函数,直接引用其类名即可。
class BigBen {
    // 定义一个名为 Bonger 的伴生对象
    companion object Bonger {
        fun getBongs(nTimes: Int) {
            // 使用 repeat 标准函数循环执行打印
            repeat(nTimes) { print("BONG ") }
        }
    }
}

fun main() {
    // 当类名 BigBen 第一次被引用时,伴生对象 Bonger 会被创建
    // 你不需要写 BigBen.Bonger.getBongs(),直接写类名即可
    BigBen.getBongs(12)
    // 输出:BONG BONG BONG BONG BONG BONG BONG BONG BONG BONG BONG BONG
}
示例解析:
- 类与对象的关系:
BigBen是一个普通的类,而Bonger是潜伏在其内部的一个单例对象 - 调用语法:虽然
getBongs定义在对象Bonger中,但它被视为BigBen类的一个“伴生”成员,因此直接使用BigBen.getBongs(12) - 生命周期:伴生对象是延迟加载的。在
main函数执行到BigBen.getBongs(12)这一行之前,Bonger对象并不存在
深度启发:伴生对象的“命名”
在上面的例子中,伴生对象被命名为 Bonger。这在某些特定场景下很有用,比如:
显式引用:你依然可以写
BigBen.Bonger.getBongs(12),这在需要将该对象作为参数传递给其他函数时很有帮助。默认名称:如果你省略了
Bonger这个名字,Kotlin 会默认将其命名为Companion。此时,你可以通过BigBen.Companion来引用它。
为什么不直接用 object(全局单例)?
如果你希望某些功能与特定的类紧密相关(例如该类的创建逻辑、常量定义),使用伴生对象比全局 object 更好,因为它能保持逻辑的内聚性,且能够访问类内部的私有成员。
示例:工厂模式
这是伴生对象最经典的使用场景——隐藏构造函数,通过特定方法创建对象:
class User private constructor(val name: String) {
    companion object {
        fun createGuest(): User {
            return User("游客")
        }
    }
}

fun main() {
    // val user = User("John") // 错误:构造函数私有
    val guest = User.createGuest() // 正确:通过伴生对象创建
}
详情请见
练习
练习一
You run a coffee shop and have a system for tracking customer orders. Consider the code below and complete the declaration of the second data object so that the following code in the main() function runs successfully:
interface Order {
    val orderId: String
    val customerName: String
    val orderTotal: Double
}

data object OrderOne: Order {
    override val orderId = "001"
    override val customerName = "Alice"
    override val orderTotal = 15.50
}

data object // Write your code here

fun main() {
    // Print the name of each data object
    println("Order name: $OrderOne")
    // Order name: OrderOne
    println("Order name: $OrderTwo")
    // Order name: OrderTwo

    // Check if the orders are identical
    println("Are the two orders identical? ${OrderOne == OrderTwo}")
    // Are the two orders identical? false

    if (OrderOne == OrderTwo) {
        println("The orders are identical.")
    } else {
        println("The orders are unique.")
        // The orders are unique.
    }

    println("Do the orders have the same customer name? ${OrderOne.customerName == OrderTwo.customerName}")
    // Do the orders have the same customer name? false
}- data object自带的
toString()方法默认打印的是对象名称(由于单独创建的object是单实例,所以不会也不可能打印出类名来objectName@className
data object OrderTwo: Order {
    override val orderId = "002"
    override val customerName = "Bob"
    override val orderTotal = 25.00
}
练习二
Create an object declaration that inherits from the Vehicle interface to create a unique vehicle type: FlyingSkateboard. Implement the name property and the move() function in your object so that the following code in the main() function runs successfully:
interface Vehicle {
    val name: String
    fun move(): String
}

object // Write your code here

fun main() {
    println("${FlyingSkateboard.name}: ${FlyingSkateboard.move()}")
    // Flying Skateboard: Glides through the air with a hover engine
    println("${FlyingSkateboard.name}: ${FlyingSkateboard.fly()}")
    // Flying Skateboard: Woooooooo
}
object FlyingSkateboard: Vehicle {
override val name: String = "Flying Skateboard"
override fun move(): String {
return "Glides through the air with a hover engine"
}
fun fly(): String {
return "Woooooooo"
}
}练习三
You have an app where you want to record temperatures. The class itself stores the information in Celsius, but you want to provide an easy way to create an instance in Fahrenheit as well. Complete the data class so that the following code in the main() function runs successfully:
data class Temperature(val celsius: Double) {
    val fahrenheit: Double = celsius * 9 / 5 + 32

    // Write your code here
}

fun main() {
    val fahrenheit = 90.0
    val temp = Temperature.fromFahrenheit(fahrenheit)
    println("${temp.celsius}°C is $fahrenheit °F")
    // 32.22222222222222°C is 90.0 °F
}
上吧!就决定是你了!伴生对象!
data class Temperature(val celsius: Double) {
    val fahrenheit: Double = celsius * 9 / 5 + 32

    // Write your code here
    companion object Converter {
        fun fromFahrenheit(fahrenheit: Double): Temperature {
            val celsius = (fahrenheit - 32) * 5 / 9
            return Temperature(celsius)
        }
    }
}
开放与特殊类/Open and special classes
与许多其他编程语言(如 Java)不同,Kotlin 的类默认是“关闭”的,这种设计哲学被称为“默认不可变”,旨在提高代码的安全性和稳定性。
开放类/Open classes
使用 open 关键字进行继承
在 Kotlin 中,类默认是 final 的,这意味着它们不能被继承。如果你希望一个类可以被继承(且不使用接口或抽象类),必须使用 open 关键字显式声明:
open class Vehicle(val make: String, val model: String)实现继承的语法
要创建一个继承自另一个类的子类,请在类头后添加冒号 :,然后调用父类的构造函数。
open class Vehicle(val make: String, val model: String)

// Car 类继承自 Vehicle 类
class Car(make: String, model: String, val numberOfDoors: Int) : Vehicle(make, model)

fun main() {
    // 创建 Car 类的实例
    val car = Car("Toyota", "Corolla", 4)

    // 访问继承自父类的属性(make, model)以及自身的属性(numberOfDoors)
    println("汽车信息: 品牌 - ${car.make}, 型号 - ${car.model}, 门数 - ${car.numberOfDoors}")
}
核心要点解析
显式调用构造函数:与接口不同,继承类时必须加括号
()并传递必要的参数(例如Vehicle(make, model))。这是因为父类拥有必须被初始化的状态(属性)。参数传递:子类
Car的构造函数接收了make和model,并将它们“转发”给了父类Vehicle。注意:在子类头中,转发给父类的参数不需要再加val或var,否则会在子类中重复定义同名属性。为什么默认是
final?:安全性:防止无意中破坏复杂的基类逻辑。
性能:编译器可以进行更好的优化,因为它确定这些类不会被修改。
设计哲学:提倡“为继承而设计,否则就禁止继承”。
重载成员函数
如果你想在继承一个类的同时改变其某些行为,可以重写(Override)继承而来的行为。
在 Kotlin 中,默认情况下父类的成员函数或属性是禁止重写的。与抽象类类似,你需要使用特定的关键字来开启这一功能。
1. 开启重写权限:open
要允许父类中的函数被重写,必须在父类的函数声明前添加 open 关键字:
open fun displayInfo() { ... }2. 执行重写:override
要在子类中重写该函数,必须在函数声明前使用 override 关键字:
override fun displayInfo() { ... }完整示例:汽车信息展示
open class Vehicle(val make: String, val model: String) {
    // 使用 open 允许子类修改此函数
    open fun displayInfo() {
        println("车辆信息: 品牌 - $make, 型号 - $model")
    }
}

class Car(make: String, model: String, val numberOfDoors: Int) : Vehicle(make, model) {
    // 使用 override 重新定义行为
    override fun displayInfo() {
        println("汽车信息: 品牌 - $make, 型号 - $model, 门数 - $numberOfDoors")
    }
}

fun main() {
    val car1 = Car("Toyota", "Corolla", 4)
    val car2 = Car("Honda", "Civic", 2)

    // 调用的是子类重写后的 displayInfo()
    car1.displayInfo()
    // 输出: 汽车信息: 品牌 - Toyota, 型号 - Corolla, 门数 - 4
    car2.displayInfo()
    // 输出: 汽车信息: 品牌 - Honda, 型号 - Civic, 门数 - 2
}
深度解析:为什么必须写 override?
防止意外重写:在复杂的继承体系中,如果你在子类中无意间写了一个与父类同名的方法,编译器会报错提醒你。这避免了因函数签名冲突导致的隐蔽 Bug。
清晰的代码意图:阅读代码的人能一眼看出哪个方法是该类独有的,哪个是从上层继承并修改的。
禁止进一步重写:如果一个方法已经被标记为
override,它默认依然是open的(即可以被孙子类继续重写)。如果你想禁止后续重写,可以加上final关键字:final override fun displayInfo()。
重写属性的机制与函数完全相同:
- 父类属性必须标记为
open。 - 子类属性必须标记为
override。 - 你可以用一个
var属性重写一个val属性,但反过来不行(因为val只有 getter,而var增加了 setter,这种扩展是允许的)。
属性
Kotlin的重要原则之一
比起重写属性,通过构造函数传递往往是更好的选择
在 Kotlin 中,虽然你可以使用 open 和 override 来修改父类的属性,但这通常不是最佳实践。
- 不推荐的做法:显式重写属性
这种方式语法正确,但会让类结构变得冗余:
open class Vehicle(val make: String, val model: String) {
    // 显式标记为 open 供以后重写
    open val transmissionType: String = "Manual"
}

class Car(make: String, model: String, val numberOfDoors: Int) : Vehicle(make, model) {
    // 再次重写该属性
    override val transmissionType: String = "Automatic"
}- 推荐做法:通过构造函数参数化
更好的方式是将该属性定义在父类的构造函数中。这样,你可以在创建子类时直接通过构造函数“转发”特定值:
// 在父类构造函数中定义 transmissionType,并提供默认值
open class Vehicle(
    val make: String,
    val model: String,
    val transmissionType: String = "Manual"
)

// 子类 Car 在调用父类构造函数时,直接传入 "Automatic"
class Car(make: String, model: String, val numberOfDoors: Int) :
    Vehicle(make, model, "Automatic")
为什么这种做法更好?
代码更简洁:你只需要在父类中声明一次属性,消除了子类中不必要的
override val ...样板代码。可读性更强:所有关于车辆配置的信息(品牌、型号、变速箱类型)都集中在构造函数这一处进行处理,逻辑非常清晰。
灵活性:如果以后有新的车型(比如
Truck)既可以是手动也可以是自动,通过构造函数传递值会比硬编码重写属性要灵活得多。
核心结论
- 直接访问而非重载:子类可以直接访问父类的非私有属性。
- 参数化优于覆盖:如果子类之间属性值不同,优先考虑将其放入父类构造函数中,并在继承时传递不同值。
详情请见Inheritance
开放类与继承
在 Kotlin 中,一个类可以继承一个父类的同时实现多个接口。在这种情况下,语法规则非常严格:必须先声明父类,然后再列出接口。
语法示例:
class 类名 : 父类(), 接口1, 接口2完整示例:
// 定义两个接口
interface EcoFriendly {
    val emissionLevel: String
}

interface ElectricVehicle {
    val batteryCapacity: Double
}

// 定义父类
open class Vehicle(val make: String, val model: String)

// 定义子类 Car,继承自 Vehicle
open class Car(make: String, model: String, val numberOfDoors: Int) : Vehicle(make, model)

// ElectricCar 继承自 Car,并实现了两个接口
class ElectricCar(
    make: String,
    model: String,
    numberOfDoors: Int,
    val capacity: Double,
    val emission: String
) : Car(make, model, numberOfDoors), EcoFriendly, ElectricVehicle {

    // 必须重写接口中未实现的属性
    override val batteryCapacity: Double = capacity
    override val emissionLevel: String = emission
}
核心要点解析
顺序至关重要:在冒号
:之后,父类Car(...)必须排在第一位。接口EcoFriendly和ElectricVehicle紧随其后,用逗号分隔。构造函数转发:
ElectricCar接收了make、model和numberOfDoors等参数,并将它们逐级向上转发给Car(进而转发给Vehicle)。只有它自己特有的属性(如capacity)才被定义为val。强制重写:由于
EcoFriendly和ElectricVehicle中的属性没有默认值,ElectricCar作为具体的类,必须使用override关键字为它们提供具体的实现。
特殊类/Special classes
除了我们已经讨论过的 abstract(抽象类)、open(可继承类)和 data(数据类)之外,Kotlin 还提供了几种“特种”类,用来解决特定的架构问题或性能瓶颈。
密封类/Sealed classes
提示
Kotlin 中功能最强大的类类型之一:密封类 (Sealed Classes)。它是对继承的一种“有限控制”,能够让你的代码逻辑变得极其严密且安全
如果你想限制继承,可以使用密封类。密封类是一种特殊的抽象类。一旦你将一个类声明为 sealed,你只能在同一个包(Package) 内创建它的子类。在该范围之外,无法继承这个密封类。
什么是包 (Package)?
包是相关类和函数的代码集合,通常对应文件系统中的一个目录。
如何创建密封类?
使用 sealed 关键字:
sealed class Mammal(val name: String)核心优势:与 when 表达式完美配合
密封类最强大的地方在于与 when 表达式结合使用。因为编译器知道所有可能的子类,所以它可以确保你处理了所有情况。
sealed class Mammal(val name: String)

// 子类必须定义在同一个包中
class Cat(val catName: String) : Mammal(catName)
class Human(val humanName: String, val job: String) : Mammal(humanName)

fun greetMammal(mammal: Mammal): String {
    // 编译器能够检查出 when 是否覆盖了所有 Mammal 的子类
    return when (mammal) {
        is Human -> "你好 ${mammal.name};你的职业是 ${mammal.job}"
        is Cat -> "你好 ${mammal.name}"
        // 不需要 else 分支,因为 Mammal 只有这两个可能的子类!
    }
}

fun main() {
    println(greetMammal(Cat("Snowy")))
    // 输出:你好 Snowy
}
In the example:
- There is a sealed class called
Mammalthat has thenameparameter in the constructor. - The
Catclass inherits from theMammalsealed class and uses thecatNameparameter in its own constructor as thenameparameter from theMammalclass. - The
Humanclass inherits from theMammalsealed class and uses thehumanNameparameter in its own constructor as thenameparameter from theMammalclass. It also has thejobparameter in its constructor. - The
greetMammal()function accepts an argument ofMammaltype and returns a string. - Within the
greetMammal()function body, there's awhenexpression that uses theisoperator to check the type ofmammaland decide which action to perform. - The
main()function calls thegreetMammal()function with an instance of theCatclass andnameparameter calledSnowy.
提示
This tour discusses the is operator in more detail in the Null safety chapter.
For more information about sealed classes and their recommended use cases, see Sealed classes and interfaces.
深度解析:为什么密封类优于普通抽象类?
类型安全( Exhaustiveness):在上面的
when表达式中,如果你忘记处理is Cat,编译器会直接报错。如果是普通抽象类,你必须加上else分支,或者面临运行时出错的风险。状态管理:密封类非常适合表示“状态”。例如在 Android 开发中,常用来表示 UI 状态:
Loading(加载中)、Success(成功)、Error(错误)。不可扩展性:它防止了库的用户在你的预设逻辑之外胡乱扩展类层级,保证了系统的封闭性和稳定性。
总结
语法:
sealed class Name。限制:子类必须在同一个包内。
最佳拍档:
when表达式(无需else分支)。
枚举类/Enum classes
当你想要在类中表示一组有限且独特的值时,枚举类非常有用。枚举类包含枚举常量,而这些常量本身就是该枚举类的实例。
如何创建枚举类?
使用 enum 关键字:
enum class State {
    IDLE, RUNNING, FINISHED
}- 定义常量:每个枚举常量必须用逗号
,隔开。通常习惯使用大写字母。 - 访问常量:使用类名后接点号
.和常量名。
val state = State.RUNNING与 when 表达式结合使用
和密封类一样,枚举类与 when 表达式是“黄金搭档”。因为编译器知道枚举中所有可能的值,所以它能确保你的逻辑覆盖了所有情况。
enum class State {
    IDLE, RUNNING, FINISHED
}

fun main() {
    val state = State.RUNNING

    // 编译器会检查是否处理了 IDLE, RUNNING 和 FINISHED
    val message = when (state) {
        State.IDLE -> "处于空闲状态"
        State.RUNNING -> "正在运行中"
        State.FINISHED -> "已完成"
        // 同样不需要 else 分支
    }

    println(message) // 输出: 正在运行中
}
进阶:枚举也可以有属性和方法
与简单的常量字符串不同,Kotlin 的枚举类可以拥有属性和构造函数:
enum class Color(val rgb: Int) {
    RED(0xFF0000),
    GREEN(0x00FF00),
    BLUE(0x0000FF); // 如果后面要写函数,这里必须加分号

    fun containsRed() = (rgb and 0xFF0000 != 0)
}
提示
Kotlin stores hexadecimals as integers, so the rgb property has the Int type, not the String type.
枚举类 (Enum) vs. 密封类 (Sealed)
虽然它们看起来很像,但有着本质的区别:
枚举类:所有实例在编译时就已固定(例如:颜色、星期、方向)。每个常量只有一个实例。
密封类:子类可以有多个实例,且每个实例可以持有不同的数据(例如:
Error子类可以携带不同的错误码或消息字符串)。
For more information, see Enum classes.
内联值类/Inline value classes
接下来介绍Kotlin 中用于极致性能优化的 内联类 / 值类 (Inline Value Classes)。
在现代编程中,我们经常为了代码的可读性和类型安全,给简单的类型(如 String 或 Int)套上一个马甲 类。但这样做会频繁创建对象,产生内存开销。值类正是为了解决这一痛点而生的。
在某些情况下,你可能需要创建一些生命周期很短的小型对象。这种做法虽然增强了语义,但会带来性能开销。内联值类 是一种特殊的类,它能在保持类型安全的同时,避免创建对象的性能损失。
核心限制
内联值类只能包含值,不能包含复杂的逻辑状态。
如何创建内联值类?
使用 value 关键字,并配合 @JvmInline 注解:
@JvmInline
value class Email(val address: String)@JvmInline注解:告知 Kotlin 编译器在编译为 JVM 字节码时进行优化(直接将对象替换为它包含的底层值)。- 单一属性:内联值类必须在类头中有且仅有一个初始化的属性。
为什么它能优化性能?
假设你有一个函数需要接收电子邮件地址:
普通类:
fun send(email: Email)。在运行时,系统必须创建一个Email对象实例。值类:虽然你在代码里写的是
Email类型,但编译器在生成的字节码中会把它替换成原生的String。
这样你既获得了类型安全(编译器不会让你把一个普通的 String 误传给需要 Email 的地方),又获得了原生类型的性能(没有对象分配开销)。
@JvmInline
value class Password(val value: String)

// 尽管底层都是 String,但编译器不允许它们混用
fun login(email: String, password: Password) {
    // 逻辑代码
}

fun main() {
    val myPass = Password("123456")

    // login("user@test.com", "123456") // 报错:需要 Password 类型,给了 String
    login("user@test.com", myPass)    // 正确:类型安全,且运行时无对象开销
}
核心总结
用途:作为基础类型的“语义包装”,提高可读性而不牺牲性能。
语法:必须加
@JvmInline value。要求:构造函数中只能有一个属性。
For more information about inline value classes, see Inline value classes.
练习
练习一
You manage a delivery service and need a way to track the status of packages. Create a sealed class called DeliveryStatus, containing data classes to represent the following statuses: Pending, InTransit, Delivered, Canceled. Complete the DeliveryStatus class declaration so that the code in the main() function runs successfully:
sealed class // Write your code here

fun printDeliveryStatus(status: DeliveryStatus) {
    when (status) {
        is DeliveryStatus.Pending -> {
            println("The package is pending pickup from ${status.sender}.")
        }
        is DeliveryStatus.InTransit -> {
            println("The package is in transit and expected to arrive by ${status.estimatedDeliveryDate}.")
        }
        is DeliveryStatus.Delivered -> {
            println("The package was delivered to ${status.recipient} on ${status.deliveryDate}.")
        }
        is DeliveryStatus.Canceled -> {
            println("The delivery was canceled due to: ${status.reason}.")
        }
    }
}

fun main() {
    val status1: DeliveryStatus = DeliveryStatus.Pending("Alice")
    val status2: DeliveryStatus = DeliveryStatus.InTransit("2024-11-20")
    val status3: DeliveryStatus = DeliveryStatus.Delivered("2024-11-18", "Bob")
    val status4: DeliveryStatus = DeliveryStatus.Canceled("Address not found")

    printDeliveryStatus(status1)
    // The package is pending pickup from Alice.
    printDeliveryStatus(status2)
    // The package is in transit and expected to arrive by 2024-11-20.
    printDeliveryStatus(status3)
    // The package was delivered to Bob on 2024-11-18.
    printDeliveryStatus(status4)
    // The delivery was canceled due to: Address not found.
}- 我嘞个内部数据类继承外部密封类啊
sealed class DeliveryStatus {
    data class Pending(val sender: String) : DeliveryStatus()
    data class InTransit(val estimatedDeliveryDate: String) : DeliveryStatus()
    data class Delivered(val deliveryDate: String, val recipient: String) : DeliveryStatus()
    data class Canceled(val reason: String) : DeliveryStatus()
}
练习二
In your program, you want to be able to handle different statuses and types of errors. You have a sealed class to capture the different statuses which are declared in data classes or objects. Complete the code below by creating an enum class called Problem that represents the different problem types: NETWORK, TIMEOUT, and UNKNOWN.
sealed class Status {
    data object Loading : Status()
    data class Error(val problem: Problem) : Status() {
        // Write your code here
    }

    data class OK(val data: List<String>) : Status()
}

fun handleStatus(status: Status) {
    when (status) {
        is Status.Loading -> println("Loading...")
        is Status.OK -> println("Data received: ${status.data}")
        is Status.Error -> when (status.problem) {
            Status.Error.Problem.NETWORK -> println("Network issue")
            Status.Error.Problem.TIMEOUT -> println("Request timed out")
            Status.Error.Problem.UNKNOWN -> println("Unknown error occurred")
        }
    }
}

fun main() {
    val status1: Status = Status.Error(Status.Error.Problem.NETWORK)
    val status2: Status = Status.OK(listOf("Data1", "Data2"))

    handleStatus(status1)
    // Network issue
    handleStatus(status2)
    // Data received: [Data1, Data2]
}
sealed class Status {
data object Loading : Status()
data class Error(val problem: Problem) : Status() {
// Write your code here
enum class Problem { NETWORK, TIMEOUT, UNKNOWN }
}
data class OK(val data: List<String>) : Status()
}属性
在 Kotlin 中,属性拥有默认的 get() 和 set() 函数,称为属性访问器。它们负责处理数值的获取和修改。
- 隐式生成:虽然你在代码中看不见它们,但编译器会自动生成这些函数,以便在幕后管理对属性的访问。
- 字段存储:这些访问器使用一个**幕后字段(Backing Field)**来存储属性的实际值。
幕后字段 (Backing Field)
为了防止递归调用(即在 get() 内部又调用 property 导致死循环),Kotlin 提供了一个名为 field 的特殊标识符,专门用于在访问器内部引用该属性存储的值。
幕后字段存在的条件(满足其一即可):
- 属性使用了默认的
get()或set()函数。 - 你在自定义的访问器中通过
field关键字访问了该值。
即使你没有在类中显式编写 get() 和 set(),Kotlin 编译器也会为每个 var 属性生成一套默认的访问逻辑。
示例解析:显式与隐式的对比
当你定义一个简单的 category 属性时:
class Contact(val id: Int, var email: String) {
    var category: String = "" // 这是一个简单的属性声明
}
在底层,这段代码等同于以下带有显式访问器的逻辑:
class Contact(val id: Int, var email: String) {
    var category: String = ""
        // 默认 Getter:直接返回幕后字段的值
        get() = field

        // 默认 Setter:将传入的新值赋给幕后字段
        set(value) {
            field = value
        }
}
关键组件说明
field(幕后字段): 这是属性真正存放数据的内存地址。在get()中,它代表“当前存储的值”;在set()中,它是你要写入的目标。value(参数名): 这是set()函数接收的参数名,代表你赋给属性的新值。例如执行contact.category = "Friend"时,value就是"Friend"。get()的执行: 每当你读取contact.category时,get()就会运行。在上面的例子中,它最初会从field中取回默认值""。set()的执行: 每当你为contact.category赋值时,set()就会被触发,并更新field。
💡 为什么理解这个很重要?
虽然大多数时候我们使用默认实现,但理解这个机制能让你在需要时轻松介入。例如,如果你想让 category 永远存储为大写:
var category: String = ""
    set(value) {
        field = value.uppercase() // 在赋值前进行转换
    }
或者你想通过 get() 进行格式化输出:
var category: String = ""
    get() = field.ifEmpty { "未分类" } // 如果为空则返回特定字符串
For more information, see Backing fields.
扩展属性/Extension Properties
就像扩展函数能让你给现有的类增加新方法一样,扩展属性允许你给类增加新的“变量式”访问方式,而无需修改原始代码或使用继承。
扩展属性允许你在不修改源代码的情况下,向现有类添加新属性。
核心局限:没有幕后字段 (No Backing Fields)
这是扩展属性与普通属性最大的区别:扩展属性没有幕后字段 (field)。
无法存储状态:因为没有
field空间,扩展属性不能存储数据,只能基于已有的数据进行计算。必须自定义访问器:你必须手动编写
get()函数(如果是var还需要set())。
如何声明?
写法是:目标类名.属性名: 类型。
val String.lastChar: Char
    get() = this[length - 1]
💡 示例:为 String 添加便捷属性
假设你想快速获取字符串的最后一个字符,而不必每次都写复杂的索引逻辑:
// 声明一个扩展属性
val String.lastChar: Char
    get() = this[this.length - 1]

fun main() {
    val message = "Kotlin"
    // 像访问原生属性一样使用它
    println(message.lastChar) // 输出: n
}- 为什么说它像“只有一个参数的函数”?
正如文中所说,你可以把扩展属性看作是一个只接收一个参数(即 接收者this)的函数。
| 特性 | 扩展属性 (val String.lastChar) | 扩展函数 (fun String.lastChar()) |
|---|---|---|
| 语法 | str.lastChar | str.lastChar() |
| 存储 | 无(计算得出) | 无(逻辑执行) |
| 语义 | 描述对象的某种特征/状态 | 描述对象的某种行为/动作 |
- 最佳实践
- 用于计算值:最适合那些通过对象现有状态就能算出来的逻辑。
- 避免复杂逻辑:属性访问在直觉上应该是快速的。如果计算非常耗时,建议使用扩展函数。
- 不能初始化:由于没有
field,你不能写val String.x = 1(这会报错,因为没地方存这个1)。
提示
Extension properties can't override existing properties of a class.
扩展属性不能重写类中已有的属性
Just like with extension functions, the Kotlin standard library uses extension properties widely. For example, see the lastIndex property for a CharSequence.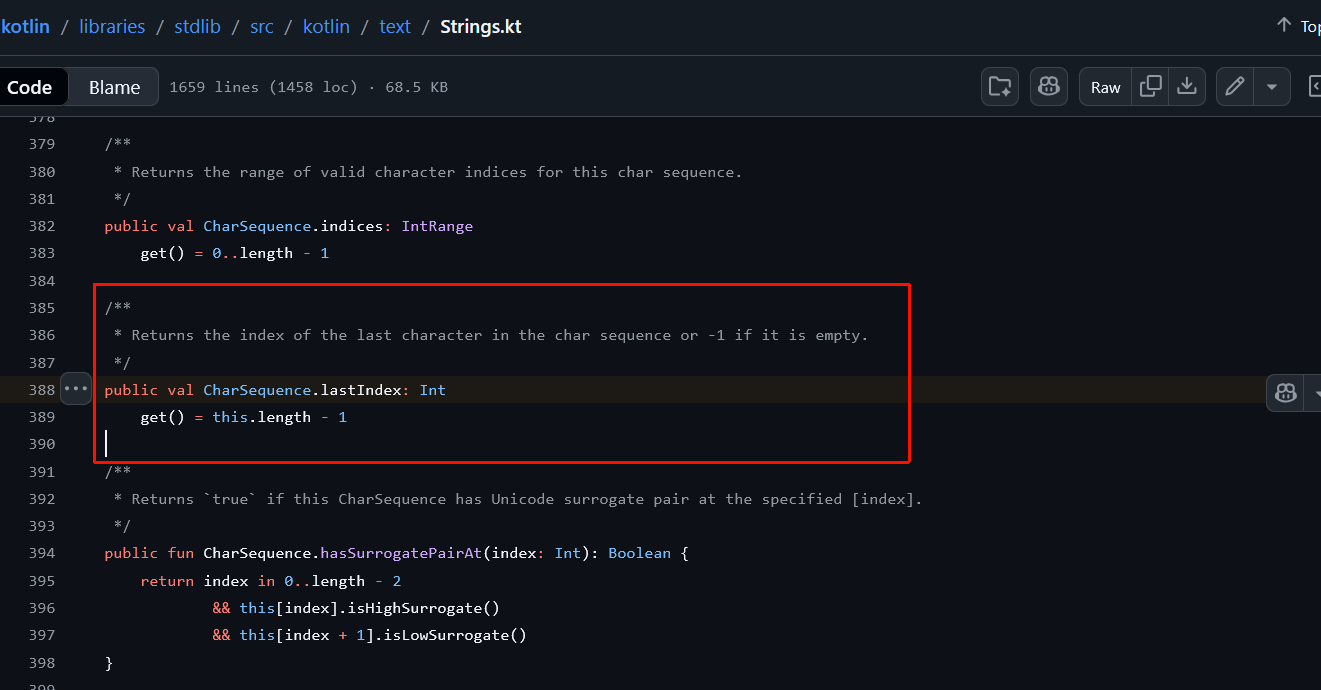
属性委托/Delegated properties
这是
by关键字在 Kotlin 中的第二种用法。之前你学过用它来委托整个接口的实现,而现在,它是将单个属性的读取(getter)和写入(setter)逻辑外包给另一个对象。
当简单的“幕后字段”不足以满足复杂的存储需求时,委托属性就派上用场了。
- 核心逻辑:当你访问该属性时,它不会去查找本地变量,而是去调用委托对象的特定方法。
- 适用场景:
- 数据库存储:属性值直接从数据库读取/写入。
- 会话管理:从浏览器 Session 或缓存中读取值。
- 映射转换:将属性值映射到
Map集合中。 - 减少样板代码:将复杂的验证或同步逻辑封装在一个委托类中,多处复用。
语法规则
声明属性名,后接 by 关键字,最后是委托对象:
val displayName: String by Delegate在这个例子中,displayName 的 get() 和 set()(如果是 var)都指向了 Delegate 对象。
示例:内置委托 lazy
Kotlin 标准库中最常用的委托之一就是 lazy(延迟加载):
val heavyResource: String by lazy {
    println("正在进行耗时初始化...")
    "资源内容"
}

fun main() {
    println("程序启动")
    // 只有在此处第一次访问时,lazy 块内的代码才会执行
    println(heavyResource)
    // 第二次访问时,直接返回已计算好的值
    println(heavyResource)
}
任何你用来委托的对象都必须具备特定的成员函数:
- 必选项:必须有
getValue()运算符函数,用于检索属性值。 - 可选项(仅针对
var):如果是可变属性,还必须有setValue()运算符函数。
标准函数签名如下:
operator fun getValue(thisRef: Any?, property: KProperty<*>): String {
    // 返回逻辑
}
operator fun setValue(thisRef: Any?, property: KProperty<*>, value: String) {
    // 赋值逻辑
}
参数详解
operator关键字: 这是必须的。它告诉编译器:这两个函数不是普通的方法,而是专门用来重载属性访问行为的“运算符”。thisRef(接收者引用):- 它代表拥有该属性的对象。
- 例如,如果你在
class User中定义了委托属性,thisRef的类型就是User。 - 使用
Any?作为类型可以使该委托类更加通用,适用于任何类。
property(属性元数据):- 类型通常是
KProperty<*>。 - 你可以通过它获取属性的“户口信息”,比如属性名(
property.name)。这在将属性值存储到数据库或 Map 时非常有用,因为你可以直接把属性名当作 Key。
- 类型通常是
value(新值):- 仅存在于
setValue中。它代表了用户通过obj.prop = "New Value"赋给属性的那个值。
- 仅存在于
operator fun getValue(thisRef: Any?, property: KProperty<*>): String {}

operator fun setValue(thisRef: Any?, property: KProperty<*>, value: String) {}
The getValue() function has a return type of String by default, but you can adjust this if you want.
The setValue() function has an additional parameter value, which is used to hold the new value that's assigned to the property.
实战示例:创建一个简单的“日志记录”委托
import kotlin.reflect.KProperty

class LogDelegate {
    private var storedValue: String = "默认值"

    operator fun getValue(thisRef: Any?, property: KProperty<*>): String {
        println("正在读取属性 '${property.name}',所在对象为 $thisRef")
        return storedValue
    }

    operator fun setValue(thisRef: Any?, property: KProperty<*>, value: String) {
        println("正在将属性 '${property.name}' 的值从 '$storedValue' 修改为 '$value'")
        storedValue = value
    }
}

class UserProfile {
    // 委托给 LogDelegate 实例
    var name: String by LogDelegate()
}

fun main() {
    val user = UserProfile()
    user.name = "Alice" // 触发 setValue
    println(user.name)  // 触发 getValue
}
So, how does this look in practice? Suppose you want to have a computed property, like a user's display name, that is calculated only once because the operation is expensive and your application is performance-sensitive. You can use a delegated property to cache the display name so that it is only computed once but can be accessed anytime without performance impact.
First, you need to create the object to delegate to. In this case, the object will be an instance of the CachedStringDelegate class:
class CachedStringDelegate {
    var cachedValue: String? = null
}
The cachedValue property contains the cached value. Within the CachedStringDelegate class, add the behavior that you want from the get() function of the delegated property to the getValue() operator function body:
class CachedStringDelegate {
    var cachedValue: String? = null

    operator fun getValue(thisRef: Any?, property: Any?): String {
        if (cachedValue == null) {
            cachedValue = "Default Value"
            println("Computed and cached: $cachedValue")
        } else {
            println("Accessed from cache: $cachedValue")
        }
        return cachedValue ?: "Unknown"
    }
}
The getValue() function checks whether the cachedValue property is null. If it is, the function assigns the "Default value" and prints a string for logging purposes. If the cachedValue property has already been computed, the property isn't null. In this case, another string is printed for logging purposes. Finally, the function uses the Elvis operator to return the cached value or "Unknown" if the value is null.
Now you can delegate the property that you want to cache (val displayName) to an instance of the CachedStringDelegate class:
class CachedStringDelegate {
    var cachedValue: String? = null

    operator fun getValue(thisRef: User, property: Any?): String {
        if (cachedValue == null) {
            cachedValue = "${thisRef.firstName} ${thisRef.lastName}"
            println("Computed and cached: $cachedValue")
        } else {
            println("Accessed from cache: $cachedValue")
        }
        return cachedValue ?: "Unknown"
    }
}

class User(val firstName: String, val lastName: String) {
    val displayName: String by CachedStringDelegate()
}

fun main() {
    val user = User("John", "Doe")

    // First access computes and caches the value
    println(user.displayName)
    // Computed and cached: John Doe
    // John Doe

    // Subsequent accesses retrieve the value from cache
    println(user.displayName)
    // Accessed from cache: John Doe
    // John Doe
}
This example:
- Creates a
Userclass that has two properties in the header,firstName, andlastName, and one property in the class body,displayName. - Delegates the
displayNameproperty to an instance of theCachedStringDelegateclass. - Creates an instance of the
Userclass calleduser. - Prints the result of accessing the
displayNameproperty on theuserinstance.
Note that in the getValue() function, the type for the thisRef parameter is narrowed from Any? type to the object type: User. This is so that the compiler can access the firstName and lastName properties of the User class.
标准委托/Standard delegates
The Kotlin standard library provides some useful delegates for you so you don't have to always create yours from scratch. If you use one of these delegates, you don't need to define getValue() and setValue() functions because the standard library automatically provides them.
延迟初始化/Lazy properties
在开发中,有些对象的初始化非常耗时(如数据库连接、大型配置文件的解析)或者占用大量内存。如果程序启动时就把它们全部创建好,会极大地拖慢启动速度。
lazy正是解决这一问题的利器。
延迟属性仅在第一次被访问时才进行初始化。Kotlin 标准库通过 lazy() 函数提供了这种功能。
工作原理
Lambda 表达式:你向
lazy()传递一个 Lambda 块,里面写初始化的代码。首次访问:当你第一次读取该属性时,Lambda 块执行,并记录返回值。
后续访问:再次读取时,不会再执行 Lambda 块,而是直接返回第一次计算好的结果。
在下面的示例中,databaseConnection 被定义为全局延迟属性:
class Database {
    fun connect() {
        println("Connecting to the database...")
    }

    fun query(sql: String): List<String> {
        return listOf("Data1", "Data2", "Data3")
    }
}

val databaseConnection: Database by lazy {
    val db = Database()
    db.connect()
    db
}

fun fetchData() {
    val data = databaseConnection.query("SELECT * FROM data")
    println("Data: $data")
}

fun main() {
    // First time accessing databaseConnection
    fetchData()
    // Connecting to the database...
    // Data: [Data1, Data2, Data3]

    // Subsequent access uses the existing connection
    fetchData()
    // Data: [Data1, Data2, Data3]
}- 资源节约:如果你的程序运行过程中从未调用过
fetchData(),那么数据库连接就永远不会建立。 - 状态保持:一旦连接建立,它就会一直存在,后续所有的查询都复用这同一个
db实例。
💡 lazy 的三大核心优势
性能优化:将昂贵的操作推迟到真正需要的时候,提升应用启动响应速度。
默认线程安全:在多线程环境下,
lazy默认保证只有一个线程能执行初始化逻辑,所有线程最终都会拿到相同的值。代码简洁:利用 尾随 Lambda (Trailing Lambda) 语法,让初始化逻辑紧跟在属性声明之后,高内聚且易读。
扩展知识:lazy vs lateinit
很多人容易混淆这两个概念,这里有一个简单的对比:
| 特性 | lazy (延迟属性) | lateinit (延迟初始化变量) |
|---|---|---|
| 关键字 | val ... by lazy { ... } | lateinit var ... |
| 可变性 | 只能用于 val (只读) | 只能用于 var (可变) |
| 初始化方式 | 自动触发(第一次访问时) | 手动触发(必须在使用前手动赋值) |
| 类型限制 | 无限制 | 不能用于基本类型(如 Int, Double) |
For more information, see Lazy properties.
可观察属性/Observable properties
可观察属性允许你在属性值发生改变时执行特定的操作。它是实现观察者模式的一种极简方式。
核心步骤:
- 导入类库:首先需要导入
kotlin.properties.Delegates。 - 调用函数:使用
Delegates.observable()。 - 提供 Lambda:传入一个带有三个参数的 Lambda 表达式,它会在每次赋值完成后被调用。
Lambda 的三个参数:
property:被修改的属性元数据(可以通过它获取属性名)。oldValue:修改前的值。newValue:修改后的新值。
💡 深度启发:observable vs vetoable
除了 observable,Kotlin 还提供了一个类似的兄弟函数:Delegates.vetoable()。
observable:在赋值之后触发。你只能观察变化,不能阻止它。vetoable:在赋值之前触发。它的 Lambda 返回一个Boolean值。如果返回false,这次赋值就会被“否决”(取消),属性保持旧值不变。
import kotlin.properties.Delegates.observable

class Thermostat {
    var temperature: Double by observable(20.0) { _, old, new ->
        if (new > 25) {
            println("Warning: Temperature is too high! ($old°C -> $new°C)")
        } else {
            println("Temperature updated: $old°C -> $new°C")
        }
    }
}

fun main() {
    val thermostat = Thermostat()
    thermostat.temperature = 22.5
    // Temperature updated: 20.0°C -> 22.5°C

    thermostat.temperature = 27.0
    // Warning: Temperature is too high! (22.5°C -> 27.0°C)
}在上面的例子中,temperature 属性的行为被重新定义了:
- 初始值设定:
observable(20.0)将属性的物理起始值设为 20.0。 - 下划线参数
_:在 Lambda 表达式中,第一个参数是KProperty(属性元数据)。如果你不需要获取属性的名字或类型,按照 Kotlin 的惯例,可以使用下划线_来忽略它,这样代码更简洁。 - 时机:Lambda 块是在新值已经存入属性之后立即执行的。这意味着你在块内打印
new时,属性的值已经是这个新值了。
💡 为什么这比手动编写 set() 更好?
你可能会问:“我为什么不在 var temperature 下面直接写个自定义的 set(value) { ... } 呢?”
使用 Delegates.observable 的优势在于:
代码复用:如果你有多个属性(比如
humidity湿度、pressure压力)都需要类似的日志逻辑,你可以把这个 Lambda 逻辑封装成一个通用的委托函数。逻辑分离:它将“如何存储数据”与“数据变化后要做什么”这两件事分离开来。
简洁性:对于简单的状态监控,
observable的声明式语法比命令式的getter/setter更具可读性。
🚀 探索:从“观察”到“干预”
你可以用它做校验。但在 observable 中,校验只能触发警告,无法阻止赋值。
如果你希望在温度超过 100°C 时直接拒绝修改(因为这在物理上可能不合理),你可以使用它的兄弟——vetoable:
import kotlin.properties.Delegates

class SafeThermostat {
    var temperature: Double by Delegates.vetoable(20.0) { _, old, new ->
        // 如果返回 false,赋值将被取消,属性保留旧值
        val isValid = new in -50.0..100.0
        if (!isValid) println("非法温度:$new°C 被拒绝!")
        isValid
    }
}
For more information, see Observable properties.
练习
练习一:编写函数找出库存耗尽的书籍
You manage an inventory system at a bookstore. The inventory is stored in a list where each item represents the quantity of a specific book. For example, listOf(3, 0, 7, 12) means the store has 3 copies of the first book, 0 of the second, 7 of the third, and 12 of the fourth.
Write a function called findOutOfStockBooks() that returns a list of indices for all the books that are out of stock.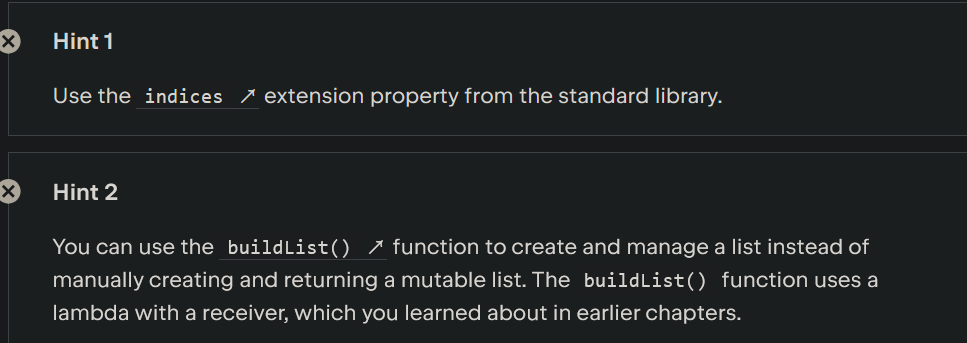
fun findOutOfStockBooks(inventory: List<Int>): List<Int> {
    // Write your code here
}

fun main() {
    val inventory = listOf(3, 0, 7, 0, 5)
    println(findOutOfStockBooks(inventory))
    // [1, 3]
}
初版
fun findOutOfStockBooks(inventory: List<Int>): List<Int> {
    val res: MutableList<Int> = mutableListOf()
    for ((idx, num) in inventory.withIndex()) {
        if (num == 0) {
            res.add(idx)
        }
    }

    return res
}
第二版
fun findOutOfStockBooks(inventory: List<Int>): List<Int> {
    val res = buildList {
        for ((idx, num) in inventory.withIndex()) {
            if (num == 0) {
                add(idx)
            }
        }
    }

    return res
}
回顾一下带接收者的lambda方法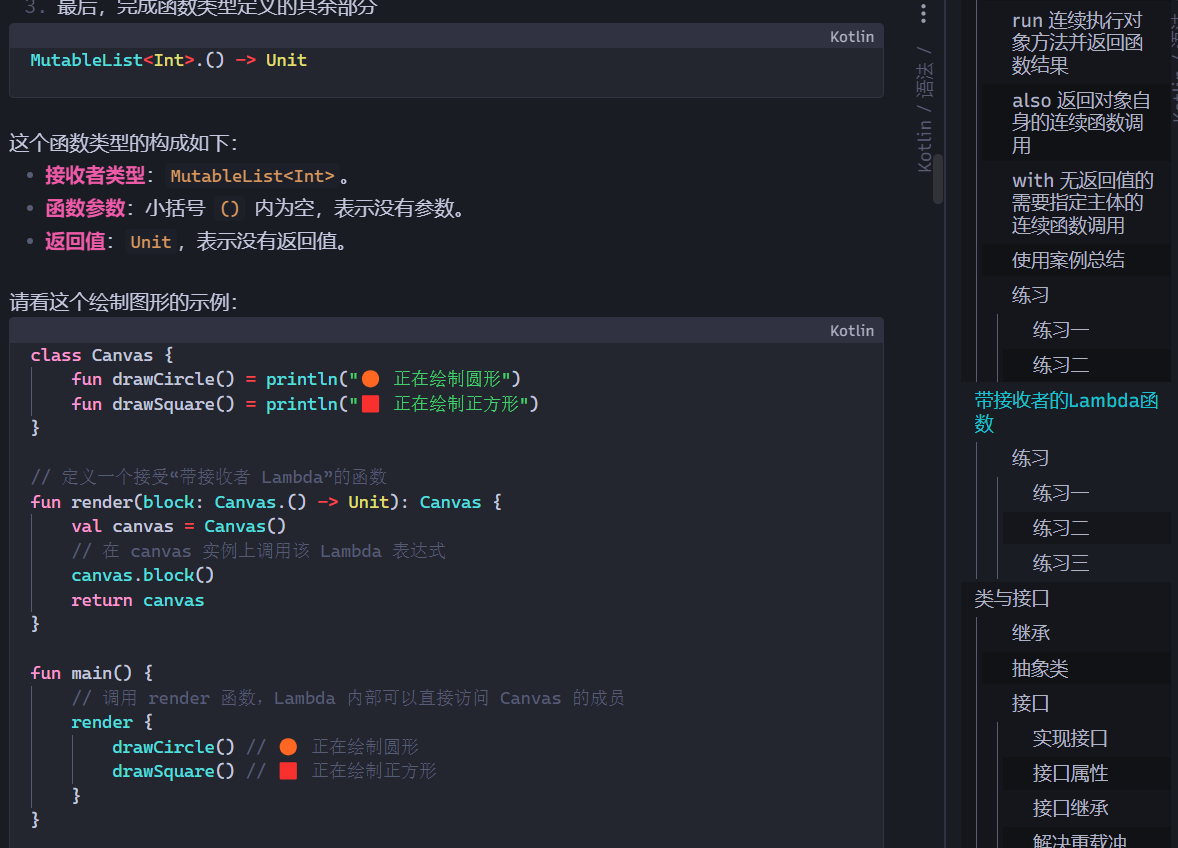
练习二:扩展属性
You have a travel app that needs to display distances in both kilometers and miles. Create an extension property for the Double type called asMiles to convert a distance in kilometers to miles:
提示
The formula to convert kilometers to miles is miles = kilometers * 0.621371.
val // Write your code here

fun main() {
    val distanceKm = 5.0
    println("$distanceKm km is ${distanceKm.asMiles} miles")
    // 5.0 km is 3.106855 miles

    val marathonDistance = 42.195
    println("$marathonDistance km is ${marathonDistance.asMiles} miles")
    // 42.195 km is 26.218757 miles
}
val Double.asMiles: Double get() = this * 0.621371练习三:延迟初始化
You have a system health checker that can determine the state of a cloud system. However, the two functions it can run to perform a health check are performance intensive. Use lazy properties to initialize the checks so that the expensive functions are only run when needed:
fun checkAppServer(): Boolean {
    println("Performing application server health check...")
    return true
}

fun checkDatabase(): Boolean {
    println("Performing database health check...")
    return false
}

fun main() {
    // Write your code here

    when {
        isAppServerHealthy -> println("Application server is online and healthy")
        isDatabaseHealthy -> println("Database is healthy")
        else -> println("System is offline")
    }
    // Performing application server health check...
    // Application server is online and healthy
}
// Write your code here
val isAppServerHealthy: Boolean by lazy {
checkAppServer()
}
val isDatabaseHealthy: Boolean by lazy {
checkDatabase()
}练习四:可观测属性
You're building a simple budget tracker app. The app needs to observe changes to the user's remaining budget and notify them whenever it goes below a certain threshold. You have a Budget class that is initialized with a totalBudget property that contains the initial budget amount. Within the class, create an observable property called remainingBudget that prints:
- A warning when the value is lower than 20% of the initial budget.
- An encouraging message when the budget is increased from the previous value.
import kotlin.properties.Delegates.observable

class Budget(val totalBudget: Int) {
    var remainingBudget: Int // Write your code here
}

fun main() {
    val myBudget = Budget(totalBudget = 1000)
    myBudget.remainingBudget = 800
    myBudget.remainingBudget = 150
    // Warning: Your remaining budget (150) is below 20% of your total budget.
    myBudget.remainingBudget = 50
    // Warning: Your remaining budget (50) is below 20% of your total budget.
    myBudget.remainingBudget = 300
    // Good news: Your remaining budget increased to 300.
}
// Write your code here
var remainingBudget: Int by observable(totalBudget) {
_, oldValue, newValue ->
val percentage = newValue.toDouble() / totalBudget.toDouble() * 100
if (percentage <= 20) {
println("Warning: Your remaining budget ($newValue) is below 20% of your total budget.")
} else if (newValue > oldValue) {
println("Good news: Your remaining budget increased to $newValue.")
}
}Null安全检查
智能类型转换与安全类型转换/Smart casts and safe casts
Kotlin通常可以自动推导变量类型。当你让Kotlin以特定方式处理某个变量或对象时,这一过程就被称作类型转换 casting 。当一个类型被自动转换时,比如被推导出来时,就被称作智能类型转换 smart castsing
is与!is操作符 (类型检查运算符)
在 Kotlin 中,你不需要像在某些老派语言中那样进行复杂的类型查询。你可以直接使用语义非常清晰的运算符:
is:如果对象属于该类型,则返回true。!is:如果对象不属于该类型,则返回true。
这些运算符与 if 或 when 配合使用时,表现得极为自然。
fun printObjectType(obj: Any) {
    when (obj) {
        is Int -> println("It's an Integer with value $obj")
        !is Double -> println("It's NOT a Double")
        else -> println("Unknown type")
    }
}

fun main() {
    val myInt = 42
    val myDouble = 3.14
    val myList = listOf(1, 2, 3)

    // The type is Int
    printObjectType(myInt)
    // It's an Integer with value 42

    // The type is List, so it's NOT a Double.
    printObjectType(myList)
    // It's NOT a Double

    // The type is Double, so the else branch is triggered.
    printObjectType(myDouble)
    // Unknown type
}
💡 核心机制:智能转换 (Smart Casts)
这是 Kotlin 类型检查最惊艳的地方。一旦你使用了 is 检查,编译器就会自动记住这个结果。
在上面的 is Int 分支内部,obj 会被自动转换为 Int 类型。你不需要手动写 (Int)obj,就可以直接调用所有 Int 的方法(如 obj.plus(1))。
fun smartCastExample(obj: Any) {
    if (obj is String) {
        // 在这个大括号内,obj 被自动当做 String 处理
        println("字符串长度是: ${obj.length}")
    }
}
💡 为什么使用 !is?
通常我们使用 is 来定位目标,但 !is 在快速失败 (Fail-fast) 的场景下非常有用:
fun processData(data: Any) {
    if (data !is String) {
        println("错误:数据格式不正确!")
        return
    }
    // 到了这里,data 自动变成了 String
    println("处理字符串:${data.uppercase()}")
}
注
You've already seen an example of how to use a when conditional expression with the is and !is operators in the Open and other special classes chapter.
as与as?操作符 (显式类型转换符)
不安全转换运算符:as
as 运算符用于将一个对象显式转换为另一种类型。它的“不安全”体现在:如果转换失败(类型不匹配)或尝试将 null 转换为非空类型,程序会直接崩溃(抛出异常)。
val a: String? = null
val b = a as String

// Triggers an error at runtime
print(b)安全转换运算符:as?
为了避免程序崩溃,Kotlin 提供了 as?。它的逻辑是:尝试转换,如果成功则返回目标类型;如果转换失败(类型不符或值为 null),则返回 null 而不是报错。
val a: String? = null
val b = a as? String

// Returns null value
print(b)
// null
安全转换最强大的地方在于可以配合 ?:(Elvis 运算符)来提供默认值,从而彻底避免空指针问题。 For example, the following calculateTotalStringLength() function calculates the total length of all strings provided in a mixed list:
fun calculateTotalStringLength(items: List<Any>): Int {
    var totalLength = 0

    for (item in items) {
        totalLength += if (item is String) {
            item.length
        } else {
            0  // Add 0 for non-String items
        }
    }

    return totalLength
}
This code can be reduced to:
fun calculateTotalStringLength(items: List<Any>): Int {
    return items.sumOf { (it as? String)?.length ?: 0 }
}
.sumOf { ... }
这是一个扩展函数,用于对集合中的元素进行转换并求和。它内部已经帮你处理了循环(for)和累加(totalLength +=)的逻辑。(it as? String)- 安全转换:对于列表中的每一个元素
it,尝试将其转换为String。 - 结果:如果是字符串,返回
String类型;如果不是(比如是Int或null),返回null。
- 安全转换:对于列表中的每一个元素
?.length- 安全调用:只有当左侧的结果不为
null时,才读取.length。 - 结果:如果左侧是字符串,返回其长度;如果左侧是
null,整个表达式返回null。
- 安全调用:只有当左侧的结果不为
?: 0- Elvis 运算符:这是最后一道防线。如果前面的链式调用最终返回了
null(意味着这个项不是字符串),则赋予默认值0。
- Elvis 运算符:这是最后一道防线。如果前面的链式调用最终返回了
💡 为什么这种写法更优?
- 不可变性:不再需要声明一个可变的
var totalLength变量。 - 原子性:逻辑被浓缩在一个表达式中,减少了中间状态带来的干扰。
- 可读性(熟练后):一旦熟悉了这种模式,你可以一眼看出代码的意图——“求所有字符串长度的和”,而不需要去追踪循环和累加器的状态。
💡 进一步挑战:更简洁的写法
如果你追求极致的函数式编程风格,还可以利用 Kotlin 标准库中的 filterIsInstance 进一步简化:
fun calculateTotalStringLength(items: List<Any>): Int {
    // 1. 过滤出所有 String 类型的元素
    // 2. 将它们映射为长度并求和
    return items.filterIsInstance<String>().sumOf { it.length }
}null值与null集合
在处理真实世界的数据(通常充满了 null)时,Kotlin有很多函数能帮你瞬间把“污染”的数据源转化为干净、强类型的列表。
列表操作
filterNotNull():存量数据的“过滤器”
当你已经拥有一个包含可空类型(如List<String?>)的集合时,filterNotNull()是最快的清理手段。- 类型转换:它不仅移除了
null,还会自动将返回类型从List<String?>提升为List<String>(不可空类型)。 - 安全性:后续处理这些数据时,你再也不需要使用
?.或!!。
- 类型转换:它不仅移除了
val items = listOf("Apple", null, "Banana")
val nonNullItems: List<String> = items.filterNotNull() // 自动变为不可空列表listOfNotNull():增量创建的“守护者”
如果你是在动态构建一个列表,且不确定传入的变量是否为null,listOfNotNull()可以防止null混入集合。- 场景:处理可选参数、数据库查询结果或 Map 的查找结果。
- 优势:避免了先创建列表再调用过滤函数的两步操作。
val user: String? = getUserFromDb()
val admin: String? = getAdminFromDb()

// 如果 user 有值而 admin 为 null,列表里只会有 user 一个人
val team = listOfNotNull(user, admin)在上面的两个例子中,如果所有元素都是null,那么程序会得到一个空列表
实用技巧:为什么这比 filter { it != null } 更好?
虽然 filter { it != null } 也能达到移除 null 的效果,但它有一个致命缺陷:它不会改变列表的泛型类型。
| 方法 | 返回类型 | 后续操作 |
|---|---|---|
list.filter { it != null } | List<T?> | 依然需要处理 null 情况(尽管你知道没有 null) |
list.filterNotNull() | List<T> | 直接访问属性,无需安全调用 |
总结与对比
| 函数 | 什么时候用? | 结果 |
|---|---|---|
filterNotNull() | 已有列表,想去掉里面的 null | 返回一个新的不含 null 的列表 |
listOfNotNull() | 正在创建列表,参数可能为 null | 只添加那些非 null 的参数到新列表中 |
集合操作
在编程中,对空集合求最大值或最小值是一个经典的“坑”,而 Kotlin 通过函数命名直接提示了潜在的风险。
在早期的 Kotlin 版本中,使用的是 max() 和 min(),但如果集合为空,它们会抛出异常。为了代码的健壮性,Kotlin 现在推荐使用显式包含 OrNull 后缀的函数。
逻辑:如果集合中有数据,返回极值;如果集合是空的(
isEmpty()),则返回null。安全提示:由于返回结果是可空的,你必须使用安全调用
?.或 Elvis 运算符?:来处理结果,这强制你考虑了“数据缺失”的情况。maxOrNull()finds the highest value. If one doesn't exist, returns anullvalue.minOrNull()finds the lowest value. If one doesn't exist, returns anullvalue.
💡 为什么后缀是 OrNull?
这种命名方式是 Kotlin 标准库的设计哲学:不要让开发者在运行时感到“惊喜”(崩溃)。
| 函数 | 集合为空时 | 结果类型 |
|---|---|---|
maxOrNull() | 返回 null | T?(可空) |
firstOrNull() | 返回 null | T?(可空) |
randomOrNull() | 返回 null | T?(可空) |
For example:
// Temperatures recorded over a week
val temperatures = listOf(15, 18, 21, 21, 19, 17, 16)

// Find the highest temperature of the week
val maxTemperature = temperatures.maxOrNull()
println("Highest temperature recorded: ${maxTemperature ?: "No data"}")
// Highest temperature recorded: 21

// Find the lowest temperature of the week
val minTemperature = temperatures.minOrNull()
println("Lowest temperature recorded: ${minTemperature ?: "No data"}")
// Lowest temperature recorded: 15
The
maxOrNull(), andminOrNull()functions are designed to be used with collections that don't containnullvalues. Otherwise, you can't tell whether the function couldn't find the desired value or whether it found anullvalue.
这些函数最适合用于不含 null 值的集合
如果你的列表是 listOf(1, 5, null):
maxOrNull()在某些版本中可能会因为无法与null比较而产生歧义或报错。即使能运行,你也无法区分返回的
null是因为“集合没数据”还是因为“最大的那个元素本身就是null”。
最佳实践:先用我们上一节学过的 filterNotNull() 清洗数据,再求极值。
val mixedData = listOf(10, 2, null, 45)
val max = mixedData.filterNotNull().maxOrNull()
💡 总结
maxOrNull():找最大,找不到给null。minOrNull():找最小,找不到给null。核心搭档:Elvis 运算符
?:。
寻找唯一值
singleOrNull():唯一的“探测器”
当你不仅想找一个符合条件的元素,还想确保**“全世界只有它一个”**时,这个函数就派上用场了。
它的运行规则非常有趣:
- 刚好有一个:返回那个元素。
- 没有找到:返回
null。 - 找到多个:返回
null(这是它与find()或firstOrNull()的最大区别)。
// Temperatures recorded over a week
val temperatures = listOf(15, 18, 21, 21, 19, 17, 16)

// Check if there was exactly one day with 30 degrees
val singleHotDay = temperatures.singleOrNull{ it == 30 }
println("Single hot day with 30 degrees: ${singleHotDay ?: "None"}")
// Single hot day with 30 degrees: None
💡 示例解析:寻找特定的温度
在官方示例中,即使列表里有数据,singleOrNull 依然可能返回 null:
val temperatures = listOf(15, 18, 21, 21, 19, 17, 16)

// 场景 A:找 30 度
// 结果:null(因为没找到)
val singleHotDay = temperatures.singleOrNull { it == 30 }

// 场景 B:找 21 度
// 结果:null(虽然找到了,但有 2 个 21 度,不符合“唯一”的条件)
val singleTwentyOne = temperatures.singleOrNull { it == 21 }
💡 singleOrNull() vs firstOrNull()
这两个函数经常被拿来比较,理解它们的区别能帮你写出更严谨的代码:
| 函数 | 逻辑意图 | 找到多个匹配项时 |
|---|---|---|
firstOrNull() | “我只要一个,不管是哪个。” | 返回第一个找到的元素。 |
singleOrNull() | “我要求它是唯一的,有竞争者就不行。” | 返回 null。 |
提示
The singleOrNull() function is designed to be used with collections that don't contain null values.
如果集合里本身就存了 null 值:
- 当函数返回
null时,你分不清是没找到/找到多个 ,还是找到了唯一的一个,但它刚好就是 null 。
最佳实践:当你正在处理具有唯一标识符(如 ID、身份证号、邮箱)的列表时,singleOrNull() 是检测数据一致性的神器。
其他操作
firstNotNullOfOrNull():寻找第一个“有效值”
这个名字虽然长,但它非常诚实:它会遍历集合,对每个元素执行转换(Lambda),并返回第一个产生非空结果的值。如果翻遍了整个集合都没找到,就返回null。
data class User(val name: String?, val age: Int?)

val users = listOf(
    User(null, 25),
    User("Alice", null),
    User("Bob", 30)
)

val firstNonNullName = users.firstNotNullOfOrNull { it.name }
println(firstNonNullName)
// Alice
在 User 列表中:
1. 第一个用户 User(null, 25):it.name 是 null,跳过。
2. 第二个用户 User("Alice", null):it.name 是 "Alice"(非空!),立即停止遍历并返回 "Alice"。
3. 即便后面还有 Bob,它也不会去看。
使用场景:当你有一系列备选方案,只想取第一个“能用”的结果时(例如:依次从缓存、数据库、网络获取数据)。
reduceOrNull():安全的逐步累加reduce的本意是“缩减”——将一个集合的所有元素通过某种逻辑(如加法、拼接)合并成一个单一的值。- 工作原理:它从第一个元素开始,将其作为“运行总计”(runningTotal),然后依次与下一个元素进行计算。
- 安全保障:传统的
reduce在面对空集合时会崩溃,而reduceOrNull()会优雅地返回null。
// Prices of items in a shopping cart
val itemPrices = listOf(20, 35, 15, 40, 10)

// Calculate the total price using the reduceOrNull() function
val totalPrice = itemPrices.reduceOrNull { runningTotal, price -> runningTotal + price }
println("Total price of items in the cart: ${totalPrice ?: "No items"}")
// Total price of items in the cart: 120

val emptyCart = listOf<Int>()
val emptyTotalPrice = emptyCart.reduceOrNull { runningTotal, price -> runningTotal + price }
println("Total price of items in the empty cart: ${emptyTotalPrice ?: "No items"}")
// Total price of items in the empty cart: No items这个例子也使用了?:操作符,当函数返回null值时就返回默认信息
为什么说它不适合含 null 的集合?
因为 reduce 的核心在于元素之间的交互。如果集合里有 null,你的 Lambda 表达式必须处理 Int? + Int? 这种复杂情况,这违背了该函数追求简洁的初衷。
详情请见
Explore Kotlin's standard library to find more functions that you can use to make your code safer.
提前终止函数与?:操作符
接下来是一个极其高效的 Kotlin 惯用法:结合 Elvis 运算符 (
?:) 使用提前返回 (return)
在其他语言中,你可能需要编写多行if (user == null)检查并嵌套大括号,但在 Kotlin 中,你可以直接在赋值语句中处理“异常路径”。
Elvis + 提前返回 这种写法通常被称为守卫语句 (Guard Clauses) 。它的核心思想是:如果前提条件不满足,立即停止函数执行
For example:
data class User(
    val id: Int,
    val name: String,
    // List of friend user IDs
    val friends: List<Int>
)

// Function to get the number of friends for a user
fun getNumberOfFriends(users: Map<Int, User>, userId: Int): Int {
    // Retrieves the user or return -1 if not found
    val user = users[userId] ?: return -1
    // Returns the number of friends
    return user.friends.size
}

fun main() {
    // Creates some sample users
    val user1 = User(1, "Alice", listOf(2, 3))
    val user2 = User(2, "Bob", listOf(1))
    val user3 = User(3, "Charlie", listOf(1))

    // Creates a map of users
    val users = mapOf(1 to user1, 2 to user2, 3 to user3)

    println(getNumberOfFriends(users, 1))
    // 2
    println(getNumberOfFriends(users, 2))
    // 1
    println(getNumberOfFriends(users, 4))
    // -1
}
代码对比:传统方式 vs Kotlin 方式
传统方式 (if-else) | Kotlin 方式 (Elvis return) |
|---|---|
kotlin if (user == null) { return -1 } return user.friends.size | kotlin val user = users[id] ?: return -1 return user.friends.size |
| 缺点:增加了嵌套层级,逻辑不够连贯。 | 优点:代码扁平化,逻辑像直线一样清晰。 |
💡 为什么这种写法很强大?
- 智能类型转换 (Smart Casting): 由于
return会直接退出函数,编译器知道如果程序运行到了下一行,user就绝对不可能为null。因此,在user.friends.size中,user会被自动视为非空类型,你不需要加?.。 - 降低认知负荷: 你不需要在脑子里记住“如果它是 null 会怎样”,因为 null 的情况已经在第一行被处理并踢出了函数。你剩下的精力可以集中在正常业务逻辑上。
- 语法多样性: Elvis 运算符后面不仅可以接
return,还可以接throw(抛出异常)或break/continue(在循环中):
val user = users[id] ?: throw IllegalArgumentException("用户不存在")但是还有高手,甚至可以一个if都不写一步到位链式调用
fun getNumberOfFriends(users: Map<Int, User>, userId: Int): Int {
    // Retrieve the user or return -1 if not found
    return users[userId]?.friends?.size ?: -1
}
详情请见:Return的更多用法
练习
练习一:不含null元素的列表创建
You are developing a notification system for an app where users can enable or disable different types of notifications. Complete the getNotificationPreferences() function so that:
- The
validUservariable uses theas?operator to check ifuseris an instance of theUserclass. If it isn't, return an empty list. - The
userNamevariable uses the Elvis?:operator to ensure that the user's name defaults to"Guest"if it isnull. - The final return statement uses the
.takeIf()function to include email and SMS notification preferences only if they are enabled. - The
main()function runs successfully and prints the expected output.
提示
The takeIf() function returns the original value if the given condition is true, otherwise it returns null. For example:
fun main() {
    // The user is logged in
    val userIsLoggedIn = true
    // The user has an active session
    val hasSession = true

    // Gives access to the dashboard if the user is logged in
    // and has an active session
    val canAccessDashboard = userIsLoggedIn.takeIf { hasSession }

    println(canAccessDashboard ?: "Access denied")
    // true
}
data class User(val name: String?)
fun getNotificationPreferences(user: Any, emailEnabled: Boolean, smsEnabled: Boolean): List<String> {
val validUser = // Write your code here
val userName = // Write your code here
return listOfNotNull( /* Write your code here */)
}
fun main() {
val user1 = User("Alice")
val user2 = User(null)
val invalidUser = "NotAUser"
println(getNotificationPreferences(user1, emailEnabled = true, smsEnabled = false))
// [Email Notifications enabled for Alice]
println(getNotificationPreferences(user2, emailEnabled = false, smsEnabled = true))
// [SMS Notifications enabled for Guest]
println(getNotificationPreferences(invalidUser, emailEnabled = true, smsEnabled = true))
// []
}官方解法
fun getNotificationPreferences(user: Any, emailEnabled: Boolean, smsEnabled: Boolean): List<String> {
    val validUser = user as? User ?: return emptyList()
    val userName = validUser.name ?: "Guest"

    return listOfNotNull(
        "Email Notifications enabled for $userName".takeIf { emailEnabled },
        "SMS Notifications enabled for $userName".takeIf { smsEnabled }
    )
}
我的解法
val validUser = user as? User
val userName = validUser?.name?: "Guest"

    return listOfNotNull(
        validUser?.let {
            if (emailEnabled) "Email Notifications enabled for $userName" else null
        },
        validUser?.let {
            if (smsEnabled) "SMS Notifications enabled for $userName" else null
        },
)练习二:singleOrNull
You are working on a subscription-based streaming service where users can have multiple subscriptions, but only one can be active at a time. Complete the getActiveSubscription() function so that it uses the singleOrNull() function with a predicate to return a null value if there is more than one active subscription:
data class Subscription(val name: String, val isActive: Boolean)

fun getActiveSubscription(subscriptions: List<Subscription>): Subscription? // Write your code here

fun main() {
    val userWithPremiumPlan = listOf(
        Subscription("Basic Plan", false),
        Subscription("Premium Plan", true)
    )

    val userWithConflictingPlans = listOf(
        Subscription("Basic Plan", true),
        Subscription("Premium Plan", true)
    )

    println(getActiveSubscription(userWithPremiumPlan))
    // Subscription(name=Premium Plan, isActive=true)

    println(getActiveSubscription(userWithConflictingPlans))
    // null
}
fun getActiveSubscription(subscriptions: List<Subscription>): Subscription? {
return subscriptions.singleOrNull {
it.isActive
}
}更加Lambda的解法
fun getActiveSubscription(subscriptions: List<Subscription>): Subscription? {
    return subscriptions.singleOrNull { subscription -> subscription.isActive }
}
练习三:字典null元素过滤
You are working on a social media platform where users have usernames and account statuses. You want to see the list of currently active usernames. Complete the getActiveUsernames() function so that the mapNotNull() function has a predicate that returns the username if it is active or a null value if it isn't:
data class User(val username: String, val isActive: Boolean)

fun getActiveUsernames(users: List<User>): List<String> {
    return users.mapNotNull { /* Write your code here */ }
}

fun main() {
    val allUsers = listOf(
        User("alice123", true),
        User("bob_the_builder", false),
        User("charlie99", true)
    )

    println(getActiveUsernames(allUsers))
    // [alice123, charlie99]
}
提示
Just like in Exercise 1, you can use the takeIf() function when you check if the user is active.

fun getActiveUsernames(users: List<User>): List<String> {
    return users.mapNotNull {
        user -> user.username.takeIf { user.isActive }
    }
}
另一个解法
fun getActiveUsernames(users: List<User>): List<String> {
    return users.mapNotNull { user ->
        if (user.isActive) user.username else null
    }
}
练习四:连续elvis
You are working on an inventory management system for an e-commerce platform. Before processing a sale, you need to check if the requested quantity of a product is valid based on the available stock.
Complete the validateStock() function so that it uses early returns and the Elvis operator (where applicable) to check if:
- The
requestedvariable isnull. - The
availablevariable isnull. - The
requestedvariable is a negative value. - The amount in the
requestedvariable is higher than in theavailablevariable.
In all of the above cases, the function must return early with the value of-1.
fun validateStock(requested: Int?, available: Int?): Int {
    // Write your code here
}

fun main() {
    println(validateStock(5,10))
    // 5
    println(validateStock(null,10))
    // -1
    println(validateStock(-2,10))
    // -1
}
本人解法
fun validateStock(requested: Int?, available: Int?): Int {
    // Write your code here
    val validatedRequest = requested?.takeIf { requested >= 0 }?: return -1
    val validatedAvailable = available?: return -1

    val temp = validatedAvailable - validatedRequest

    return when {
        temp >= 0 -> temp
        else -> -1
    }
}
官方解法
fun validateStock(requested: Int?, available: Int?): Int {
    val validRequested = requested ?: return -1
    val validAvailable = available ?: return -1

    if (validRequested < 0) return -1
    if (validRequested > validAvailable) return -1

    return validRequested
}