Kotlin API扫盲:协程
注
协程库不是Kotlin标准库的一部分,需要手动引入:
import import kotlinx.coroutines.*协程
协程基础
为了创建能够同时执行多个任务的应用程序(这一概念被称为并发),Kotlin 使用了 协程 (coroutines)。协程是一种可挂起的计算,让你能以清晰、顺序化的风格编写并发代码。协程可以与其他协程并发运行,并有可能实现并行。
在 JVM 和 Kotlin/Native 上,所有并发代码(如协程)都运行在由操作系统管理的线程上。协程可以挂起其执行而不是阻塞线程。这允许一个协程在等待数据到达时挂起,而另一个协程在同一个线程上运行,从而确保了有效的资源利用。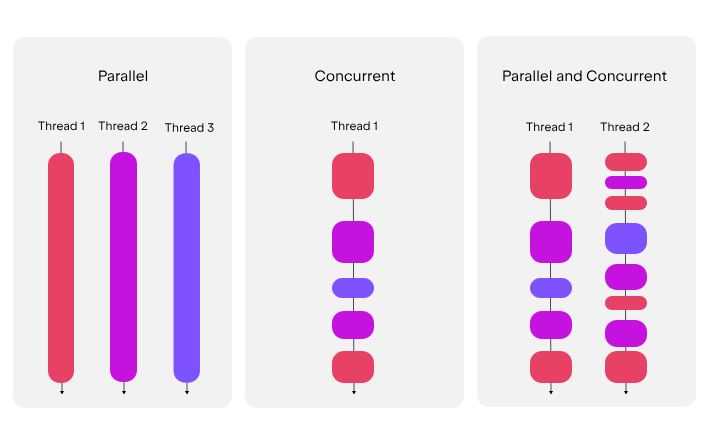
关于协程与(JVM)线程的不同,详情请见
suspend关键字
协程最基础的构建块是挂起函数 (suspending function)。它允许运行中的操作暂停并在稍后恢复,而不会影响代码的结构。
要声明一个挂起函数,请使用 suspend 关键字:
suspend fun greet() {
    println("Hello world from a suspending function")
}
你只能从另一个挂起函数中调用挂起函数。要在 Kotlin 应用程序的入口点调用挂起函数,请为 main() 函数加上 suspend 关键字标记:
suspend fun main() {
    showUserInfo()
}

suspend fun showUserInfo() {
    println("Loading user...")
    greet()
    println("User: John Smith")
}

suspend fun greet() {
    println("Hello world from a suspending function")
}

// Output:
Loading user...
Hello world from a suspending function
User: John Smith
这个示例尚未涉及并发,但通过使用 suspend 关键字标记这些函数,你允许它们调用其他挂起函数,并能在内部运行并发代码
注
- 为什么挂起函数只能由挂起函数调用
因为普通函数不知道如何处理“暂停”。挂起函数需要一个支持协程的状态机环境。将main()标记为suspend是现代 Kotlin(1.3 版本后)提供的简便写法,底层它会自动帮你包装在一个协程作用域中。 - 何为不影响代码结构
在 Java 或 JavaScript 的早期异步方案中,你可能需要处理复杂的回调(Callback)或链式的.then()。而在 Kotlin 中,showUserInfo()内部的调用看起来完全是同步的:打印“加载中”。
挂起(等待
greet()完成)。恢复并打印“用户信息”。
尽管suspend关键字就是Kotlin语言的一部分,大多数协程功能仍然是包含在kotlinx.coroutines库中的
添加协程库依赖
// build.gradle.kts
repositories {
    mavenCentral()
}

dependencies {
    implementation("org.jetbrains.kotlinx:kotlinx-coroutines-core:1.10.2")
}
写下你的第一个协程
提示
本节所演示的代码中,协程构造函数CoroutineScope.launch和CoroutineScope.async显式使用了this表达式。这些构造函数是CoroutineScope的扩展函数,而this表达式为当前作为函数体接受者的CoroutineScope对象
请点击 Extract coroutine builders from the coroutine scope 获得代码案例
要在Kotlin中写一个协程,你需要:
- A suspending function.
- A coroutine scope in which it can run, for example inside the
withContext()function.- 协程函数运行所需的协程作用域,例如
withContext函数内
- 协程函数运行所需的协程作用域,例如
- A coroutine builder like
CoroutineScope.launch()to start it.- 启动协程函数所需的协程构造器函数,如
CoroutineScope.launch()
- 启动协程函数所需的协程构造器函数,如
- A dispatcher to control which threads it uses.
- 用于控制协程运行所依赖的协程的分配器
让我们看到下面一个在多线程环境中跑多协程的例子:
- 导入协程库
import kotlinx.coroutines.*- 使用
suspend关键字标记允许暂停和恢复(resume)的函数:
suspend fun greet() {
    println("The greet() on the thread: ${Thread.currentThread().name}")
}

suspend fun main() {}
提示
尽管你可以在某些项目里给main函数上suspend,但当你在用框架或其他现成代码写东西时,框架可能不允许你使用suspend。所以有必要的话,建议先看看框架的文档,看人家给不给用suspen;如果不给的话,就用runBlocking()调用它们,代价是阻塞当前线程
- 添加
delay()函数模拟一个需要被挂起的任务,比如爬虫或数据库写入:
suspend fun greet() {
    println("The greet() on the thread: ${Thread.currentThread().name}")
    delay(1000L)
}- 使用
withContext(Dispatchers.Default),在多线程并发上下文中,为共享协程池定义一个入口点:
suspend fun main() {
    withContext(Dispatchers.Default) {
        // Add the coroutine builders here
    }
}
提示
挂起函数 withContext() 通常用于上下文切换,但在本示例中,它还为并发代码定义了一个非阻塞的入口点。它使用 Dispatchers.Default 调度器在共享线程池上运行代码,以实现多线程执行。默认情况下,该线程池在运行时最多使用与可用 CPU 核心数相同的线程,且至少包含两个线程。
在 withContext() 块内部启动的协程共享同一个协程作用域 (coroutine scope),这确保了结构化并发 (structured concurrency)。
术语补充
调度器:
Dispatchers.Default调度器决定了协程在哪个线程上运行。
Dispatchers.Default:专为 CPU 密集型任务(如排序、复杂计算、JSON 解析)设计。它利用多核 CPU 的并行能力。线程管理:它不会为每个协程创建一个新线程(那样太昂贵了),而是维护一个与核心数匹配的“共享池”。当一个协程挂起时,池中的线程会立即转去执行另一个协程。
上下文切换 (Context Switching)
withContext()的神奇之处在于:它允许你在保持挂起状态的同时,安全地切换执行环境。 例如,你可以在Main线程(UI 线程)调用它,它会把内部逻辑切到Default线程池执行,完成后再自动切回Main线程。结构化并发:协程的“监护人”机制
这是 Kotlin 协程最引以为傲的特性。
同生共死:在
withContext作用域内启动的所有子协程,都必须在withContext块结束前完成。自动清理:如果父作用域被取消,或者其中一个子协程抛出未捕获的异常,整个作用域内的其他协程都会被自动取消。这防止了“僵尸协程”导致的内存泄漏。
- 使用协程构造函数,例如
CoroutineScope.launch()来启动协程:
suspend fun main() {
    withContext(Dispatchers.Default) { // this: CoroutineScope
        // Starts a coroutine inside the scope with CoroutineScope.launch()
        this.launch { greet() }
        println("The withContext() on the thread: ${Thread.currentThread().name}")
    }
}- 把这些代码片段组合起来,形成一个可以在同一时间运行共享线程池中的多个协程的程序:
// Imports the coroutines library
import kotlinx.coroutines.*

// Imports the kotlin.time.Duration to express duration in seconds
import kotlin.time.Duration.Companion.seconds

// Defines a suspending function
suspend fun greet() {
    println("The greet() on the thread: ${Thread.currentThread().name}")
    // Suspends for 1 second and releases the thread
    delay(1.seconds)
    // The delay() function simulates a suspending API call here
    // You can add suspending API calls here like a network request
}

suspend fun main() {
    // Runs the code inside this block on a shared thread pool
    withContext(Dispatchers.Default) { // this: CoroutineScope
        this.launch() {
            greet()
        }

        // Starts another coroutine
        this.launch() {
            println("The CoroutineScope.launch() on the thread: ${Thread.currentThread().name}")
            delay(1.seconds)
            // The delay function simulates a suspending API call here
            // You can add suspending API calls here like a network request
        }

        println("The withContext() on the thread: ${Thread.currentThread().name}")
    }
}
试着多运行几次,你会发现每一次运行,输出顺序和线程名称都会不一样,因为决定线程何时运行的是操作系统
协程作用域与结构化并发
当你在应用程序中运行许多协程时,你需要一种将它们作为小组进行管理的方法。Kotlin 协程依赖于一个被称为结构化并发 (structured concurrency) 的原则来提供这种结构。
根据这一原则,协程形成了具有联动生命周期的父子任务树状层级结构。协程的生命周期是从创建到完成、失败或取消的一系列状态序列。父协程会等待其所有子协程完成后再结束。如果父协程失败或被取消,其所有子协程也会被递归取消。保持协程以这种方式连接,使得取消操作和错误处理变得可预测且安全。
为了维持结构化并发,新的协程只能在定义并管理其生命周期的 CoroutineScope(协程作用域) 中启动。CoroutineScope 包含协程上下文 (coroutine context),它定义了调度器和其他执行属性。当你在一个协程内部启动另一个协程时,它会自动成为其父级作用域的子协程。
在 CoroutineScope 上调用协程构建器函数(如 CoroutineScope.launch()),会启动一个与该作用域关联的协程的子协程。在构建器的代码块内部,接收者(receiver)是一个嵌套的 CoroutineScope,因此你在其中启动的任何协程都会成为其子协程
使用coroutineScope()函数创建一个协程作用域
要使用当前的协程上下文(coroutine context)创建一个新的协程作用域,请使用 coroutineScope() 函数。该函数会创建一个协程子树的根协程。它是该代码块内启动的协程的直接父级,也是这些子协程所启动的任何协程的间接父级。coroutineScope() 会执行挂起代码块,并等待该代码块及其内部启动的所有协程全部完成。
示例如下:
suspend fun main() {
    // 协程子树的根
    coroutineScope { // this: CoroutineScope
        this.launch {
            this.launch {
                delay(2.seconds)
                println("嵌套子协程已完成")
            }
            println("子协程 1 已完成")
        }
        this.launch {
            delay(1.seconds)
            println("子协程 2 已完成")
        }
    }
    // 只有在 coroutineScope 中所有的子协程都完成后才会运行
    println("协程作用域已完成")
}

// 只是其中一种可能的输出
Child coroutine 1 completed
Child coroutine 2 completed
Child of the enclosing coroutine completed
Coroutine scope completed由于此示例中未指定调度器(dispatcher),coroutineScope() 块中的 CoroutineScope.launch() 构建器函数会继承当前上下文。如果该上下文没有指定调度器,CoroutineScope.launch() 将使用 Dispatchers.Default,它运行在共享线程池上。
补充说明
coroutineScope() 是实现结构化并发最常用的工具之一,它像是一个“分流器”,将复杂的并发任务打包成一个整体。
作用域的继承与边界
coroutineScope()的最大特点是它会继承父级的上下文(比如 Job 和 Dispatcher),但它会提供一个新的 Job 来建立边界。等待机制:它是一个挂起函数。这意味着在它内部的所有协程(包括深层嵌套的)运行完之前,它会一直“卡”在那行代码。
逻辑隔离:它将内部的并发逻辑与外部隔离开来,确保函数返回时,内部不再有任何残留任务。
默认调度器的回退机制
如果你在
main函数中使用协程而没有指定任何 Dispatcher(比如没有withContext(Dispatchers.IO)),Kotlin 编译器会非常聪明地将任务分配给Dispatchers.Default。- 这保证了即使你没写多线程配置,你的代码依然能在多核 CPU 上利用并行能力。
它是如何处理异常的?
这是
coroutineScope与另一个函数supervisorScope的核心区别:- 在
coroutineScope中,如果任何一个子协程抛出异常,整个作用域会立即失败,并取消所有其他兄弟协程。这被称为“快速失败”(Fail-fast)。
- 在
从协程作用域中提取协程构造器
在某些情况下,你可能希望将协程构建器(如 CoroutineScope.launch())的调用提取到独立的函数中。
考虑以下示例:
suspend fun main() {
    coroutineScope { // this: CoroutineScope
        // Calls CoroutineScope.launch() where CoroutineScope is the receiver
        this.launch { println("1") }
        this.launch { println("2") }
    }
}
提示
你也可以直接写 launch 而不使用显式的 this 表达式。这些示例使用显式的 this 是为了强调它是 CoroutineScope 的扩展函数。有关 Kotlin 中带接收者的 Lambda 如何工作的更多信息,请参阅带接收者的函数字面量。
coroutineScope() 函数接受一个带有 CoroutineScope 接收者的 Lambda。在这个 Lambda 内部,隐式接收者就是一个 CoroutineScope,因此像 CoroutineScope.launch() 和 CoroutineScope.async() 这样的构建器函数会被解析为该接收者的扩展函数。
要将协程构建器提取到另一个函数中,该函数必须声明一个 CoroutineScope 接收者,否则会发生编译错误:
suspend fun main() {
    coroutineScope {
        launchAll()
    }
}

fun CoroutineScope.launchAll() { // this: CoroutineScope
    // Calls .launch() on CoroutineScope
    this.launch { println("1") }
    this.launch { println("2") }
}

// 只是一个可能的输出
2
1如何优雅地重构并发代码。
为什么需要扩展函数?
launch或async不是顶层函数,它们必须在某个“作用域(Scope)”内运行。当你把代码抽离出来时,新函数必须知道它属于哪个作用域。 通过定义fun CoroutineScope.yourFunction(),你实际上是在说:“这个函数必须在有协程管家的地方才能执行。”“带接收者的 Lambda” (Lambda with Receiver)
这是 Kotlin 的语法糖精华。在
coroutineScope { ... }的大括号里,你仿佛置身于CoroutineScope对象的内部。隐式 context:你不需要反复写
scope.launch,直接写launch即可。安全性:这种绑定确保了提取出的代码依然遵循“结构化并发”——
launchAll()里启动的所有协程都会被外层的coroutineScope统一管理。
常见的重构误区
初学者常犯的错误是直接写
suspend fun launchAll()。问题:
suspend只是允许你调用挂起函数(如delay),但它并不提供启动新协程的权限(Scope)。解决:如果你要启动新协程,用
CoroutineScope扩展函数;如果你只是顺序执行一系列挂起任务,用普通的suspend函数。
协程构造函数
协程构造函数(coroutine builder function) 是接受一个挂起 Lambda(suspend lambda) 作为参数,并由此定义要运行的协程的函数。以下是一些示例:
协程构建器函数需要在一个 CoroutineScope(协程作用域) 中运行。这可以是一个现有的作用域,也可以是你使用 coroutineScope()、runBlocking() 或 withContext() 等辅助函数创建的作用域。每个构建器都定义了协程如何启动,以及你如何与其结果进行交互
CoroutineScope.launch()
CoroutineScope.launch() 协程构建器函数是 CoroutineScope 的一个扩展函数。它会在现有的协程作用域内启动一个新的协程,且不会阻塞该作用域中的其他部分。
当你需要运行一个与当前工作并行的任务,且不需要其结果或者不想等待它完成时,请使用 CoroutineScope.launch():
suspend fun performBackgroundWork() = coroutineScope { // this: CoroutineScope
    // Starts a coroutine that runs without blocking the scope
    this.launch {
        // Suspends to simulate background work
        delay(100.milliseconds)
        println("Sending notification in background")
    }

    // Main coroutine continues while a previous one suspends
    println("Scope continues")
}

// 输出:
Scope continues
Sending notification in background
运行此示例后,你可以看到 main() 函数并没有被 CoroutineScope.launch() 阻塞,而是在后台协程工作时继续运行其他代码。
注
CoroutineScope.launch() 函数返回一个 Job 句柄。你可以使用这个句柄来等待启动的协程完成。更多信息请参阅取消与超时
补充说明
launch 是协程中最典型的“发后即忘(Fire-and-forget)”模式。理解它的关键在于其非阻塞的本质和对生命周期的控制。
非阻塞的并行
在上面的例子中,执行流程并不是“等 100 毫秒 -> 打印通知 -> 打印作用域继续”,而是:
调用
launch,立即向调度器申请一个任务。不等待任务开始,直接执行下一行
println("Scope continues")。后台协程在自己的节奏中完成
delay并打印通知。
Job:任务的遥控器虽然
launch不返回结果值,但它返回的Job对象非常强大:job.join():如果你突然改变主意,想要等待这个后台任务执行完再继续,可以调用join()(这是一个挂起函数)。job.cancel():如果用户离开了当前页面,你可以通过Job随时取消这个后台任务,避免浪费资源。
结构化并发的保障
尽管
launch是后台运行的,但它依然被包裹在coroutineScope中。这意味着:- 如果
performBackgroundWork所在的函数结束了,coroutineScope会自动等待launch里的任务彻底完成,确保没有“遗留任务”。
- 如果
CoroutineScope.async()
CoroutineScope.async() 协程构建器函数是 CoroutineScope 的一个扩展函数。它在现有的协程作用域内启动一个并发计算,并返回一个代表最终结果的 Deferred 句柄。使用 .await() 函数可以挂起代码,直到结果就绪:
suspend fun main() = withContext(Dispatchers.Default) { // this: CoroutineScope
    // Starts downloading the first page
    val firstPage = this.async {
        delay(50.milliseconds)
        "First page"
    }

    // Starts downloading the second page in parallel
    val secondPage = this.async {
        delay(100.milliseconds)
        "Second page"
    }

    // Awaits both results and compares them
    val pagesAreEqual = firstPage.await() == secondPage.await()
    println("Pages are equal: $pagesAreEqual")
}

// 输出:
Pages are equal: false
补充说明
如果说 launch 是“发后即忘”,那么 async 就是**“有求必应”**。它是实现并行编程(Parallelism)最优雅的武器。
并行 vs 串行
在上面的代码中,总耗时大约是 100 毫秒(即最慢的那个任务的时间),而不是 50 + 100 = 150 毫秒。这是因为两个
async块几乎是同时启动的。Deferred<T>:未来的承诺async返回的是Deferred,它继承自Job。它像是一个带有“结果槽位”的盒子。
当你调用
await()时,如果结果还没出来,当前协程会挂起(让出线程),直到盒子被填满。
与
withContext的区别withContext会立即挂起当前协程直到块内逻辑完成。async会立即返回并继续执行下一行代码。只有当你真正需要结果并调用await()时,才会发生挂起。
runBlocking()
runBlocking() 协程构建器函数会创建一个协程作用域,并阻塞当前线程,直到该作用域内启动的协程执行完毕。
请仅在没有其他办法从非挂起代码(non-suspending code) 中调用挂起代码时才使用 runBlocking()
import kotlin.time.Duration.Companion.milliseconds
import kotlinx.coroutines.*

// A third-party interface you can't change
interface Repository {
    fun readItem(): Int
}

object MyRepository : Repository {
    override fun readItem(): Int {
        // Bridges to a suspending function
        return runBlocking {
            myReadItem()
        }
    }
}

suspend fun myReadItem(): Int {
    delay(100.milliseconds)
    return 4
}
协程调度器/Coroutine dispatchers
协程调度器 (Coroutine Dispatcher) 控制着协程在执行时使用哪个线程或线程池。协程并不总是绑定在单个线程上。根据调度器的不同,它们可以在一个线程上暂停,并在另一个线程上恢复。这让你能够同时运行许多协程,而无需为每个协程分配独立的线程。
尽管协程可以在不同的线程上挂起和恢复,但仍能保证在协程恢复时,挂起前写入的值在同一个协程中依然可用。
调度器与 协程作用域 (Coroutine Scope) 协同工作,共同定义了协程何时运行以及在哪运行。协程作用域控制着协程的生命周期,而调度器则控制着用于执行的线程。
提示
你不需要为每个协程都指定调度器。默认情况下,协程会从其父作用域继承调度器。你可以指定一个调度器,以便在不同的上下文中运行协程。
如果协程上下文中不包含调度器,协程构建器将默认使用 Dispatchers.Default。
补充说明
调度器是协程的“交通指挥官”。理解它需要理清它与线程、作用域之间的三角关系。
线程复用:协程不是线程
调度器的核心价值在于资源解耦。
传统模型:1 个任务 = 1 个线程(昂贵且受限)。
协程模型:N 个任务 = M 个线程(高效且灵活)。 调度器负责将排队的协程分发到空闲的线程上执行。
状态可见性保证 (Visibility Guarantee)
文中提到的挂起前写入的值在恢复后依然可用 是一个非常重要的底层承诺。 在多线程编程中,从线程 A 切换到 线程 B 通常需要处理内存可见性问题(如
volatile)。Kotlin 协程框架在底层处理了这些复杂的同步逻辑,确保你在delay()之后读到的变量值是准确的,即便它已经换了一个线程运行。作用域 vs 调度器:行政部 vs 调度部
这是一个绝佳的比喻:
协程作用域 (Scope):像是行政部门。它决定了任务的“生死”(生命周期)。如果部门解散(作用域销毁),所有下属任务(协程)必须停止。
调度器 (Dispatcher):像是调度部门。它决定了任务去哪间办公室(哪个线程)干活。
默认行为:
Dispatchers.Default如果你没有明确指定,Kotlin 会假设你正在进行 CPU 密集型计算,并分配
Dispatchers.Default。特点:线程数与 CPU 核心数一致。
注意:如果你在做 I/O 操作(如读写数据库、请求网络),应该显式切换到
Dispatchers.IO,否则会霸占 CPU 计算资源。
kotlinx.coroutines 库为不同的使用场景包含了不同的调度器。例如,Dispatchers.Default 在一个共享线程池上运行协程,在后台执行工作,与主线程分离。这使其成为数据处理等 CPU 密集型操作的理想选择。
要为 CoroutineScope.launch() 等协程构建器指定调度器,请将其作为参数传递:
suspend fun runWithDispatcher() = coroutineScope { // this: CoroutineScope
    this.launch(Dispatchers.Default) {
        println("Running on ${Thread.currentThread().name}")
    }
}
或者,你可以使用 withContext() 代码块,使其内部的所有代码都在指定的调度器上运行:
suspend fun main() = withContext(Dispatchers.Default) { // this: CoroutineScope
    println("Running withContext block on ${Thread.currentThread().name}")

    val one = this.async {
        println("First calculation starting on ${Thread.currentThread().name}")
        val sum = (1L..500_000L).sum()
        delay(200L)
        println("First calculation done on ${Thread.currentThread().name}")
        sum
    }

    val two = this.async {
        println("Second calculation starting on ${Thread.currentThread().name}")
        val sum = (500_001L..1_000_000L).sum()
        println("Second calculation done on ${Thread.currentThread().name}")
        sum
    }

    // Waits for both calculations and prints the result
    println("Combined total: ${one.await() + two.await()}")
}

// 输出:
Running withContext block on DefaultDispatcher-worker-1
First calculation starting on DefaultDispatcher-worker-2 @coroutine#1
Second calculation starting on DefaultDispatcher-worker-1 @coroutine#2
Second calculation done on DefaultDispatcher-worker-1 @coroutine#2
First calculation done on DefaultDispatcher-worker-2 @coroutine#1
Combined total: 500000500000
提示
要了解更多关于协程调度器及其用途的信息,包括 Dispatchers.IO 和 Dispatchers.Main 等其他调度器,请参阅协程上下文与调度器
补充说明
三大核心调度器:术业有专攻
在 Kotlin 协程中,你最常打交道的是这三位:
Dispatchers.Main:职责:更新 UI、处理用户交互。
特点:运行在主线程,严禁执行耗时操作,否则界面会卡死。
Dispatchers.Default:职责:计算密集型任务(算法、JSON 解析、大规模数值运算)。
特点:线程数受 CPU 核心数限制,确保 CPU 被填满但不被挤爆。
Dispatchers.IO:职责:阻塞型 I/O 任务(数据库读写、文件操作、网络请求)。
特点:线程池很大,因为 I/O 任务大部分时间在等硬件响应,多开点线程没关系。
withContext:优雅的“瞬间移动”示例中的
withContext(Dispatchers.Default)是最推荐的用法。它比手动launch(Dispatcher)更安全,因为它:有返回值:你可以直接获取块内逻辑的结果。
强制等待:它会挂起当前协程直到切换过去的任务完成。
自动恢复:它执行完后,会自动把协程“切回”原来的调度器。
协程对比JVM线程
虽然协程是像 JVM 线程一样并发运行代码的可挂起计算,但它们的底层工作原理却大不相同。
线程 (Thread) 由操作系统管理。线程可以在多个 CPU 核心上并行运行任务,代表了 JVM 上并发处理的标准方法。当你创建一个线程时,操作系统会为其栈分配内存,并利用内核在线程之间进行切换。这使得线程功能强大,但也非常消耗资源。每个线程通常需要几兆字节(MB)的内存,通常 JVM 一次只能处理几千个线程。
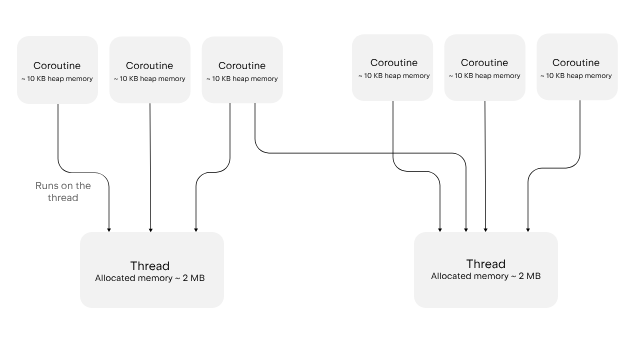
另一方面,协程 (Coroutine) 并不绑定到特定的线程。它可以在一个线程上挂起并在另一个线程上恢复,因此许多协程可以共享同一个线程池。当一个协程挂起时,线程并不会被阻塞,而是可以自由地运行其他任务。这使得协程比线程轻量得多,并允许在一个进程中运行数百万个协程而不会耗尽系统资源。
Let's look at an example where 50,000 coroutines each wait five seconds and then print a period (.):
suspend fun printPeriods() = coroutineScope { // this: CoroutineScope
    // Launches 50,000 coroutines that each wait five seconds, then print a period
    repeat(50_000) {
        this.launch {
            delay(5.seconds)
            print(".")
        }
    }
}
Now let's look at the same example using JVM threads:
import kotlin.concurrent.thread

fun main() {
    repeat(50_000) {
        thread {
            Thread.sleep(5000L)
            print(".")
        }
    }
}
Running this version uses much more memory because each thread needs its own memory stack. For 50,000 threads, that can be up to 100 GB, compared to roughly 500 MB for the same number of coroutines.
Depending on your operating system, JDK version, and settings, the JVM thread version may throw an out-of-memory error or slow down thread creation to avoid running too many threads at once.
协程与channel 入门
注
本节会用到Retrofit网络库——Retrofit是适用于 Android 和 Java/Kotlin 的一个类型安全(Type-safe)的 HTTP 客户端库。它由 Square 公司开发,现已成为 JVM 生态系统中处理网络请求的事实标准。
Retrofit 的核心思想是将 HTTP API 转换为 Java/Kotlin 接口。通过使用注解(Annotations),你可以声明式地定义请求方式(GET, POST 等)、参数、请求头以及响应的处理方式。
在开始之前
用IDEA开一个新项目
Download and install the latest version of IntelliJ IDEA.
Clone the project template by choosing Get from VCS on the Welcome screen or selecting File | New | Project from Version Control.
You can also clone it from the command line:
git clone https://github.com/kotlin-hands-on/intro-coroutines配置Github API Token
You'll be using the GitHub API in your project. To get access, provide your GitHub account name and either a password or a token. If you have two-factor authentication enabled, a token will be enough.
Generate a new GitHub token to use the GitHub API with your account:
- Specify the name of your token, for example,
coroutines-tutorial: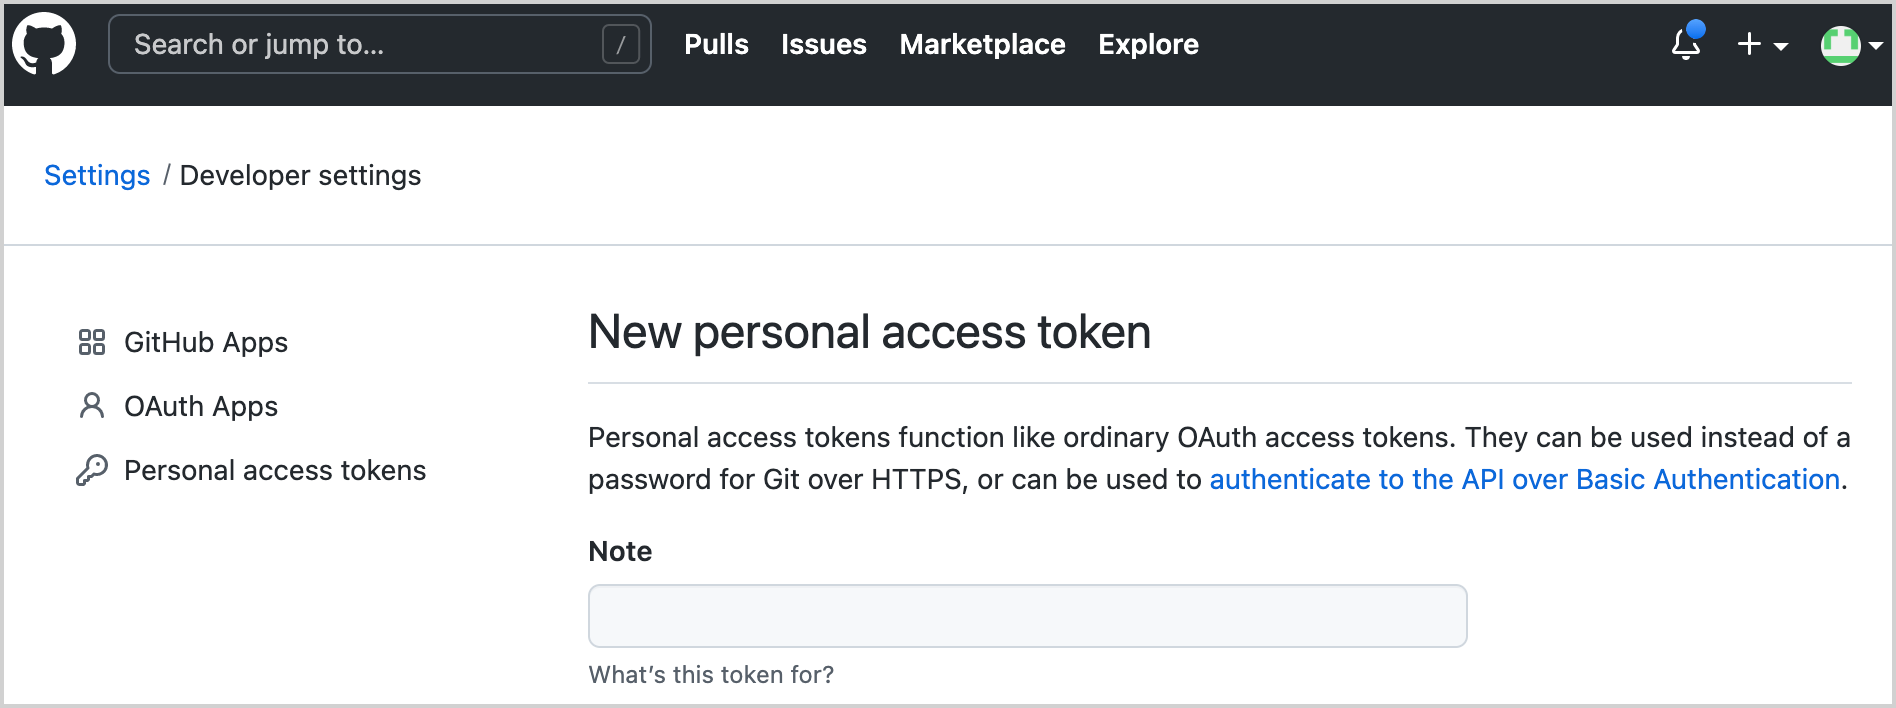
Do not select any scopes. Click Generate token at the bottom of the page.
Copy the generated token.
运行代码
The program loads the contributors for all of the repositories under the given organization (named “kotlin” by default). Later you'll add logic to sort the users by the number of their contributions.
Open the
src/contributors/main.ktfile and run themain()function. You'll see the following window: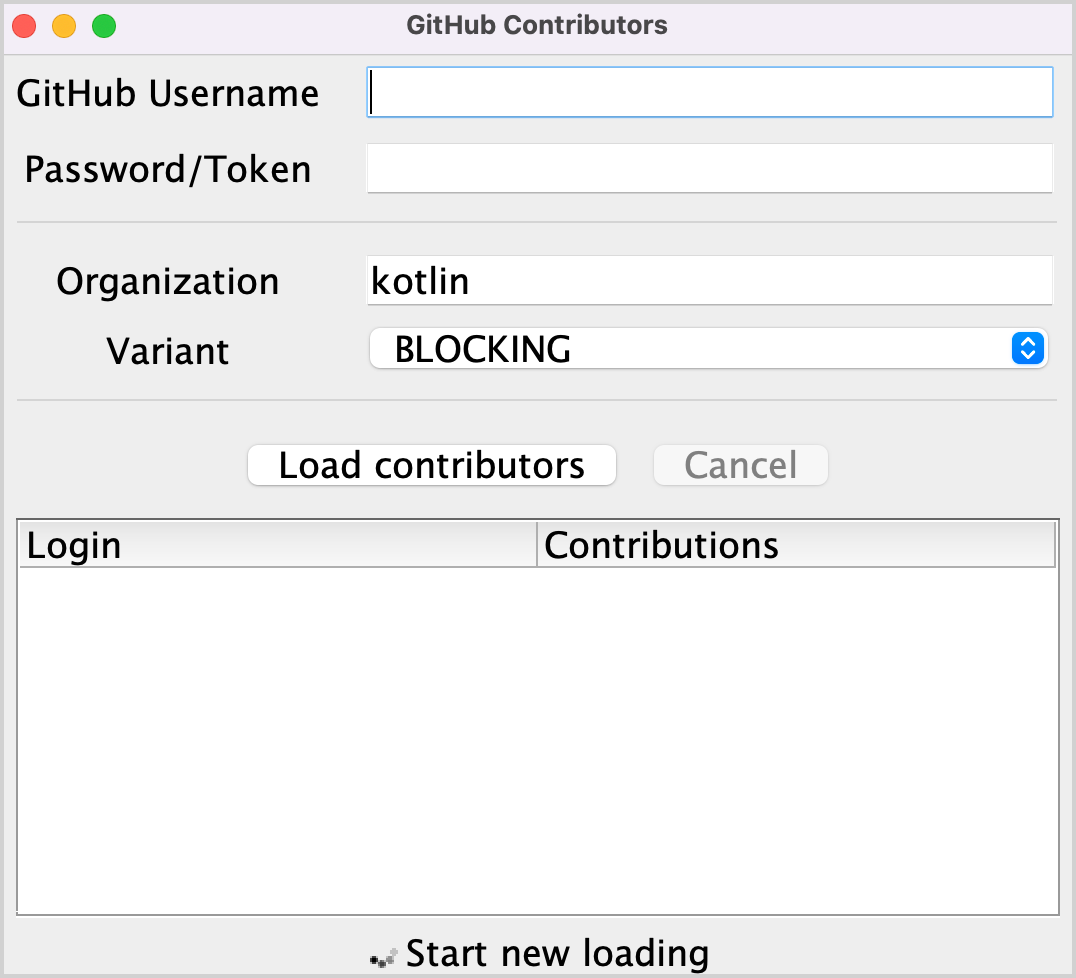
If the font is too small, adjust it by changing the value ofsetDefaultFontSize(18f)in themain()function.Provide your GitHub username and token (or password) in the corresponding fields.
Make sure that the BLOCKING option is selected in the Variant dropdown menu.
Click Load contributors. The UI should freeze for some time and then show the list of contributors.
Open the program output to ensure the data has been loaded. The list of contributors is logged after each successful request.
There are different ways of implementing this logic: by using blocking requests or callbacks. You'll compare these solutions with one that uses coroutines and see how channels can be used to share information between different coroutines.
阻塞式请求
You will use the Retrofit library to perform HTTP requests to GitHub. It allows requesting the list of repositories under the given organization and the list of contributors for each repository:
interface GitHubService {
    @GET("orgs/{org}/repos?per_page=100")
    fun getOrgReposCall(
        @Path("org") org: String
    ): Call<List<Repo>>

    @GET("repos/{owner}/{repo}/contributors?per_page=100")
    fun getRepoContributorsCall(
        @Path("owner") owner: String,
        @Path("repo") repo: String
    ): Call<List<User>>
}
This API is used by the loadContributorsBlocking() function to fetch the list of contributors for the given organization.
Open
src/tasks/Request1Blocking.ktto see its implementation:fun loadContributorsBlocking( service: GitHubService, req: RequestData ): List<User> { val repos = service .getOrgReposCall(req.org) // #1 .execute() // #2 .also { logRepos(req, it) } // #3 .body() ?: emptyList() // #4 return repos.flatMap { repo -> service .getRepoContributorsCall(req.org, repo.name) // #1 .execute() // #2 .also { logUsers(repo, it) } // #3 .bodyList() // #4 }.aggregate() }- At first, you get a list of the repositories under the given organization and store it in the
reposlist. Then for each repository, the list of contributors is requested, and all of the lists are merged into one final list of contributors. getOrgReposCall()andgetRepoContributorsCall()both return an instance of the*Callclass (#1). At this point, no request is sent.*Call.execute()is then invoked to perform the request (#2).execute()is a synchronous call that blocks the underlying thread.- When you get the response, the result is logged by calling the specific
logRepos()andlogUsers()functions (#3). If the HTTP response contains an error, this error will be logged here. - Finally, get the response's body, which contains the data you need. For this tutorial, you'll use an empty list as a result in case there is an error, and you'll log the corresponding error (
#4
- At first, you get a list of the repositories under the given organization and store it in the
To avoid repeating
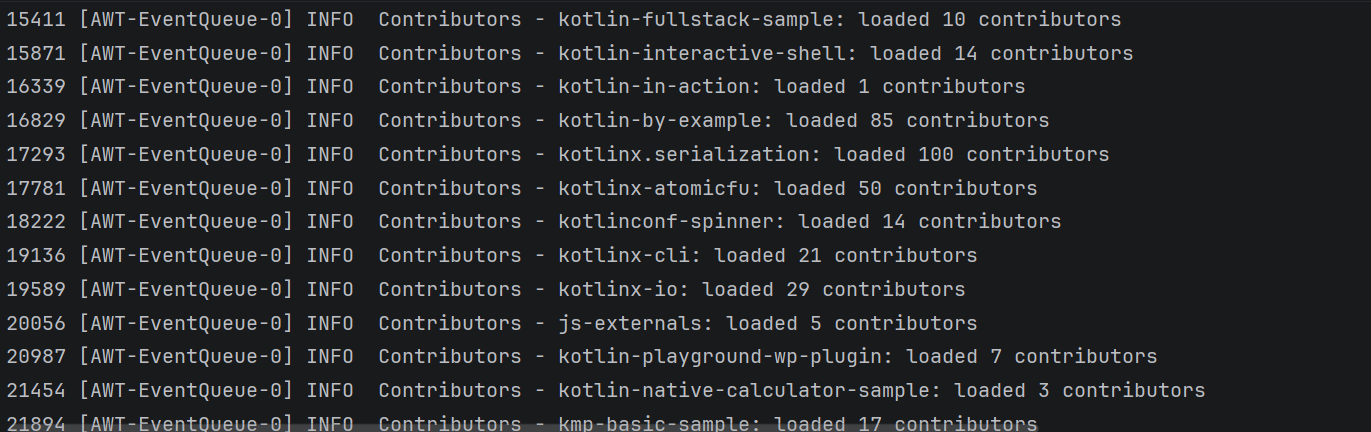
.body() ?: emptyList(), an extension functionbodyList()is declared:fun <T> Response<List<T>>.bodyList(): List<T> { return body() ?: emptyList() }Run the program again and take a look at the system output in IntelliJ IDEA. It should have something like this:
1770 [AWT-EventQueue-0] INFO Contributors - kotlin: loaded 40 repos 2025 [AWT-EventQueue-0] INFO Contributors - kotlin-examples: loaded 23 contributors 2229 [AWT-EventQueue-0] INFO Contributors - kotlin-koans: loaded 45 contributors ...- The first item on each line is the number of milliseconds that have passed since the program started, then the thread name in square brackets. You can see from which thread the loading request is called.
- The final item on each line is the actual message: how many repositories or contributors were loaded.
This log output demonstrates that all of the results were logged from the main thread. When you run the code with a BLOCKING option, the window freezes and doesn't react to input until the loading is finished. All of the requests are executed from the same thread as the one calledloadContributorsBlocking()is from, which is the main UI thread (in Swing, it's an AWT event dispatching thread). This main thread becomes blocked, and that's why the UI is frozen:
After the list of contributors has loaded, the result is updated.
In
src/contributors/Contributors.kt, find theloadContributors()function responsible for choosing how the contributors are loaded and look at howloadContributorsBlocking()is called:when (getSelectedVariant()) { BLOCKING -> { // Blocking UI thread val users = loadContributorsBlocking(service, req) updateResults(users, startTime) } }- The
updateResults()call goes right after theloadContributorsBlocking()call. updateResults()updates the UI, so it must always be called from the UI thread.- Since
loadContributorsBlocking()is also called from the UI thread, the UI thread becomes blocked and the UI is frozen.
- The
任务一:我要成为FP小子!
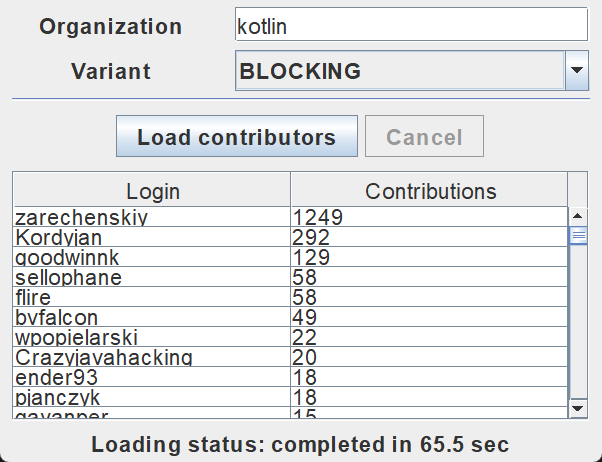
The first task helps you familiarize yourself with the task domain. Currently, each contributor's name is repeated several times, once for every project they have taken part in. Implement the aggregate() function combining the users so that each contributor is added only once. The User.contributions property should contain the total number of contributions of the given user to all the projects. The resulting list should be sorted in descending order according to the number of contributions.
Open src/tasks/Aggregation.kt and implement the List<User>.aggregate() function. Users should be sorted by the total number of their contributions.
The corresponding test file test/tasks/AggregationKtTest.kt shows an example of the expected result.
提示
You can jump between the source code and the test class automatically by using the IntelliJ IDEA shortcut Ctrl+Shift+T/⇧ ⌘ T.
After implementing this task, the resulting list for the "kotlin" organization should be similar to the following:
官方解法
- 为了按用户名对用户列表进行分组,你需要
groupBy()——它会返回一个将用户名login映射到所有引用了这个login的地方的Map - 对Map进行遍历,累加每个用户各自的贡献数,并用用户名和贡献数总和创建一个新的
User对象 - 降序排序新的
List<User>:
fun List<User>.aggregate(): List<User> =
    groupBy { it.login }
        .map { (login, group) -> User(login, group.sumOf { it.contributions }) }
.sortedByDescending { it.contributions }使用groupingBy的例子请点此查看
回调
之前的解决方案虽然有效,但它会阻塞线程,从而导致 UI 冻结。一种避免此问题的传统方法是使用回调 (callbacks)。
与其直接调用那些应该在操作完成后立即执行的代码,不如将其提取到一个独立的回调中(通常是一个 Lambda 表达式),并将其传递给调用者,以便稍后被调用。
为了使 UI 保持响应,你可以将整个计算过程移动到独立的线程中,或者切换到使用回调而非阻塞调用的 Retrofit API。
使用回调
- Open
src/tasks/Request2Background.ktand see its implementation. First, the whole computation is moved to a different thread. Thethread()function starts a new thread:Now that all of the loading has been moved to a separate thread, the main thread is free and can be occupied by other tasks:thread { loadContributorsBlocking(service, req) }
- The signature of the
loadContributorsBackground()function changes. It takes anupdateResults()callback as the last argument to call it after all the loading completes:fun loadContributorsBackground( service: GitHubService, req: RequestData, updateResults: (List<User>) -> Unit ) - Now when the
loadContributorsBackground()is called, theupdateResults()call goes in the callback, not immediately afterward as it did before:By callingloadContributorsBackground(service, req) { users -> SwingUtilities.invokeLater { updateResults(users, startTime) } }SwingUtilities.invokeLater, you ensure that theupdateResults()call, which updates the results, happens on the main UI thread (AWT event dispatching thread).
However, if you try to load the contributors via theBACKGROUNDoption, you can see that the list is updated but nothing changes.
任务二
Fix the loadContributorsBackground() function in src/tasks/Request2Background.kt so that the resulting list is shown in the UI.
官方解法
没看明白我要做什么,所以直接上官方解法
If you try to load the contributors, you can see in the log that the contributors are loaded but the result isn't displayed. To fix this, call updateResults() on the resulting list of users:
thread {
    updateResults(loadContributorsBlocking(service, req))
}
Make sure to call the logic passed in the callback explicitly. Otherwise, nothing will happen.
使用Retrofit库的回调API
在之前的解决方案中,整个加载逻辑被移动到了后台线程,但这仍然不是对资源的最佳利用。所有的加载请求都是按顺序进行的,线程在等待加载结果时被阻塞,而它本可以被其他任务占用。具体来说,线程本可以开始加载另一个请求,以便更早地接收到完整结果。
因此,处理每个仓库的数据应当分为两个部分:加载和处理响应结果。第二个处理部分应当被提取到一个回调函数中。
这样,在接收到前一个仓库的结果(并调用相应回调)之前,就可以开始加载每一个仓库:
Retrofit 的回调 API 可以帮助实现这一点。Call.enqueue() 函数会启动一个 HTTP 请求,并接受一个回调作为参数。在这个回调中,你需要指定每个请求完成后需要执行的操作。
注
Call.enqueue() 是传统的非阻塞实现方式:
它立即返回,不会让你的代码停在那行等结果。
它在后台线程池中管理 HTTP 请求。
回调挑战:虽然这比顺序阻塞快得多,但如果你有 100 个仓库要加载,你就需要管理 100 个回调。
打开src/tasks/Request3Callbacks.kt文件,找到使用了回调API的loadContributorsCallbacks()实现:
fun loadContributorsCallbacks(
    service: GitHubService, req: RequestData,
    updateResults: (List<User>) -> Unit
) {
    service.getOrgReposCall(req.org).onResponse { responseRepos ->  // #1
        logRepos(req, responseRepos)
        val repos = responseRepos.bodyList()

        val allUsers = mutableListOf<User>()
        for (repo in repos) {
            service.getRepoContributorsCall(req.org, repo.name)
                .onResponse { responseUsers ->  // #2
                    logUsers(repo, responseUsers)
                    val users = responseUsers.bodyList()
                    allUsers += users
                }
            }
        }
        // TODO: Why doesn't this code work? How to fix that?
        updateResults(allUsers.aggregate())
}- For convenience, this code fragment uses the
onResponse()extension function declared in the same file. It takes a lambda as an argument rather than an object expression. - The logic for handling the responses is extracted into callbacks: the corresponding lambdas start at lines
#1and#2.
However, the provided solution doesn't work. If you run the program and load contributors by choosing the CALLBACKS option, you'll see that nothing is shown. However, the test from Request3CallbacksKtTest immediately returns the result that it successfully passed.
Think about why the given code doesn't work as expected and try to fix it, or see the solutions below.
【选做】任务三
Rewrite the code in the src/tasks/Request3Callbacks.kt file so that the loaded list of contributors is shown.