Flutter UI导引 (下)
环境配置
由于教程开发的是IOS应用,而本人没有IOS设备,也不想捣鼓adb,所以就想在Windows上直接开发
在Windows上开发需要C++工具链和Windows 10/11 SDK(包括DirectX SDK),如果因为某些组件的注册表缓存污染而无法完成安装,可以尝试用微软疑难解答程序卸载有问题的组件,然后回Visual Studio Installer安装
高级UI特性
引言 Introduction
In this third installment of the Flutter tutorial series, you'll use Flutter's Cupertino library to build a partial clone of the iOS Contacts app.
在Flutter教程系列第三部分里,你将使用Flutter Cupertino库构建一个IOS通讯录APP
By the end of this tutorial, you'll have learned how to create adaptive layouts, implement comprehensive theming, build navigation patterns, and use advanced scrolling techniques.
通过本教程,你会学会如何创建自适应布局、实现复杂的主题、构建导航模式(Navigation pattern ),以及掌握高级滚动组件技巧
你将学到 What you'll learn
This tutorial explores the following topics:
教程包含以下主题:
- Building responsive layouts with
LayoutBuilder.
使用LayoutBuilder构建响应式布局 - Using advanced scrolling with slivers and search.
使用具有 slivers 和搜索的高级滚动功能。 - Implementing stack-based navigation patterns.
实现基于栈的导航模式。 - Creating comprehensive themes with
CupertinoThemeData.
使用CupertinoThemeData创建全面的主题。 - Supporting both light and dark themes.
支持亮色和暗色主题。 - Creating an iOS-style UI using Cupertino widgets.
使用 Cupertino 组件创建 iOS 风格的 UI。
This tutorial assumes that you've completed the previous Flutter tutorials and are comfortable with basic widget composition, state management, and the Flutter project structure.
本教程假设您已完成之前的 Flutter 教程,并且熟悉基本的组件组合、状态管理和 Flutter 项目结构。
创建新项目 Create a new Flutter project
flutter create rolodex --empty
cd rolodex
设置项目结构 Set up the structure
First, create the basic directory structure for your app. In your project's
libdirectory, create the following folders:
首先,为您的应用程序创建基本目录结构。在您的项目的 lib 目录下,创建以下文件夹:
mkdir lib/data lib/screens lib/themeThis command creates folders to organize your code into logical sections: data models, screen widgets, and theme configuration.
该命令会创建文件夹以将您的代码组织成逻辑部分: 数据模型、屏幕组件和主题配置
添加Cupertino组件依赖库 Add the cupertino icons dependency
flutter pub add cupertino_icons注
cupertino_icons是官方开发的IOS组件库
修改main函数代码 Replace the starter code
In your IDE, open the
lib/main.dartfile, and replace its entire contents with the following starter code:
把lib/main.dart的代码换成下面这样:
import 'package:flutter/cupertino.dart';

void main() {
  runApp(const RolodexApp());
}

class RolodexApp extends StatelessWidget {
  const RolodexApp({super.key});

  @override
  Widget build(BuildContext context) {
    return const CupertinoApp(
      title: 'Rolodex',
      theme: CupertinoThemeData(
        barBackgroundColor: CupertinoDynamicColor.withBrightness(
          color: Color(0xFFF9F9F9),
          darkColor: Color(0xFF1D1D1D),
        ),
      ),
      home: CupertinoPageScaffold(child: Center(child: Text('Hello Rolodex!'))),
    );
  }
}
Unlike the previous two tutorials, this app uses
CupertinoAppinstead ofMaterialApp. The Cupertino design system provides iOS-style widgets and styling, which is perfect for building apps that feel native on Apple devices.
与前两次教程不同的是,本次教程使用CupertinoApp(UI库)而非MaterialApp。Cupertino设计库提供IOS风格的组件和样式,完美适用Native APP构建
运行程序 Run your app
flutter run -d chrome定义数据模型 Create the data models
Before building the UI, create the data structures and sample data that the app will use. This section is lightly explained because it's not the focus of this tutorial.
在构建UI之前,需要先定义程序会用到的模型结构和测试数据。本节不在教程初衷范围内,因此不会赘述
通讯录数据 Contact data
Create a new file,
lib/data/contact.dart, and add the basicContactclass:
在lib/data(数据模型)目录下创建contact.dart,添加基本的Contact类:
class Contact {
  Contact({
    required this.id,
    required this.firstName,
    this.middleName,
    required this.lastName,
    this.suffix,
  });

  final int id;
  final String firstName;
  final String lastName;
  final String? middleName;
  final String? suffix;
}

final johnAppleseed = Contact(id: 0, firstName: 'John', lastName: 'Appleseed');
final kateBell = Contact(id: 1, firstName: 'Kate', lastName: 'Bell');
final annaHaro = Contact(id: 2, firstName: 'Anna', lastName: 'Haro');
final danielHiggins = Contact(
  id: 3,
  firstName: 'Daniel',
  lastName: 'Higgins',
  suffix: 'Jr.',
);
final davidTaylor = Contact(id: 4, firstName: 'David', lastName: 'Taylor');
final hankZakroff = Contact(
  id: 5,
  firstName: 'Hank',
  middleName: 'M.',
  lastName: 'Zakroff',
);

final alexAnderson = Contact(id: 6, firstName: 'Alex', lastName: 'Anderson');
final benBrown = Contact(id: 7, firstName: 'Ben', lastName: 'Brown');
final carolCarter = Contact(id: 8, firstName: 'Carol', lastName: 'Carter');
final dianaDevito = Contact(id: 9, firstName: 'Diana', lastName: 'Devito');
final emilyEvans = Contact(id: 10, firstName: 'Emily', lastName: 'Evans');
final frankFisher = Contact(id: 11, firstName: 'Frank', lastName: 'Fisher');
final graceGreen = Contact(id: 12, firstName: 'Grace', lastName: 'Green');
final henryHall = Contact(id: 13, firstName: 'Henry', lastName: 'Hall');
final isaacIngram = Contact(id: 14, firstName: 'Isaac', lastName: 'Ingram');
final juliaJackson = Contact(id: 15, firstName: 'Julia', lastName: 'Jackson');
final kevinKelly = Contact(id: 16, firstName: 'Kevin', lastName: 'Kelly');
final lindaLewis = Contact(id: 17, firstName: 'Linda', lastName: 'Lewis');
final michaelMiller = Contact(id: 18, firstName: 'Michael', lastName: 'Miller');
final nancyNewman = Contact(id: 19, firstName: 'Nancy', lastName: 'Newman');
final oliverOwens = Contact(id: 20, firstName: 'Oliver', lastName: 'Owens');
final penelopeParker = Contact(
  id: 21,
  firstName: 'Penelope',
  lastName: 'Parker',
);
final quentinQuinn = Contact(id: 22, firstName: 'Quentin', lastName: 'Quinn');
final rachelReed = Contact(id: 23, firstName: 'Rachel', lastName: 'Reed');
final samuelSmith = Contact(id: 24, firstName: 'Samuel', lastName: 'Smith');
final tessaTurner = Contact(id: 25, firstName: 'Tessa', lastName: 'Turner');
final umbertoUpton = Contact(id: 26, firstName: 'Umberto', lastName: 'Upton');
final victoriaVance = Contact(id: 27, firstName: 'Victoria', lastName: 'Vance');
final williamWilson = Contact(id: 28, firstName: 'William', lastName: 'Wilson');
final xavierXu = Contact(id: 29, firstName: 'Xavier', lastName: 'Xu');
final yasmineYoung = Contact(id: 30, firstName: 'Yasmine', lastName: 'Young');
final zacharyZimmerman = Contact(
  id: 31,
  firstName: 'Zachary',
  lastName: 'Zimmerman',
);
final elizabethMJohnson = Contact(
  id: 32,
  firstName: 'Elizabeth',
  middleName: 'M.',
  lastName: 'Johnson',
);
final robertLWilliamsSr = Contact(
  id: 33,
  firstName: 'Robert',
  middleName: 'L.',
  lastName: 'Williams',
  suffix: 'Sr.',
);
final margaretAnneDavis = Contact(
  id: 34,
  firstName: 'Margaret',
  middleName: 'Anne',
  lastName: 'Davis',
);
final williamJamesBrownIII = Contact(
  id: 35,
  firstName: 'William',
  middleName: 'James',
  lastName: 'Brown',
  suffix: 'III',
);
final maryElizabethClark = Contact(
  id: 36,
  firstName: 'Mary',
  middleName: 'Elizabeth',
  lastName: 'Clark',
);
final drSarahWatson = Contact(
  id: 37,
  firstName: 'Dr. Sarah',
  lastName: 'Watson',
);
final jamesRSmithEsq = Contact(
  id: 38,
  firstName: 'James',
  middleName: 'R.',
  lastName: 'Smith',
  suffix: 'Esq.',
);
final mariaCruz = Contact(id: 39, firstName: 'Maria', lastName: 'Cruz');
final pierreMartin = Contact(id: 40, firstName: 'Pierre', lastName: 'Martin');
final yukiTanaka = Contact(id: 41, firstName: 'Yuki', lastName: 'Tanaka');
final hansSchmidt = Contact(id: 42, firstName: 'Hans', lastName: 'Schmidt');
final priyaPatel = Contact(id: 43, firstName: 'Priya', lastName: 'Patel');
final carlosGarcia = Contact(id: 44, firstName: 'Carlos', lastName: 'Garcia');
final ninaVolkova = Contact(id: 45, firstName: 'Nina', lastName: 'Volkova');
final jenniferAdams = Contact(id: 46, firstName: 'Jennifer', lastName: 'Adams');
final michaelBaker = Contact(id: 47, firstName: 'Michael', lastName: 'Baker');
final sarahCooper = Contact(id: 48, firstName: 'Sarah', lastName: 'Cooper');
final christopherDaniel = Contact(
  id: 49,
  firstName: 'Christopher',
  lastName: 'Daniel',
);
final jessicaEdwards = Contact(
  id: 50,
  firstName: 'Jessica',
  lastName: 'Edwards',
);

final Set<Contact> allContacts = {
  johnAppleseed,
  kateBell,
  annaHaro,
  danielHiggins,
  davidTaylor,
  hankZakroff,
  alexAnderson,
  benBrown,
  carolCarter,
  dianaDevito,
  emilyEvans,
  frankFisher,
  graceGreen,
  henryHall,
  isaacIngram,
  juliaJackson,
  kevinKelly,
  lindaLewis,
  michaelMiller,
  nancyNewman,
  oliverOwens,
  penelopeParker,
  quentinQuinn,
  rachelReed,
  samuelSmith,
  tessaTurner,
  umbertoUpton,
  victoriaVance,
  williamWilson,
  xavierXu,
  yasmineYoung,
  zacharyZimmerman,
  elizabethMJohnson,
  robertLWilliamsSr,
  margaretAnneDavis,
  williamJamesBrownIII,
  maryElizabethClark,
  drSarahWatson,
  jamesRSmithEsq,
  mariaCruz,
  pierreMartin,
  yukiTanaka,
  hansSchmidt,
  priyaPatel,
  carlosGarcia,
  ninaVolkova,
  jenniferAdams,
  michaelBaker,
  sarahCooper,
  christopherDaniel,
  jessicaEdwards,
};
This sample data includes contacts with and without middle names and suffixes. This gives you a variety of data to work with as you build the UI.
测试数据包括带或不带中间名和字母简写的通讯录数据,你在构建UI时会有很多测试数据可用
通讯录组数据 ContactGroup data
Now, create the contact groups that organize your contacts into lists. Create a new
lib/data/contact_group.dartfile and add theContactGroupclass:
创建contact_group.dart,添加ContactGroup类:
import 'dart:collection';

import 'package:flutter/cupertino.dart';

import 'contact.dart';

class ContactGroup {
  factory ContactGroup({
    required int id,
    required String label,
    bool permanent = false,
    String? title,
    List<Contact>? contacts,
  }) {
    final contactsCopy = contacts ?? <Contact>[];
    _sortContacts(contactsCopy);
    return ContactGroup._internal(
      id: id,
      label: label,
      permanent: permanent,
      title: title,
      contacts: contactsCopy,
    );
  }

  ContactGroup._internal({
    required this.id,
    required this.label,
    this.permanent = false,
    String? title,
    List<Contact>? contacts,
  }) : title = title ?? label,
       _contacts = contacts ?? const <Contact>[];

  final int id;
  final bool permanent;
  final String label;
  final String title;
  final List<Contact> _contacts;

  List<Contact> get contacts => _contacts;

  AlphabetizedContactMap get alphabetizedContacts {
    final contactsMap = AlphabetizedContactMap();
    for (final contact in _contacts) {
      final lastInitial = contact.lastName[0].toUpperCase();
      if (contactsMap.containsKey(lastInitial)) {
        contactsMap[lastInitial]!.add(contact);
      } else {
        contactsMap[lastInitial] = [contact];
      }
    }
    return contactsMap;
  }
}
A
ContactGrouprepresents a collection of contacts, such as "All Contacts" or "Favorites".
ContactGroup代表通讯录数据集合,也即 全部通讯人 或 偏好通讯人
Add the following helper code and sample data to
lib/data/contact_group.dart:
在同文件内补充辅助数据和样本数据:
typedef AlphabetizedContactMap = SplayTreeMap<String, List<Contact>>;

/// Sorts a list of [contacts] alphabetically by
/// last name, then first name, then middle name.
/// If names are identical, sorts by contact ID to ensure consistent ordering.
void _sortContacts(List<Contact> contacts) {
  contacts.sort((a, b) {
    final checkLastName = a.lastName.compareTo(b.lastName);
    if (checkLastName != 0) {
      return checkLastName;
    }
    final checkFirstName = a.firstName.compareTo(b.firstName);
    if (checkFirstName != 0) {
      return checkFirstName;
    }
    if (a.middleName != null && b.middleName != null) {
      final checkMiddleName = a.middleName!.compareTo(b.middleName!);
      if (checkMiddleName != 0) {
        return checkMiddleName;
      }
    } else if (a.middleName != null || b.middleName != null) {
      return a.middleName != null ? 1 : -1;
    }

    // If both contacts have the exact same name, order by first created.
    return a.id.compareTo(b.id);
  });
}

final allPhone = ContactGroup(
  id: 0,
  permanent: true,
  label: 'All iPhone',
  title: 'iPhone',
  contacts: allContacts.toList(),
);

final friends = ContactGroup(
  id: 1,
  label: 'Friends',
  contacts: [allContacts.elementAt(3)],
);

final work = ContactGroup(id: 2, label: 'Work');

List<ContactGroup> generateSeedData() {
  return [allPhone, friends, work];
}
This code creates three sample groups and a function to generate the initial data for the app.
上面的代码为程序提供了三组测试数据,以及一个用于创建初始数据的函数
Finally, add a class that manages state changes to
lib/data/contact_group.dart:
最后补一个用来管理状态变更的类:
class ContactGroupsModel {
  ContactGroupsModel() : _listsNotifier = ValueNotifier(generateSeedData());

  final ValueNotifier<List<ContactGroup>> _listsNotifier;

  ValueNotifier<List<ContactGroup>> get listsNotifier => _listsNotifier;

  List<ContactGroup> get lists => _listsNotifier.value;

  ContactGroup findContactList(int id) {
    return lists[id];
  }

  void dispose() {
    _listsNotifier.dispose();
  }
}
If you aren't familiar with
ValueNotifier, you should complete the previous tutorial covering state before continuing, which covers state management.
如果你不认得ValueNotifier,请在继续本教程前完成Flutter教程第二部分 维基爬虫第一节 状态管理 (上一个教程),它会教你如何管理数据状态
让数据上线 Connect the data to your app
Update your
main.dartto include the global state and import the new data file:
在主函数main.dart里导入全局(通讯录数据)状态:
import 'package:flutter/cupertino.dart';

import 'data/contact_group.dart';

final contactGroupsModel = ContactGroupsModel();

void main() {
  runApp(const RolodexApp());
}

class RolodexApp extends StatelessWidget {
  const RolodexApp({super.key});

  @override
  Widget build(BuildContext context) {
    return const CupertinoApp(
      title: 'Rolodex',
      theme: CupertinoThemeData(
        barBackgroundColor: CupertinoDynamicColor.withBrightness(
          color: Color(0xFFF9F9F9),
          darkColor: Color(0xFF1D1D1D),
        ),
      ),
      home: CupertinoPageScaffold(child: Center(child: Text('Hello Rolodex!'))),
    );
  }
}
With all the extraneous code out of the way, in the next lesson, you'll start building the app in earnest.
有了这些(本教程不涉及的)必需的数据后,在下一章节,你将开始构建APP
注
in earnest
- 认真地
- 真诚地
- 全身心地
- 努力地
自我测验 Test yourself
CupertinoApp和MaterialApp的主要区别是什么
What is the main difference between CupertinoApp and MaterialApp?
CupertinoApp provides iOS-style widgets and styling, while MaterialApp provides Material Design widgets.CupertinoApp uses Cupertino design system widgets that match the iOS look and feel.
ValueNotifier的作用是什么
What is the purpose of a ValueNotifier in state management?
To hold a single value and notify listeners when that value changes.ValueNotifier is a simple ChangeNotifier that wraps a single value and notifies listeners on change.
自适应布局
引言 Introduction
Modern apps need to work well on screens of all sizes. On this page, you'll learn how to create layouts that adapt to different screen widths. This app shows a sidebar on large screens and a navigation-based UI on small screens. Specifically, this app handles two screen sizes:
现代软件必须能够工作在任意尺寸的屏幕中。在本节,你将学习到如何创建可以适应不同屏幕宽度的布局。程序会在大屏下使用侧边栏,而在小屏下使用基于导航栈的UI。特别地,程序能够处理下面两种屏幕尺寸:
- Large screens (tablets, desktop): Shows contact groups and contact details side-by-side.
- 大屏(表格、桌面):分栏显示通讯组和通讯人详情
- Small screens (phones): Uses navigation to move between contact groups and details.
- 小屏(手机) :使用导航组件在通讯组和通讯人详情之间切换
创建通讯组页面 Create the contact group page
First, create the basic structure of the
ContactGroupsPagewidget for your contact groups screen. Createlib/screens/contact_groups.dartand add the following basic structure:
在lib/screen (页面目录)下创建contact_groups.dart,定义通讯组页面需要的ContactGroupsPage等组件
import 'package:flutter/cupertino.dart';

class ContactGroupsPage extends StatelessWidget {
  const ContactGroupsPage({super.key});

  @override
  Widget build(BuildContext context) {
    return const CupertinoPageScaffold(
      backgroundColor: CupertinoColors.extraLightBackgroundGray,
      child: Center(child: Text('Contact Groups will go here')),
    );
  }
}
创建通讯录页面 Create the contacts page
Similarly, create
lib/screens/contacts.dartto eventually display individual contacts:
相似地,在同目录下创建contacts.dart,构建单个通讯人页面:
import 'package:flutter/cupertino.dart';

class ContactListsPage extends StatelessWidget {
  const ContactListsPage({super.key, required this.listId});

  final int listId;

  @override
  Widget build(BuildContext context) {
    return const CupertinoPageScaffold(
      backgroundColor: CupertinoColors.extraLightBackgroundGray,
      child: Center(child: Text('Lists of contacts will go here')),
    );
  }
}
The
ContaactsListPagewidget andContactGroupsPagewidget are placeholder pages that are needed to implement the adaptive layout widget, which you'll do next.
目前ContactsListPage和ContactGroupsPage组件都还只是占位符页面,有待实现自适应布局,而这是你接下来要做的
构建自适应布局的基础 Build the adaptive layout foundation
Create
lib/screens/adaptive_layout.dartand start with the following basic structure:
在同目录下新建adaptive_layout.dart,开始搭建基础(自适应布局)结构:
import 'package:flutter/cupertino.dart';

import 'contact_groups.dart';

class AdaptiveLayout extends StatefulWidget {
  const AdaptiveLayout({super.key});

  @override
  State<AdaptiveLayout> createState() => _AdaptiveLayoutState();
}

class _AdaptiveLayoutState extends State<AdaptiveLayout> {
  @override
  Widget build(BuildContext context) {
    return const ContactGroupsPage(); // Temporary placeholder
  }
}
This is a
StatefulWidgetbecause the adaptive layout eventually manages which contact group is currently selected.
AdaptiveLayout是StatefulWidget的原因是这个子类后面要知道当前选中的通讯组是哪个
Next, add the screen size detection logic to
lib/screens/adaptive_layout.dart:
接下来添加屏幕大小检测逻辑:
import 'package:flutter/cupertino.dart';

import 'contact_groups.dart';

const largeScreenMinWidth = 600;

class AdaptiveLayout extends StatefulWidget {
  const AdaptiveLayout({super.key});

  @override
  State<AdaptiveLayout> createState() => _AdaptiveLayoutState();
}

class _AdaptiveLayoutState extends State<AdaptiveLayout> {
  @override
  Widget build(BuildContext context) {
    return LayoutBuilder(
      builder: (context, constraints) {
        final isLargeScreen = constraints.maxWidth > largeScreenMinWidth;

        if (isLargeScreen) {
          return const Text('Large screen layout'); // Temporary
        } else {
          return const ContactGroupsPage();
        }
      },
    );
  }
}
The
LayoutBuilderwidget provides information about the parent's size constraints. In thebuildercallback, you receive aBoxConstraintsobject that tells you the maximum available width and height.
LayoutBuilder组件提供父组件尺寸约束相关的信息。其builder回调函数会传入一个BoxConstraints对象,告诉你可用的最大组件高宽
By checking if
constraints.maxWidth > largeScreenMinWidth, you can decide which layout to show. The 600-pixel threshold is a common breakpoint that separates phone-sized screens from tablet-sized screens.
通过检查constraints.maxWidth > largeScreenMinWidth,你可以判断要显示哪种布局。600像素宽度常用于区分手机屏幕和桌面端屏幕
更新主函数 Update the main app
Update
main.dartto use the adaptive layout, so you can see your changes:
在main.dart中使用自适应布局,这样你能看到代码变动效果:
import 'package:flutter/cupertino.dart';

import 'data/contact_group.dart';
import 'screens/adaptive_layout.dart';

final contactGroupsModel = ContactGroupsModel();

void main() {
  runApp(const RolodexApp());
}

class RolodexApp extends StatelessWidget {
  const RolodexApp({super.key});

  @override
  Widget build(BuildContext context) {
    return const CupertinoApp(
      title: 'Rolodex',
      theme: CupertinoThemeData(
        barBackgroundColor: CupertinoDynamicColor.withBrightness(
          color: Color(0xFFF9F9F9),
          darkColor: Color(0xFF1D1D1D),
        ),
      ),
      home: AdaptiveLayout(),
    );
  }
}
添加列表选择功能 Add list selection functionality
The large screen layout needs to track which contact group is selected. Update the state object in
lib/screens/adaptive_layout.dartwith the following code:
大屏幕布局需要追踪选中的通讯组。请在adaptive_layout.dart中添加如下代码:
import 'package:flutter/cupertino.dart';

import 'contact_groups.dart';

const largeScreenMinWidth = 600;

class AdaptiveLayout extends StatefulWidget {
  const AdaptiveLayout({super.key});

  @override
  State<AdaptiveLayout> createState() => _AdaptiveLayoutState();
}

class _AdaptiveLayoutState extends State<AdaptiveLayout> {
  int selectedListId = 0;

  void _onContactListSelected(int listId) {
    setState(() {
      selectedListId = listId;
    });
  }

  @override
  Widget build(BuildContext context) {
    return LayoutBuilder(
      builder: (context, constraints) {
        final isLargeScreen = constraints.maxWidth > largeScreenMinWidth;

        if (isLargeScreen) {
          return const Text('Large screen layout');
        } else {
          return const ContactGroupsPage();
        }
      },
    );
  }
}
注
Dart是有类型推导的语言,声明selectedListId时可以不写类型,而是直接写var <VARIABLE_NAME>
The
selectedListIdvariable tracks the currently selected contact group, and_onContactListSelectedupdates this value when the user makes a choice.
selectedListId用于追踪当前选中的通讯组ID,而_onContactListSelected会在用户做出选择时更新变量的值
构建大屏UI布局 Build the large screen layout
Now, implement the side-by-side layout for large screens in
lib/screens/adaptive_layout.dart. First, replace the temporary text with a widget that contains the proper layout.
现在在adaptive_layout.dart中实现分栏布局。首先替换之前的占位符为包含合适布局的组件
import 'package:flutter/cupertino.dart';

import 'contact_groups.dart';

const largeScreenMinWidth = 600;

class AdaptiveLayout extends StatefulWidget {
  const AdaptiveLayout({super.key});

  @override
  State<AdaptiveLayout> createState() => _AdaptiveLayoutState();
}

class _AdaptiveLayoutState extends State<AdaptiveLayout> {
  int selectedListId = 0;

  void _onContactListSelected(int listId) {
    setState(() {
      selectedListId = listId;
    });
  }

  @override
  Widget build(BuildContext context) {
    return LayoutBuilder(
      builder: (context, constraints) {
        final isLargeScreen = constraints.maxWidth > largeScreenMinWidth;

        if (isLargeScreen) {
          return _buildLargeScreenLayout();
        } else {
          // For small screens, use the original, navigation-style approach.
          return const ContactGroupsPage();
        }
      },
    );
  }

  Widget _buildLargeScreenLayout() {
    return const CupertinoPageScaffold(
      backgroundColor: CupertinoColors.extraLightBackgroundGray,
      child: SafeArea(child: Row(children: [Text('Sidebar'), Text('Details')])),
    );
  }
}
The large screen layout uses a
Rowto place the sidebar and details side-by-side.SafeAreaensures that the content doesn't overlap with system UI elements like the status bar.
大屏布局使用Row分栏放置侧边栏和通讯人详情。SafeArea确保组件不会和系统UI(如状态栏)重合
注
这里看不到Sidebar和Details文本的话,可以改一下backgroudColor;这俩文本默认是白色的,会和背景混在一起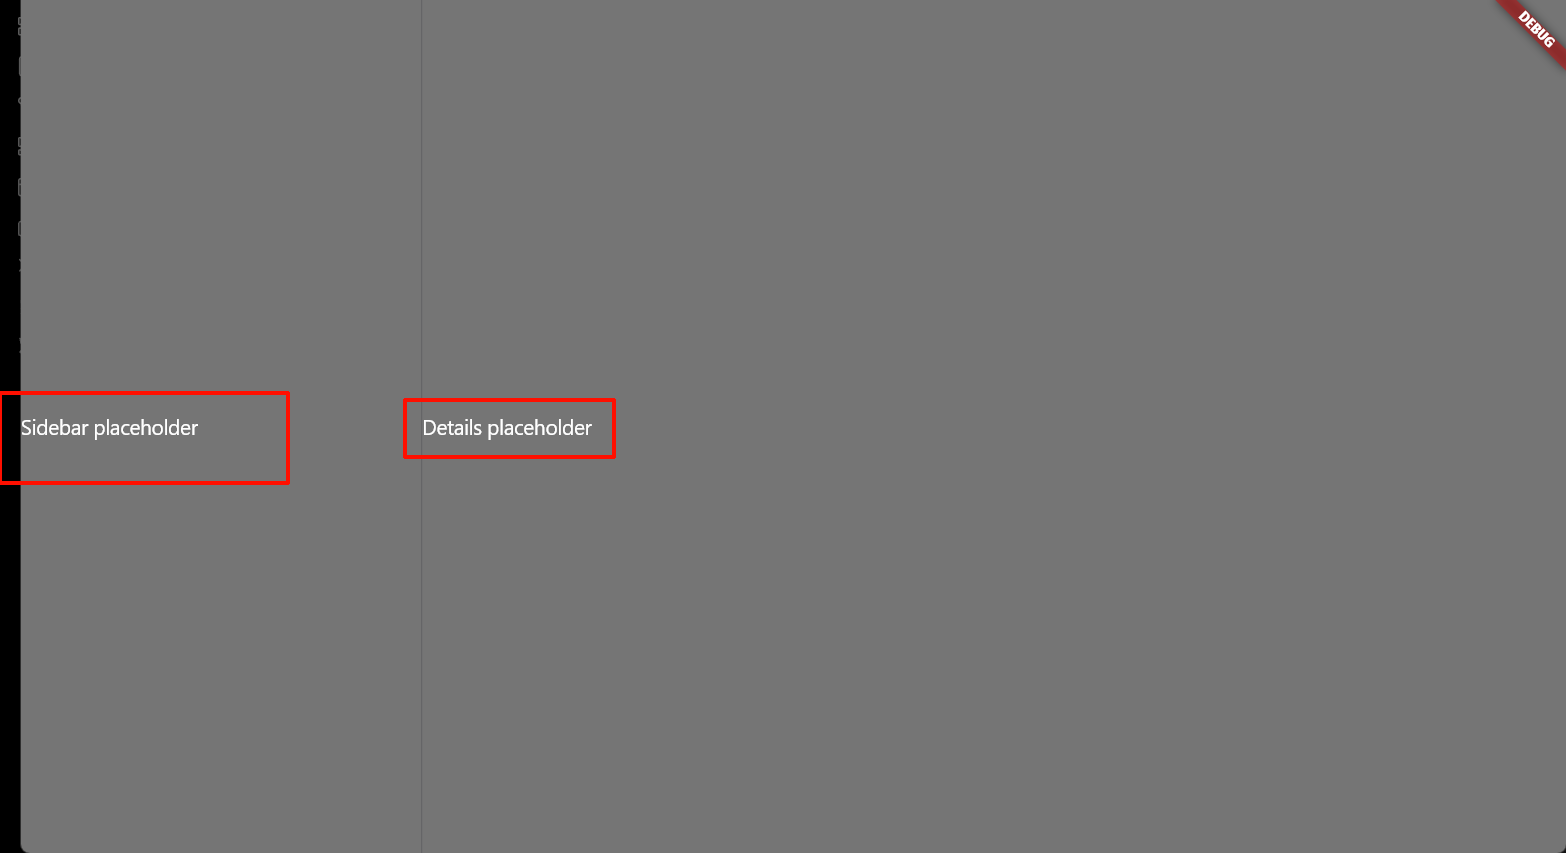
Now, set the sizes of the two panels and add a visual divider in
lib/screens/adaptive_layout.dart:
现在加上分栏大小和一个可见分隔符:
Widget _buildLargeScreenLayout() {
  return CupertinoPageScaffold(
    backgroundColor: CupertinoColors.extraLightBackgroundGray,
    child: SafeArea(
      child: Row(
        children: [
          const SizedBox(width: 320, child: Text('Sidebar placeholder')),
          Container(width: 1, color: CupertinoColors.separator),
          const Expanded(child: Text('Details placeholder')),
        ],
      ),
    ),
  );
}
This layout creates the following:
- A fixed-width sidebar (320 pixels) for contact groups.
- A 1-pixel divider between the panels.
- A details panel that uses an
Expandedwidget to take the remaining space.
自我测验 Test yourself
LayoutBuilder会通过它的回调构造函数传递什么信息
What information does LayoutBuilder provide to its builder callback?
The parent's size constraints, including maximum width and height.LayoutBuilder's builder receives BoxConstraints that tell you the available space from the parent.
在大屏布局中,哪个组件可用于创建列式布局
In a large screen layout, which widget can be used to place a sidebar and details panel side-by-side?
RowRow arranges its children horizontally, making it ideal for placing a sidebar and details panel side-by-side.
注意
Row不是行式布局,是列式布局
高级滚动条 Advanced scrolling and silvers
Silvers与组件 Silvers and widgets
Slivers are scrollable areas that can be composed together in a
CustomScrollViewor other scroll views. Think of slivers as building blocks that each contribute a portion of the overall scrollable content.
Slivers 是可滚动的区域,可以组合在 CustomScrollView 或其他滚动视图中。(你可以)将 slivers 视为构建块,每个构建块都为整体可滚动内容贡献一部分
重要
是S l i v e r,不是S i l v e r
slivers 是英语单词 sliver 的复数形式。在日常及专业语境中,主要作名词或动词使用。具体释义如下:
1. 作名词 (n.)
- 裂片 / 薄片:指从某物上切下或断裂下来的细长、薄的碎片(例如:a sliver of glass 玻璃碎片)。
- 少许 / 极小的一部分:指微小的一点点(例如:a sliver of hope 一丝希望)。
- 【纺织】梳条 / 棉条:指纺织纤维在梳理后形成的一股无捻的、连续的松散长条。
2. 作动词 (v.)
- 切成薄片 / 剖开:指将物体切成细长条或剥落成薄片。
- 【纺织】使成为条子:在纺织工艺中处理纤维。
注
暂译为视窗动态切片
While slivers and widgets are both fundamental Flutter concepts, they serve different purposes and aren't interchangeable.
虽然 slivers 和组件都是 Flutter 的基本概念,但它们服务于不同的目的,不能互相替换
- Widgets are general UI building blocks that can be used anywhere in your widget tree.
组件是通用的 UI 构建块,可以在组件树中的任何地方使用 - Slivers are specialized widgets designed specifically for scrollable layouts and have some constraints:
Slivers 是专门为可滚动布局设计的特殊组件,并有一些限制:- Slivers can only be direct children of scroll views, such as
CustomScrollViewandNestedScrollView.- Slivers 只能是滚动视图,如
CustomScrollView和NestedScrollView的直系子类
- Slivers 只能是滚动视图,如
- Some scroll views only accept slivers as children. You can't pass regular widgets to
CustomScrollView.slivers.- 某些滚动视图只接受 slivers 作为子元素(之一)。你不能将常规组件传递给
CustomScrollView.slivers
- 某些滚动视图只接受 slivers 作为子元素(之一)。你不能将常规组件传递给
- To use regular widgets within a sliver context, wrap them in
SliverToBoxAdapterorSliverFillRemaining.- 要在 sliver 上下文中使用常规组件,请将它们包裹在
SliverToBoxAdapter或SliverFillRemaining中
- 要在 sliver 上下文中使用常规组件,请将它们包裹在
- Slivers can only be direct children of scroll views, such as
This architectural separation allows Flutter to optimize scrolling performance while it maintains clear boundaries between different types of UI components.
这种架构分离允许 Flutter在维持不同类型 UI 组件之间的清晰边界的前提下优化滚动性能
为通讯组添加基本的滚动结构 Add a basic silver structure to contact groups
First, replace the placeholder content in your contact groups page. To avoid duplicating code between the phone layout and the tablet sidebar, you can create a private, reusable widget.
首先,替换您的联系人组页面中的占位符内容。 为了避免在手机布局和平板侧边栏之间重复代码, 您可以创建一个私有的、可重用的组件
Update
lib/screens/contact_groups.dartby adding_ContactGroupsViewto the bottom of the file.
更新 lib/screens/contact_groups.dart ,在文件底部添加 _ContactGroupsView:
import 'package:flutter/cupertino.dart';

import '../data/contact_group.dart';
import '../main.dart';

class ContactGroupsPage extends StatelessWidget {
  const ContactGroupsPage({super.key});

  @override
  Widget build(BuildContext context) {
    return _ContactGroupsView(
      selectedListId: 0,
      onListSelected: (list) {
        debugPrint(list.toString());
      },
    );
  }
}

// ···
class _ContactGroupsView extends StatelessWidget {
  const _ContactGroupsView({required this.onListSelected, this.selectedListId});

  final int? selectedListId;
  final void Function(ContactGroup) onListSelected;

  @override
  Widget build(BuildContext context) {
    return CupertinoPageScaffold(
      backgroundColor: CupertinoColors.extraLightBackgroundGray,
      child: CustomScrollView(
        slivers: [
          const CupertinoSliverNavigationBar(largeTitle: Text('Lists')),
          SliverFillRemaining(
            child: ValueListenableBuilder<List<ContactGroup>>(
              valueListenable: contactGroupsModel.listsNotifier,
              builder: (context, contactLists, child) {
                return CupertinoListSection.insetGrouped(
                  header: const Text('iPhone'),
                  children: [
                    for (final ContactGroup contactList in contactLists)
                      CupertinoListTile(
                        title: Text(contactList.label),
                        onTap: () => onListSelected(contactList),
                      ),
                  ],
                );
              },
            ),
          ),
        ],
      ),
    );
  }
}
This private widget contains the shared UI for displaying the list of contact groups. On small screens, it will be used as a page, and on large screens it will be used to fill the left column.
这个私有组件包含用于 显示联系人组列表的共享 UI。 在小屏布局上,它将用作通讯录页面;而在大大屏布局上,它将用于填充左侧列
This widget introduces several slivers:
此小部件引入了几个 slivers:
CupertinoSliverNavigationBar: An opinionated navigation bar that collapses as the page scrolls.CupertinoSliverNavigationBar:一个主观的导航栏,随着页面滚动而折叠。SliverList: A scrollable list of items.SliverList:一个可滚动的列表。SliverFillRemaining: A sliver that takes up the remaining space in the scroll area, and whose child is a non-sliver widget.SliverFillRemaining: 一个占据滚动区域剩余空间的 sliver,其子组件是一个非 sliver 组件。
It accepts a callback function,
onListSelected, to handle taps, which makes it adaptable for both navigation and sidebar selection.
它接受一个回调函数 onListSelected 来处理点击事件,这使得它既适用于导航,也适用于侧边栏选择
Now, update
ContactGroupsPageinlib/screens/contact_groups.dartto use your new_ContactGroupsViewwidget:
现在,在 lib/screens/contact_groups.dart 中更新 ContactGroupsPage 以使用您 _ContactGroupsView 组件:
class ContactGroupsPage extends StatelessWidget {
  const ContactGroupsPage({super.key});

  @override
  Widget build(BuildContext context) {
    return _ContactGroupsView(
      selectedListId: 0,
      onListSelected: (list) {
        debugPrint(list.toString());
      },
    );
  }
}
This structure keeps the
ContactGroupsPageclean and focused on its primary responsibility: navigation, which you'll learn about in the next section of this tutorial.
这种结构使 ContactGroupsPage 保持简洁,专注于其主要职责:导航。您将在本教程的下一节中学习到
使用图标和视觉元素增强列表(的视觉效果) Enhancing the list with icons and visual elements
Now, add icons and contact counts to make the list more informative. Add this
_buildTrailinghelper method to your_ContactGroupsViewclass inlib/screens/contact_groups.dart:
现在,添加图标和联系人数量使列表(视觉)信息更加丰富。将这个 _buildTrailing 辅助方法添加到 lib/screens/contact_groups.dart 中的_ContactGroupsView 类:
Widget _buildTrailing(List<Contact> contacts, BuildContext context) {
  final TextStyle style = CupertinoTheme.of(
    context,
  ).textTheme.textStyle.copyWith(color: CupertinoColors.systemGrey);

  return Row(
    mainAxisSize: MainAxisSize.min,
    children: [
      Text(contacts.length.toString(), style: style),
      const Icon(
        CupertinoIcons.forward,
        color: CupertinoColors.systemGrey3,
        size: 18,
      ),
    ],
  );
}
This helper creates the trailing content for each list item. It shows the contact count and a forward arrow.
此辅助工具为每个列表项创建尾部内容。它显示联系人数量和向前的箭头。
Now, update the
CupertinoListSectionin_ContactGroupsViewto use icons and the trailing helper. Update the code within theValueListenableBuilder.buildercallback in thebuildmethod:
现在,更新 CupertinoListSection 中的 _ContactGroupsView 以使用图标和尾部辅助工具。更新 ValueListenableBuilder.builder 回调中 build 方法内的代码:
child: ValueListenableBuilder<List<ContactGroup>>(
  valueListenable: contactGroupsModel.listsNotifier,
  builder: (context, contactLists, child) {
    const groupIcon = Icon(
      CupertinoIcons.group,
      weight: 900,
      size: 32,
    );

    const pairIcon = Icon(
      CupertinoIcons.person_2,
      weight: 900,
      size: 24,
    );

    return CupertinoListSection.insetGrouped(
      header: const Text('iPhone'),
      children: [
        for (final ContactGroup contactList in contactLists)
          CupertinoListTile(
            leading: contactList.id == 0 ? groupIcon : pairIcon,
            title: Text(contactList.label),
            trailing: _buildTrailing(contactList.contacts, context),
            onTap: () => onListSelected(contactList),
          ),
      ],
    );
  },
),
The updated code now shows icons that differentiate between the main "All iPhone" group and user-created groups, along with contact counts and navigation indicators.
更新后的代码现在显示图标,以区分主要的"All iPhone"组和用户创建的组,以及联系人数量和导航指示器
为通讯录创建高级滚动区域 Create advanced scrolling for contacts
Next, you'll implement the contacts list page.
接下来,您将实现联系人列表页面。
In the next lesson, you'll implement navigation for small screens. To see your progress on the contacts list page in the meantime, first update
lib/screens/adaptive_layout.dartto display the contacts list page:
在下一节中,你将实现小屏幕的导航。在此期间,要检查联系人列表页面的(构建)进度,请先更新 lib/screens/adaptive_layout.dart 以显示联系人列表页面:
import 'package:flutter/cupertino.dart';

import 'contacts.dart';

const largeScreenMinWidth = 600;

class AdaptiveLayout extends StatefulWidget {
  const AdaptiveLayout({super.key});

  @override
  State<AdaptiveLayout> createState() => _AdaptiveLayoutState();
}

class _AdaptiveLayoutState extends State<AdaptiveLayout> {
  int selectedListId = 0;

  void _onContactListSelected(int listId) {
    setState(() {
      selectedListId = listId;
    });
  }

  @override
  Widget build(BuildContext context) {
    return LayoutBuilder(
      builder: (context, constraints) {
        final isLargeScreen = constraints.maxWidth > largeScreenMinWidth;

        if (isLargeScreen) {
          return _buildLargeScreenLayout();
        } else {
          return const ContactListsPage(listId: 0); // New, temporary
        }
      },
    );
  }

  Widget _buildLargeScreenLayout() {
    return CupertinoPageScaffold(
      backgroundColor: CupertinoColors.extraLightBackgroundGray,
      child: SafeArea(
        child: Row(
          children: [
            const SizedBox(width: 320, child: Text('Sidebar placeholder')),
            Container(width: 1, color: CupertinoColors.separator),
            const Expanded(child: Text('Details placeholder')),
          ],
        ),
      ),
    );
  }
}
Update
lib/screens/contacts.dartby adding_ContactListViewto the bottom of the file:
更新lib/screens/contacts.dart中的_ContactListView:
class _ContactListView extends StatelessWidget {
  const _ContactListView({
    required this.listId,
    this.automaticallyImplyLeading = true,
  });

  final int listId;
  final bool automaticallyImplyLeading;

  @override
  Widget build(BuildContext context) {
    return CupertinoPageScaffold(
      child: ValueListenableBuilder<List<ContactGroup>>(
        valueListenable: contactGroupsModel.listsNotifier,
        builder: (context, contactGroups, child) {
          final contactList = contactGroupsModel.findContactList(listId);

          return CustomScrollView(
            slivers: [
              CupertinoSliverNavigationBar(
                largeTitle: Text(contactList.title),
                automaticallyImplyLeading: automaticallyImplyLeading,
              ),
              SliverFillRemaining(
                child: Center(
                  child: Text(
                    '${contactList.contacts.length} contacts in ${contactList.label}',
                  ),
                ),
              ),
            ],
          );
        },
      ),
    );
  }
}
Now, update
ContactListsPageto use this view:
现在,更新 ContactListsPage 以使用此视图:
class ContactListsPage extends StatelessWidget {
  const ContactListsPage({super.key, required this.listId});

  final int listId;

  @override
  Widget build(BuildContext context) {
    return _ContactListView(listId: listId);
  }
}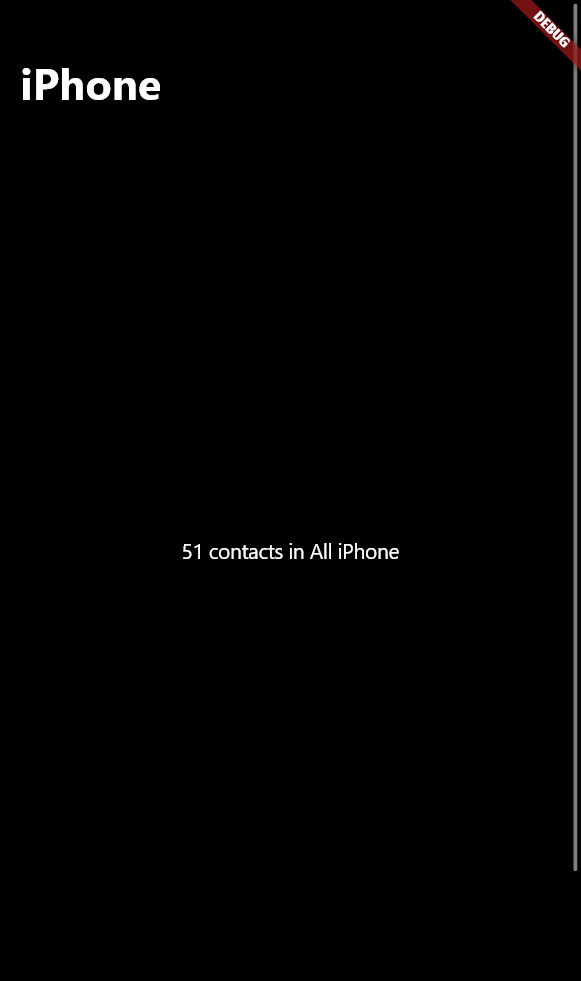
This basic implementation demonstrates how to use slivers with dynamic data in a reusable component.
这个基本实现展示了如何使用 slivers 与动态 在可重用组件中包含数据
添加Slivers的搜索集成 Add searcg integration with slivers
Now, enhance the contacts page with integrated search functionality UI. Update the
CustomScrollViewin_ContactListViewto use theCupertinoSliverNavigationBar.searchconstructor instead of the defaultCupertinoSliverNavigationBarconstructor:
现在,为联系人页面添加集成的搜索功能 UI。将 CustomScrollView 中的 _ContactListView 更新为使用 CupertinoSliverNavigationBar.search 构造函数,而不是默认的 CupertinoSliverNavigationBar 构造函数:
class _ContactListView extends StatelessWidget {
  // ···
  @override
  Widget build(BuildContext context) {
    return CupertinoPageScaffold(
      child: ValueListenableBuilder<List<ContactGroup>>(
        valueListenable: contactGroupsModel.listsNotifier,
        builder: (context, contactGroups, child) {
          final contactList = contactGroupsModel.findContactList(listId);

          return CustomScrollView(
            slivers: [
              // Now using a search bar:
              CupertinoSliverNavigationBar.search(
                largeTitle: Text(contactList.title),
                searchField: const CupertinoSearchTextField(
                  suffixIcon: Icon(CupertinoIcons.mic_fill),
                  suffixMode: OverlayVisibilityMode.always,
                ),
              ),
              SliverFillRemaining(
                child: Center(
                  child: Text(
                    '${contactList.contacts.length} contacts in ${contactList.label}',
                  ),
                ),
              ),
            ],
          );
        },
      ),
    );
  }
}
The
CupertinoSliverNavigationBar.searchconstructor provides integrated search functionality. As you scroll down, the search field smoothly transitions into the collapsed navigation bar.
CupertinoSliverNavigationBar.search 构造函数提供集成搜索功能。当你向下滚动时,搜索字段会平滑过渡到折叠的导航栏。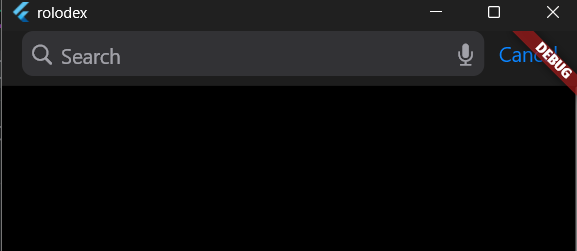
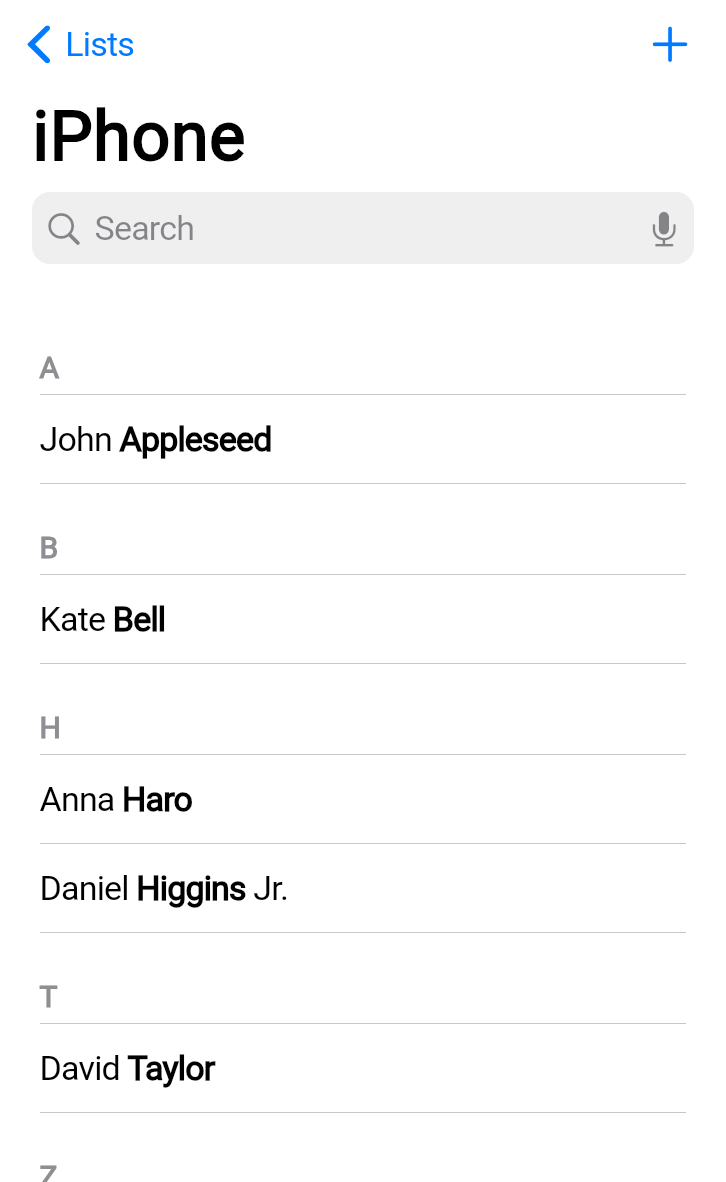
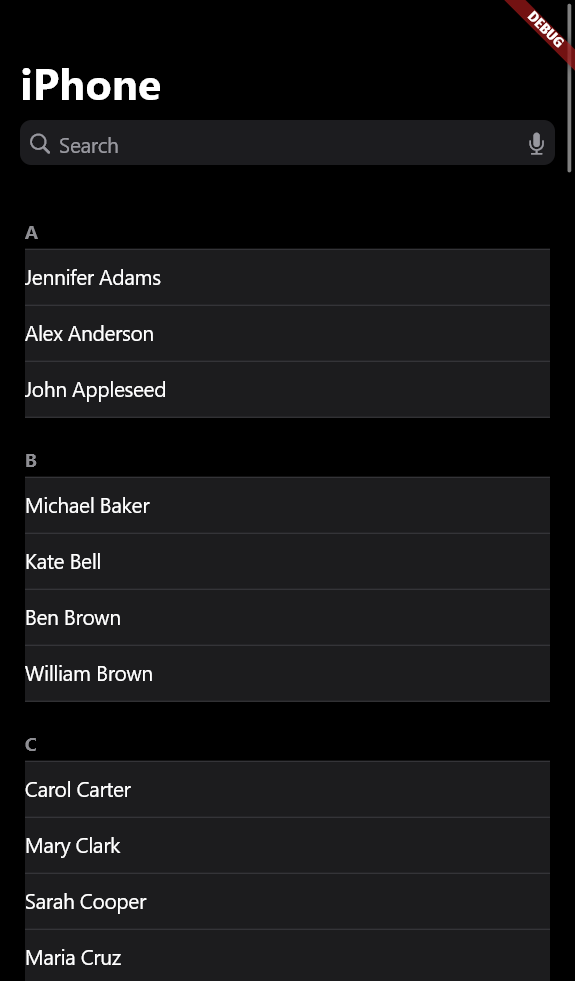
创建按字母排序的通讯录页面 Create alphabetized contact sections
Real-world contact apps organize contacts alphabetically. To do this, create sections for each letter. Add the following widget to the bottom of your
contacts.dartfile. This widget doesn't contain any slivers.
现实中的联系人应用按字母顺序组织联系人。为此,请为每个字母(开头的通讯人)创建一个分区。将以下组件添加到您的 contacts.dart 文件的底部。这个小部件不包含任何视窗切片
class ContactListSection extends StatelessWidget {
  const ContactListSection({
    super.key,
    required this.lastInitial,
    required this.contacts,
  });

  final String lastInitial;
  final List<Contact> contacts;

  @override
  Widget build(BuildContext context) {
    return Padding(
      padding: const EdgeInsetsDirectional.fromSTEB(20, 0, 20, 0),
      child: Column(
        children: [
          const SizedBox(height: 15),
          Align(
            alignment: AlignmentDirectional.bottomStart,
            child: Text(
              lastInitial,
              style: const TextStyle(
                color: CupertinoColors.systemGrey,
                fontSize: 15,
                fontWeight: FontWeight.w700,
              ),
            ),
          ),
          CupertinoListSection(
            backgroundColor: CupertinoColors.systemBackground,
            dividerMargin: 0,
            additionalDividerMargin: 0,
            topMargin: 4,
            children: [
              for (final Contact contact in contacts)
                CupertinoListTile(
                  padding: const EdgeInsets.all(0),
                  title: Text('${contact.firstName} ${contact.lastName}'),
                ),
            ],
          ),
        ],
      ),
    );
  }
}
This widget creates the familiar alphabetized sections that you see in the iOS Contacts app.
这个组件创建了您在 iOS 联系人应用中熟悉的按字母排序的部分。 您在 iOS 联系人应用中看到的内容。
使用SliverList实现字母序组件 Use SliverList for the alphabetized sections
Now, replace the placeholder content in
_ContactListViewwith the alphabetized sections:
现在,用按字母顺序排列的部分替换 _ContactListView 中的占位符内容:
class _ContactListView extends StatelessWidget {
  // ···
  @override
  Widget build(BuildContext context) {
    return CupertinoPageScaffold(
      child: ValueListenableBuilder<List<ContactGroup>>(
        valueListenable: contactGroupsModel.listsNotifier,
        builder: (context, contactGroups, child) {
          final contactList = contactGroupsModel.findContactList(listId);

          final contacts = contactList.alphabetizedContacts;

          return CustomScrollView(
            slivers: [
              CupertinoSliverNavigationBar.search(
                largeTitle: Text(contactList.title),
                automaticallyImplyLeading: automaticallyImplyLeading,
                searchField: const CupertinoSearchTextField(
                  suffixIcon: Icon(CupertinoIcons.mic_fill),
                  suffixMode: OverlayVisibilityMode.always,
                ),
              ),
              SliverList.list(
                children: [
                  const SizedBox(height: 20),
                  ...contacts.keys.map(
                    (initial) => ContactListSection(
                      lastInitial: initial,
                      contacts: contacts[initial]!,
                    ),
                  ),
                ],
              ),
            ],
          );
        },
      ),
    );
  }
}
SliverList.listallows you to provide a list of widgets that become part of the scrollable content. This is the simplest way to add a list of normal widgets to a scrollable sliver area.
SliverList.list 允许你提供一组小部件,这些小部件将成为滚动内容的一部分。这是将一组普通小部件添加到可滚动 sliver 区域的最简单方法
In the next lesson, you'll learn about stack-based navigation and update the UI on small screens to navigate between the contacts list view and the contacts view.
在下一节中,你将学习基于栈的导航和 更新小屏幕上的 UI 以在导航联系人列表视图和联系人视图之间切换
自我测验 Test yourself
动态视图切片与常规组件的关键区别是什么
What is the key difference between slivers and regular widgets?
Slivers are specialized widgets designed for scrollable layouts and can only be direct children of scroll views.Slivers work within scroll views like CustomScrollView; regular widgets can be used anywhere.
如何在CustomScrollView的视图切片里使用常规组件
How do you use a regular widget inside a CustomScrollView's slivers list?
Wrap it in a SliverToBoxAdapter or SliverFillRemaining.These adapters convert regular widgets into slivers so they can be used in sliver contexts.
这些适配器将常规组件转换为 sliver,以便它们可以在 sliver 上下文中使用。
栈导航 Stack-based navigation
引言 Introduction
Now that you understand slivers and scrolling, you can implement navigation between screens. In this lesson, you'll update the small-screen view such that when a contact group is tapped, it navigates to the contact list for that group.
现在你已经了解了 slivers 和滚动,你可以实现屏幕之间的导航。在本课中,你将更新小屏幕视图,以便当点击一个联系人组时,它会导航到该组的联系人列表。
First, revert changes in the adaptive layout widget so that it displays the
ContactGroupsPageby default on small screens.
首先,将自适应布局组件的更改还原,以便它在小屏幕上默认显示 ContactGroupsPage
class _AdaptiveLayoutState extends State<AdaptiveLayout> {
  int selectedListId = 0;

  void _onContactListSelected(int listId) {
    setState(() {
      selectedListId = listId;
    });
  }

  @override
  Widget build(BuildContext context) {
    return LayoutBuilder(
      builder: (context, constraints) {
        final isLargeScreen = constraints.maxWidth > largeScreenMinWidth;

        if (isLargeScreen) {
          return _buildLargeScreenLayout();
        } else {
          return const ContactGroupsPage(); // Reverted
        }
      },
    );
  }
  // ···
}
为通讯录组添加导航组件 Add navigation to contact groups
The
ContactGroupsPagealready uses a_ContactGroupsViewand provides it with a callback. That callback needs to be updated to navigate when a group is tapped, rather than printing the group to the console.
ContactGroupsPage已经在使用_ContactGroupsView,并向其提供回调函数。这个回调函数需要更新,以便在点击通讯录组时进行导航,而不是将它打印到控制台
Ensure that the
onListSelectedcallback and imports inlib/screens/contact_groups.dartare implemented as follows:
确保 onListSelected 回调和 lib/screens/contact_groups.dart 中的导入按如下方式实现:
// lib/screens/contact_groups.dart
import 'contacts.dart';

class ContactGroupsPage extends StatelessWidget {
  const ContactGroupsPage({super.key});

  @override
  Widget build(BuildContext context) {
    return _ContactGroupsView(
      onListSelected: (list) => Navigator.of(context).push(
        CupertinoPageRoute<void>(
          title: list.title,
          builder: (context) => ContactListsPage(listId: list.id),
        ),
      ),
    );
  }
}
This small code block contains the most important new information on this page.
这段代码包含了本页最重要的新信息
Navigator.of(context)retrieves the nearestNavigatorwidget from the widget tree. Thepushmethod adds a new route to the navigator's stack, and displays the widget returned from thebuilderproperty.
Navigator.of(context) 从组件树中检索最近的 Navigator 组件。 push 方法向导航器的堆栈中添加新路由,并显示从 builder 属性返回的组件
This is the most basic implementation of using stack-based navigation, where new screens are pushed on top of the current screen. To navigate back to the previous screen, you'd use the
Navigator.popmethod.
这是使用基于堆栈的导航的最基本实现,其中新屏幕被推到当前屏幕的顶部。要返回到前一个屏幕,您会使用 Navigator.pop 方法
CupertinoPageRoutecreates iOS-style page transitions with the following features:
CupertinoPageRoute 会创建具有以下特征的 iOS 风格页面过渡:
- A slide-in animation from the right.
从右侧滑入的动画。 - Automatic back button support.
自动返回按钮支持。 - Proper title handling. 正确的标题处理。
- Swipe-to-go-back gesture support.
滑动返回手势支持。
为大屏布局创建侧边栏组件 Create the sidebar component for large screens
For large screens, you need a sidebar that doesn't navigate but instead updates the main content area. Thanks to the refactoring in the previous step, creating this component is more straightforward. Add this widget to the bottom of
lib/screens/contact_groups.dart:
对于大屏幕,您需要一个不会导航而是更新主内容区域的侧边栏。得益于上一步的重构,创建这个组件更加直接。将这个组件添加到 lib/screens/contact_groups.dart 的底部:
/// A sidebar component for selecting contact groups on large screens.
class ContactGroupsSidebar extends StatelessWidget {
  const ContactGroupsSidebar({
    super.key,
    required this.selectedListId,
    required this.onListSelected,
  });

  final int selectedListId;
  final void Function(int) onListSelected;

  @override
  Widget build(BuildContext context) {
    return _ContactGroupsView(
      selectedListId: selectedListId,
      onListSelected: (list) => onListSelected(list.id),
    );
  }
}
This sidebar component reuses the
_ContactGroupsViewand provides a different callback. Instead of navigating, it callsonListSelectedwith the ID of the tapped list. It also passes theselectedListIdto_ContactGroupsViewso that the selected item can be highlighted.
这个侧边栏组件重用了 _ContactGroupsView 并提供了一个不同的回调。它不会导航,而是调用 onListSelected 并传入被点击列表的 ID。它还将 selectedListId 传递给 _ContactGroupsView ,以便突出显示选中的项目。
为大屏布局创建通讯录详情视图 Create the detail view for large screens
For the large screen layout, you need a detail view that doesn't show navigation controls. Just like the sidebar, this can be recreated by reusing the
_ContactListView. Add this widget to the bottom of yourcontacts.dartfile:
对于大屏幕布局,您需要一个不显示导航控制的详细视图。就像侧边栏一样,这可以通过重用 _ContactListView 来重新创建。将此小部件添加到您的 contacts.dart 文件的底部:
class ContactListDetail extends StatelessWidget {
  const ContactListDetail({super.key, required this.listId});

  final int listId;

  @override
  Widget build(BuildContext context) {
    return _ContactListView(listId: listId, automaticallyImplyLeading: false);
  }
}
The detail view reuses
_ContactListViewand sets theautomaticallyImplyLeadingparameter tofalseto hide the back button, as navigation is handled by the sidebar.
详情视图重用了 _ContactListView ,并将 automaticallyImplyLeading 参数设置为 false 以隐藏返回按钮,因为导航由侧边栏处理。
让侧边栏上线 Connect the sidebar to the adaptive layout
Now, connect the sidebar to your adaptive layout. Update your
adaptive_layout.dartfile to import the necessary files and update the large screen layout:
现在,将侧边栏连接到您的自适应布局。更新您的 adaptive_layout.dart 文件以导入必要的文件并更新大屏幕布局:
import 'package:flutter/cupertino.dart';

import 'contact_groups.dart';
import 'contacts.dart';
// 或者
// import 'package:rolodex/screens/contacts.dart';
// import 'package:rolodex/screens/contact_groups.dart';
Then update the
_buildLargeScreenLayoutmethod:
然后更新 _buildLargeScreenLayout 方法:
Widget _buildLargeScreenLayout() {
  return CupertinoPageScaffold(
    backgroundColor: CupertinoColors.extraLightBackgroundGray,
    child: SafeArea(
      child: Row(
        children: [
          SizedBox(
            width: 320,
            child: ContactGroupsSidebar(
              selectedListId: selectedListId,
              onListSelected: _onContactListSelected,
            ),
          ),
          Container(width: 1, color: CupertinoColors.separator),
          Expanded(child: ContactListDetail(listId: selectedListId)),
        ],
      ),
    ),
  );
}
This code creates the classic menu-detail layout where the sidebar controls the content of the detail area.
这段代码创建了经典的菜单-详情布局,其中侧边栏 控制详情区域的内容
自我测验 Test yourself
Naviagtor.of(context).push的作用是什么
What does
Navigator.of(context).pushdo?
Adds a new route to the navigation stack, displaying it on top of the current screen.Push adds the new route to the stack, allowing users to go back to the previous screen.
Navigator.of(context).pop()的作用是什么
What does
Navigator.of(context).pop()do?
Removes the current route from the navigation stack, returning to the previous screen.Pop removes the top route from the stack, revealing the screen beneath it.