Flutter UI导引 (中):有状态的程序
项目管理
引言
In the next few lessons, you'll learn how to work with data in a Flutter app. You'll build an app that fetches and displays article summaries from the Wikipedia API.
在接下来的数个章节中,你将学习到如何处理Flutter程序中的数据。你会搭建一个爬取并显示维基百科文章总结的程序
These lessons explore:
接下来的章节(将带你)探索
- Making HTTP requests in Flutter.
在Flutter中发起HTTP请求 - Managing application state with
ChangeNotifier.
使用ChangeNotifier管理程序状态 - Using the MVVM architecture pattern.
学习MVVM架构 - Creating responsive user interfaces that update automatically when data changes.
搭建合格的响应式UI
注
MVVM(Model-View-ViewModel)是一种用于构建用户界面的软件架构模式,旨在通过数据绑定实现视图(View)与模型(Model)的解耦。其核心组件包括:处理数据的 Model,展示界面的 View,以及作为桥梁处理逻辑并同步数据的 ViewModel,大幅提高了代码的可维护性与测试性
This tutorial assumes you've completed the Getting started with Dart and the Introduction to Flutter UI tutorials, and therefore doesn't explain concepts like HTTP, JSON, or widget basics.
本教程默认你已经完成Dart新手教程和Flutter UI导引(一),因此不会再介绍HTTP、JSON或基础组件相关的内容
Support Wikipedia
Wikipedia is a valuable resource, providing free access to human knowledge through millions of articles written collaboratively by volunteers worldwide. Consider donating to Wikipedia to help keep this incredible resource free and accessible to everyone.
创建新项目 Create a new Flutter project
Create a new Flutter project using the Flutter CLI. In your preferred terminal, run the following command to create a minimal Flutter app:
使用Flutter CLI创建新的Flutter项目。在你喜欢的终端中,运行下面的指令,创建最小Flutter程序项目
flutter create wikipedia_reader --empty添加必要的依赖 Add required dependencies
你需要使用http库发起HTTP请求。运行下面的指令,把它添加到你的项目中
cd wikipedia_reader && flutter pub add http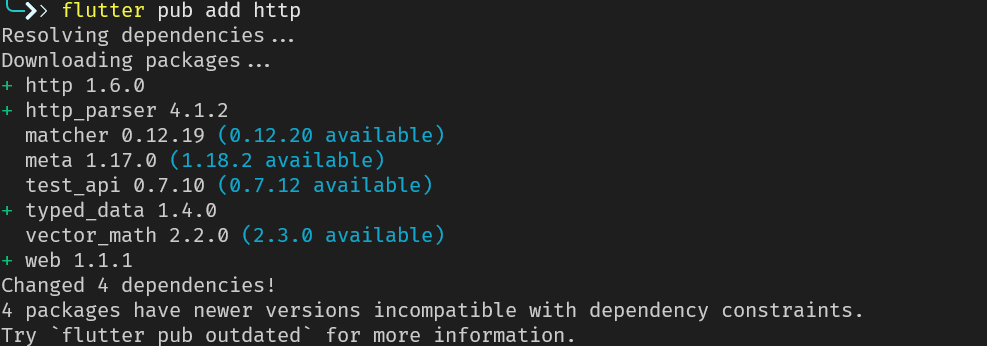
添加初始代码 Examine the starter code
First, create a new file
lib/summary.dartto define the data model for Wikipedia article summaries. This file has no special logic, and is simply a collection of classes that represent the data returned by the Wikipedia API. It's sufficient to copy the code below into the file and then ignore it. If you aren't comfortable with basic Dart classes, you should read the Dart Getting Started tutorial first.
首先创建一个新文件 lib/summary.dart来定义维基百科文章总结的数据模型。文件不包含特定的运行逻辑,只是简单罗列维基百科API映射的数据类型。你可以直接下载下面的文件,放到项目里,然后就不再管它。如果你对Dart类还不熟悉,请先阅读Dart新手教程
// lib/summary.dart
/// Representation of the JSON data returned by the Wikipedia API.
class Summary {
  /// Returns a new [Summary] instance.
  Summary({
    required this.titles,
    required this.pageId,
    required this.extract,
    required this.extractHtml,
    required this.lang,
    required this.dir,
    required this.url,
    this.description,
    this.thumbnail,
    this.originalImage,
  });

  /// The title information of this article.
  final TitlesSet titles;

  /// The page ID of this article.
  final int pageId;

  /// The first few sentences of the article in plain text.
  final String extract;

  /// The first few sentences of the article in HTML format.
  final String extractHtml;

  /// The language code of the article's content, such as "en" for English.
  final String lang;

  /// The text directionality of the article's content, such as "ltr" or "rtl".
  final String dir;

  /// The URL of the page.
  final String url;

  /// A description of the article, if available.
  final String? description;

  /// A thumbnail-sized version of the article's primary image, if available.
  final ImageFile? thumbnail;

  /// The original full-sized article's primary image, if available.
  final ImageFile? originalImage;

  /// Whether this article has an image.
  bool get hasImage => originalImage != null && thumbnail != null;

  /// Returns a new [Summary] instance and imports its values from a JSON map
  static Summary fromJson(Map<String, Object?> json) {
    return switch (json) {
      {
        'titles': final Map<String, Object?> titles,
        'pageid': final int pageId,
        'extract': final String extract,
        'extract_html': final String extractHtml,
        'thumbnail': final Map<String, Object?> thumbnail,
        'originalimage': final Map<String, Object?> originalImage,
        'lang': final String lang,
        'dir': final String dir,
        'description': final String description,
        'content_urls': {
          'desktop': {'page': final String url},
          'mobile': {'page': String _},
        },
      } =>
        Summary(
          titles: TitlesSet.fromJson(titles),
          pageId: pageId,
          extract: extract,
          extractHtml: extractHtml,
          thumbnail: ImageFile.fromJson(thumbnail),
          originalImage: ImageFile.fromJson(originalImage),
          lang: lang,
          dir: dir,
          description: description,
          url: url,
        ),
      {
        'titles': final Map<String, Object?> titles,
        'pageid': final int pageId,
        'extract': final String extract,
        'extract_html': final String extractHtml,
        'lang': final String lang,
        'dir': final String dir,
        'description': final String description,
        'content_urls': {
          'desktop': {'page': final String url},
          'mobile': {'page': String _},
        },
      } =>
        Summary(
          titles: TitlesSet.fromJson(titles),
          pageId: pageId,
          extract: extract,
          extractHtml: extractHtml,
          lang: lang,
          dir: dir,
          description: description,
          url: url,
        ),
      {
        'titles': final Map<String, Object?> titles,
        'pageid': final int pageId,
        'extract': final String extract,
        'extract_html': final String extractHtml,
        'lang': final String lang,
        'dir': final String dir,
        'content_urls': {
          'desktop': {'page': final String url},
          'mobile': {'page': String _},
        },
      } =>
        Summary(
          titles: TitlesSet.fromJson(titles),
          pageId: pageId,
          extract: extract,
          extractHtml: extractHtml,
          lang: lang,
          dir: dir,
          url: url,
        ),
      _ => throw FormatException('Could not deserialize Summary, json=$json'),
    };
  }

  @override
  String toString() =>
      'Summary['
      'titles=$titles, '
      'pageId=$pageId, '
      'extract=$extract, '
      'extractHtml=$extractHtml, '
      'thumbnail=${thumbnail ?? 'null'}, '
      'originalImage=${originalImage ?? 'null'}, '
      'lang=$lang, '
      'dir=$dir, '
      'description=$description'
      ']';
}

// Image path and size, but doesn't contain any Wikipedia descriptions.
class ImageFile {
  /// Returns a new [ImageFile] instance.
  ImageFile({required this.source, required this.width, required this.height});

  /// The URI of the original image.
  final String source;

  /// The width of the original image.
  final int width;

  /// The height of the original image.
  final int height;

  /// The file extension of the image, or 'err' if one can't be determined.
  String get extension {
    final extension = getFileExtension(source);
    // By default, return a non-viable image extension.
    return extension ?? 'err';
  }

  /// Returns a JSON map representation of this [ImageFile].
  Map<String, Object?> toJson() {
    return <String, Object?>{
      'source': source,
      'width': width,
      'height': height,
    };
  }

  /// Returns a new [ImageFile] instance with its values populated from [json].
  static ImageFile fromJson(Map<String, Object?> json) {
    if (json case {
      'source': final String source,
      'height': final int height,
      'width': final int width,
    }) {
      return ImageFile(source: source, width: width, height: height);
    }
    throw FormatException('Could not deserialize OriginalImage, json=$json');
  }

  @override
  String toString() =>
      'OriginalImage[source_=$source, width=$width, height=$height]';
}

class TitlesSet {
  /// Returns a new [TitlesSet] instance.
  TitlesSet({
    required this.canonical,
    required this.normalized,
    required this.display,
  });

  /// The non-prefixed DB key for the article.
  ///
  /// Might contain changes such as underscores instead of spaces.
  /// Best suited for making request URIs, but still requires percent-encoding.
  final String canonical;

  /// The [normalized title](https://www.mediawiki.org/wiki/API:Query#Example_2:_Title_normalization)
  /// of the article.
  final String normalized;

  /// The title as it should be displayed to the user.
  final String display;

  /// Returns a new [TitlesSet] instance with its values populated from [json].
  static TitlesSet fromJson(Map<String, Object?> json) {
    if (json case {
      'canonical': final String canonical,
      'normalized': final String normalized,
      'display': final String display,
    }) {
      return TitlesSet(
        canonical: canonical,
        normalized: normalized,
        display: display,
      );
    }
    throw FormatException('Could not deserialize TitleSet, json=$json');
  }

  @override
  String toString() =>
      'TitlesSet['
      'canonical=$canonical, '
      'normalized=$normalized, '
      'display=$display'
      ']';
}

String? getFileExtension(String file) {
  final segments = file.split('.');
  if (segments.isNotEmpty) return segments.last;
  return null;
}

const acceptableImageFormats = ['png', 'jpg', 'jpeg'];
Then, open
lib/main.dartand replace the existing code with this basic structure, which adds required imports that the app uses:
然后打开lib/main.dart,替换代码为下面这样的:
import 'dart:convert';
import 'dart:io';

import 'package:flutter/material.dart';
import 'package:http/http.dart';

import 'summary.dart';

void main() {
  runApp(const MainApp());
}

class MainApp extends StatelessWidget {
  const MainApp({super.key});

  @override
  Widget build(BuildContext context) {
    return MaterialApp(
      home: Scaffold(
        appBar: AppBar(title: const Text('Wikipedia Flutter')),
        body: const Center(child: Text('Loading...')),
      ),
    );
  }
}
This code provides a basic app structure with a title bar and placeholder content. The imports at the top include everything you need for HTTP requests, JSON parsing, and the Wikipedia data model.
这份代码为标题栏和主页占位符提供了基础的结构。文件顶部的导入语句满足了你对HTTP请求、JSON解析和维基百科数据模型的一切需求
运行一下程序 Run your app
Test that everything works by running your app:
检查你的程序是否运行良好:
flutter run -d chromeYou should see a simple app with "Wikipedia Flutter" in the app bar and "Loading..." in the center of the screen.
你应该能看到一个简单的标题栏 Wikipedia Flutter和一个屏幕居中的文本Loading...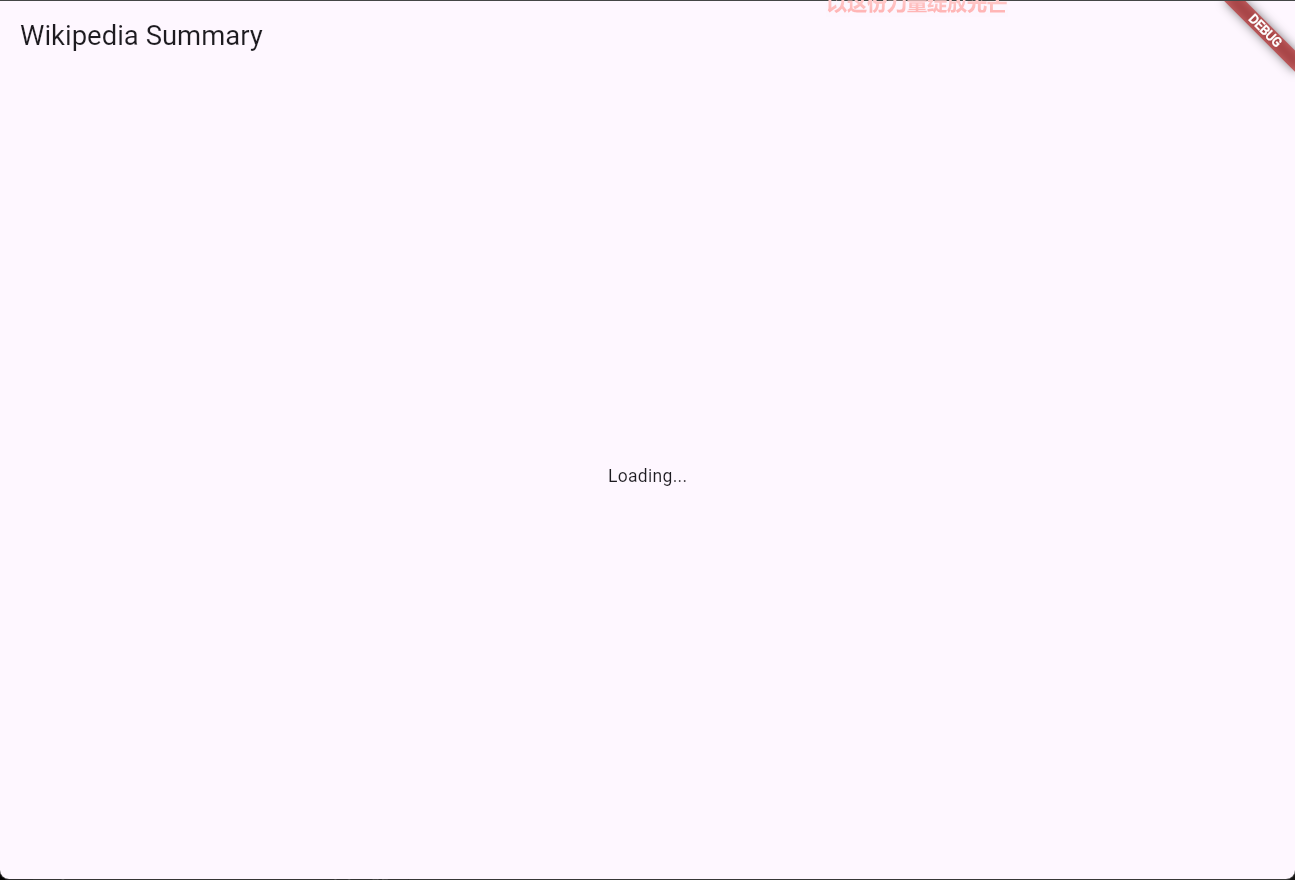
自我测验 Test yourself
flutter create的--empty标志的用处是什么
What does the
--emptyflag do when runningflutter create?
Creates a minimal Flutter project with less boilerplate code.The
--emptyflag generates a minimal starter template without the default counter app.
哪个指令用来快速添加依赖
What command is used to add a package dependency to a Flutter project?
`flutter pub add [package_name]`Running
flutter pub addadds the package to pubspec.yaml and downloads it.
发起HTTP请求
引言 Introduction
The overarching pattern that this tutorial implements is called Model-View-ViewModel or MVVM. MVVM is an architectural pattern used in client apps that separates your app into three layers:
本教程所实现的总体模式被称作 Model-View-ViewModel ,简称MVVM 。MVVM是一种用于客户端应用程序的架构模式,它将应用程序分为三个层次
- Model: Handles data operations.
模型层:处理数据操作 - View: Displays the UI.
视图层:显示UI - ViewModel: Manages state and connects the two.
模型层:管理状态并将(UI与数据)二者联系起来
The core tenet of MVVM (and many other patterns) is separation of concerns. Managing state in separate classes (outside your UI widgets) makes your code more testable, reusable, and easier to maintain.
MVVM(以及许多其他模式)的核心原则是关注点分离。在单独的类中管理状态(而不是在您的 UI 组件中)使您的代码更易于测试、重用和维护
A single feature in your app contains each one of the MVVM components. In this tutorial, in addition to Flutter widgets, you'll create
ArticleModel,ArticleViewModel, andArticleView.
您的应用程序中每一个独立的功能都包含各自的 MVVM 组件。在本教程中,除了 Flutter 自带组件外,您还需要创建 ArticleModel 、 ArticleViewModel 和 ArticleView
定义模型 Define the model
The Model is the source-of-truth for your app's data and is responsible for low-level tasks such as making HTTP requests, caching data, or managing system resources such as used by a Flutter plugin. A model doesn't usually need to import Flutter libraries.
模型是应用程序数据的事实来源,并负责 执行低级任务,例如发起 HTTP 请求、缓存数据或 管理系统资源(Flutter 插件所使用的资源)。 模型通常不需要导入 Flutter 库
Create an empty
ArticleModelclass in yourmain.dartfile:
在你的 main.dart 文件中创建一个空的 ArticleModel 类:
class ArticleModel {
  // Properties and methods will be added here.
}
构造HTTP请求 Make the HTTP request
Wikipedia provides a REST API that returns JSON data about articles. For this app, you'll use the endpoint that returns a random article summary.
维基百科提供了一个返回文章摘要的 JSON 数据的 REST API。 对于本教程,您将使用返回随机文章摘要的API
https://en.wikipedia.org/api/rest_v1/page/random/summaryAdd a method to fetch a random Wikipedia article summary
添加一个方法来获取随机文章摘要:
class ArticleModel {
  Future<Summary> getRandomArticleSummary() async {
    final uri = Uri.https(
      'en.wikipedia.org',
      '/api/rest_v1/page/random/summary',
    );
    final response = await get(uri);

    // TODO: Add error handling and JSON parsing.
    throw UnimplementedError();
  }
}
Use the
asyncandawaitkeywords to handle asynchronous operations. Theasynckeyword marks a method as asynchronous, andawaitwaits for expressions that return aFuture.
使用 async 和 await 关键字来处理异步操作。 async 关键字将方法标记为异步,而 await 等待返回 Future 的表达式
The
Uri.httpsconstructor safely builds URLs by handling encoding and formatting. This approach is more reliable than string concatenation, especially when dealing with special characters or query parameters
Uri.https 构造函数通过处理编码和格式化来安全地构建 URL。这种方法比字符串连接更可靠,尤其是在处理特殊字符或查询参数时
处理网络异常 Handle network errors
Always handle errors when making HTTP requests. A status code of 200 indicates success, while other codes indicate errors. If the status code isn't 200, the model throws an error for the UI to display to users
在进行 HTTP 请求时,始终需要处理错误。状态码为 200 表示成功,其他代码表示错误。如果状态码不是 200,模型会抛出错误,以便 UI 显示给用户
class ArticleModel {
  Future<Summary> getRandomArticleSummary() async {
    final uri = Uri.https(
      'en.wikipedia.org',
      '/api/rest_v1/page/random/summary',
    );
    final response = await get(uri);

    if (response.statusCode != 200) {
      throw const HttpException('Failed to update resource');
    }

    // TODO: Parse JSON and return Summary.
    throw UnimplementedError();
  }
}
注
abstract class HttpStatus {
  static const int continue_ = 100;
  static const int switchingProtocols = 101;
  static const int processing = 102;
  static const int ok = 200;
  static const int created = 201;
  static const int accepted = 202;
  static const int nonAuthoritativeInformation = 203;
  ...
}可以使用来自内置组件的HttpStatus类级字段来替换硬编码的200(魔法值),提升代码可读性
final response = await get(uri);
switch (response.statusCode) {
  case HttpStatus.ok:
  default:
    throw const HttpException("Failed to update resource");
}
The
Summaryclass is defined insummary.dart. If you're unfamiliar with JSON parsing, check out the Getting started with Dart tutorial.
Summary 类定义在 summary.dart 中。如果您不熟悉 JSON 解析,请查看 Dart 入门教程
自我测验 Test yourself
async和await关键字的用处是什么
What do the
asyncandawaitkeywords do in Dart?
They mark a function as asynchronous and pause execution until a Future completes.The
asynckeyword marks a function as asynchronous, andawaitpauses execution until the Future resolves.
Uri.https为什么比直接拼接URL字符串要好
Why is
Uri.httpspreferred over string concatenation when building URLs in Dart?
It safely handles encoding and formatting, especially for special characters and query parameters.Uri.https properly encodes special characters and formats URLs, preventing common errors.
使用ChangeNotifier更新程序状态
引言 Introduction
When developers talk about state-management in Flutter, they're essentially referring to the pattern by which your app updates the data it needs to render correctly and then tells Flutter to re-render the UI with that new data.
当开发者提到Flutter中的状态管理时,他们实际指的是APP需要以何种模式更新它需要正确渲染的数据,并告诉Flutter使用这些新数据重新渲染UI
In MVVM, this responsibility falls to the ViewModel layer, which sits between and connects your UI to your Model layer. In Flutter, ViewModels use Flutter's
ChangeNotifierclass to notify the UI when data changes.
在MVVM中,这项职责由ViewModel层提供。该层位于UI层与Model层之间,连接这两层。在Flutter中,ViewModel使用Flutter的 ChangeNotifier 类在数据变化时通知UI
To use
ChangeNotifier, extend it in your state management class to gain access to thenotifyListeners()method, which triggers UI rebuilds when called.
要使用 ChangeNotifier ,你需要在状态管理类中扩展它,以便访问notifyListener()方法,该方法在调用时触发UI重建
创建基本的ViewModel结构 Create the basic view model structure
Create the
ArticleViewModelclass with its basic structure and state properties:
创建 ArticleViewModel 类及其基本结构和状态属性:
class ArticleViewModel extends ChangeNotifier {
  final ArticleModel model;
  Summary? summary;
  Exception? error;
  bool isLoading = false;

  ArticleViewModel(this.model);
}
The
ArticleViewModelholds three pieces of state:
ArticleViewModel 持有三种状态:
summary: The current Wikipedia article data.summary: 当前维基百科文章数据。error: Any error that occurred during data fetching.error: 数据获取过程中发生的任何错误。isLoading: A flag to show progress indicators.isLoading: 用于显示进度指示器的标志。
更新构造函数 Add constructor initialization
Update the constructor to automatically fetch content when the
ArticleViewModelis created:
更新构造函数,以便在 ArticleViewModel 创建时自动获取内容:
class ArticleViewModel extends ChangeNotifier {
  final ArticleModel model;
  Summary? summary;
  Exception? error;
  bool isLoading = false;

  ArticleViewModel(this.model) {
    fetchArticle();
  }

  // Methods will be added next.
  Future<void> fetchArticle() async {}
}
This constructor initialization provides immediate content when a
ArticleViewModelobject is created. Because constructors can't be asynchronous, it delegates initial content fetching to a separate method
这个构造函数初始化在创建 ArticleViewModel 对象时立即提供内容。因为构造函数不能是异步的,它将初始内容获取委托给一个单独的方法
实现 fetchArticle 方法 Set up the fetchArticle method
Add the
fetchArticlemethod that fetches data and manages state updates:
添加用于获取数据和管理状态更新的 fetchArticle 方法:
class ArticleViewModel extends ChangeNotifier {
  final ArticleModel model;
  Summary? summary;
  Exception? error;
  bool isLoading = false;

  ArticleViewModel(this.model) {
    fetchArticle();
  }

  Future<void> fetchArticle() async {
    isLoading = true;
    notifyListeners();

    // TODO: Add data fetching logic

    isLoading = false;
    notifyListeners();
  }
}
The ViewModel updates the
isLoadingproperty and callsnotifyListeners()to inform the UI of the update. When the operation completes, it toggles the property back. When you build the UI, you'll use thisisLoadingproperty to show a loading indicator while fetching a new article.
ViewModel 更新 isLoading 属性并调用 notifyListeners() 通知 UI 更新。操作完成后,它会将属性切换回原状态。在构建 UI 时,您将使用这个 isLoading 属性在获取新文章时显示加载指示器
从ArticleModel获取文章 Receive an article from the ArticleModel
Complete the
fetchArticlemethod to fetch an article summary. Use a try-catch block to gracefully handle network errors and store error messages that the UI can display to users. The method clears previous errors on success and clears the previous article summary on error to maintain a consistent state.
完成 fetchArticle 方法以获取文章摘要。使用 try-catch 块优雅地处理网络错误,并存储 UI 可以显示给用户的错误消息。该方法在成功时清除之前的错误,并在出错时清除之前的文章摘要以保持状态的一致性
class ArticleViewModel extends ChangeNotifier {
final ArticleModel model;
Summary? summary;
Exception? error;
bool isLoading = false;
ArticleViewModel(this.model) {
fetchArticle();
}
Future<void> fetchArticle() async {
isLoading = true;
notifyListeners();
try {
summary = await model.getRandomArticleSummary();
error = null; // Clear any previous errors.
} on HttpException catch (e) {
error = e;
summary = null;
}
isLoading = false;
notifyListeners();
}
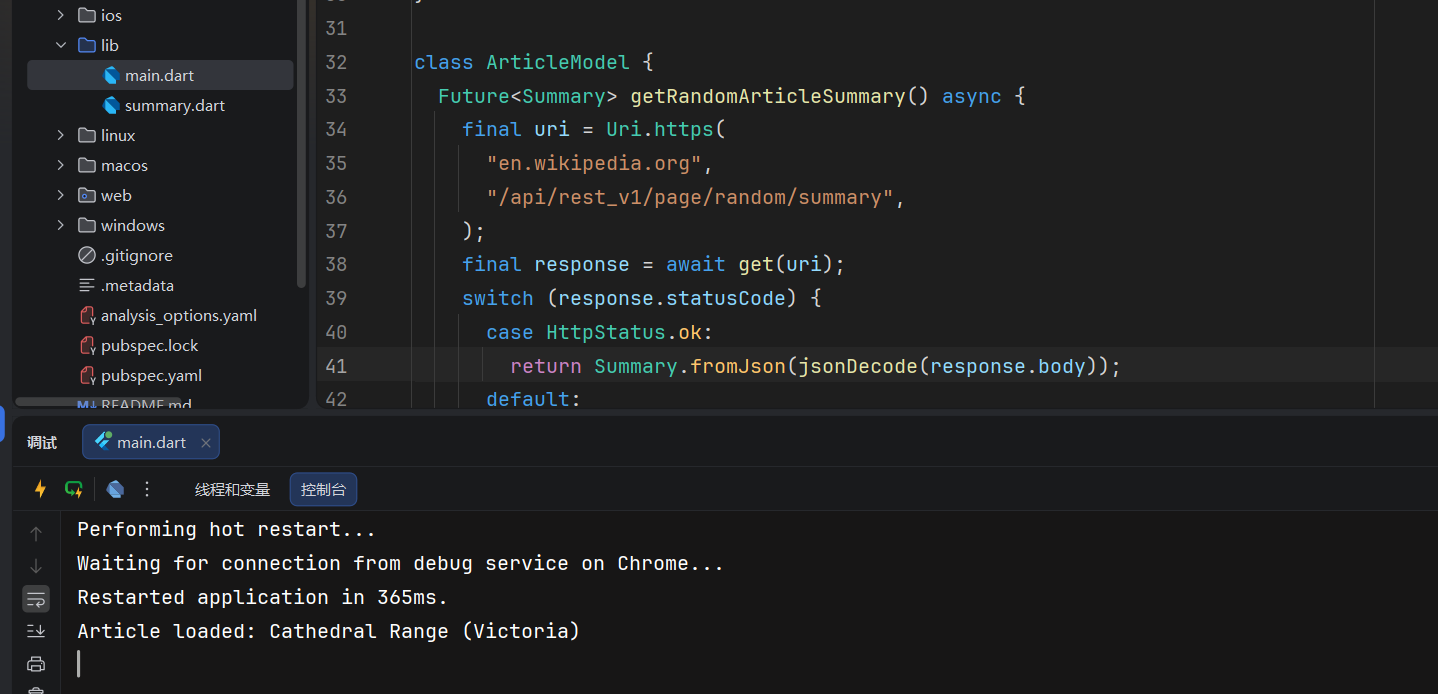
}测试视图模型 Test the ViewModel
Before building the full UI, test that your HTTP requests work by printing results to the console. First, update the
fetchArticlemethod to print the results:
在构建完整 UI 之前,通过将结果打印到控制台来测试您的 HTTP 请求是否正常工作。首先,更新 fetchArticle 方法以打印结果:
Future<void> fetchArticle() async {
  isLoading = true;
  notifyListeners();
  try {
    summary = await model.getRandomArticleSummary();
    print('Article loaded: ${summary!.titles.normalized}'); // Temporary
    error = null; // Clear any previous errors.
  } on HttpException catch (e) {
    print('Error loading article: ${e.message}'); // Temporary
    error = e;
    summary = null;
  }
  isLoading = false;
  notifyListeners();
}
Then, update the
MainAppwidget to create theArticleViewModel, which calls thefetchArticlemethod on creation:
然后,更新 MainApp 组件以创建 ArticleViewModel ,它在创建时调用 fetchArticle 方法:
class MainApp extends StatelessWidget {
  const MainApp({super.key});

  @override
  Widget build(BuildContext context) {
    // Instantiate your `ArticleViewModel` to test its HTTP requests.
    final viewModel = ArticleViewModel(ArticleModel());

    return MaterialApp(
      home: Scaffold(
        appBar: AppBar(title: const Text('Wikipedia Flutter')),
        body: const Center(child: Text('Check console for article data')),
      ),
    );
  }
}
Hot reload your app and check your console output. You should see either an article title or an error message, which confirms that your Model and ViewModel are wired up correctly.
热重载你的应用并检查控制台输出。 你应该看到文章标题或错误消息, 这表明你的 Model 和 ViewModel 已正确连接。
自我测验 Test yourself
什么是ChangeNotifier
What is a ChangeNotifier?
A class that can notify listeners when its data changes, enabling reactive UI updates.ChangeNotifier provides the notifyListeners method to signal widgets to rebuild when state changes.
在ChangeNotifier里调用notifyListerner()做什么
What does calling
notifyListeners()do in a ChangeNotifier?
Tells any listening widgets to rebuild and reflect the new state.Calling
notifyListeners()triggers a rebuild of all widgets listening to this ChangeNotifier.
使用ListenableBuilder更新UI
引言 Introduction
The view layer is your UI, and in Flutter, that refers to your app's widgets. As it pertains to this tutorial, the important part is wiring up your UI to respond to data changes from the ViewModel.
ListenableBuilderis a widget that can "listen" to aChangeNotifier, and automatically rebuilds when it's providedChangeNotifiercallsnotifyListeners().
视图层是您的 UI,在 Flutter 中,它指的是您的应用程序的组件。就本教程而言,重要的是将您的 UI 连接到 ViewModel 以响应数据变化。 ListenableBuilder 是一个可以监听 ChangeNotifier 的组件,并在提供 ChangeNotifier 调用 notifyListeners() 时自动重建。
创建 Article 视图组件 Create the article view widget
Create the
ArticleViewwidget that manages your page's layout and ViewModel lifecycle. Because it must explicitly initialize data fetching before rendering, implement it as aStatefulWidget.
创建一个 ArticleView 组件来管理您页面的布局和 ViewModel 生命周期。因为它必须在渲染之前显式初始化数据获取,所以将其实现为 StatefulWidget
Start by creating the basic stateful structure:
首先创建基本的有状态结构:
import 'package:flutter/material.dart';

class ArticleView extends StatefulWidget {
  const ArticleView({super.key});

  @override
  State<ArticleView> createState() => _ArticleViewState();
}

class _ArticleViewState extends State<ArticleView> {
  // The view model will be instantiated here next.

  @override
  Widget build(BuildContext context) {
    return Scaffold(
      appBar: AppBar(title: const Text('Wikipedia Flutter')),
      body: const Center(child: Text('Loading...')),
    );
  }
}
实例化模型 Instantiate the article view model
Next, initialize your
ArticleViewModelmapping it to the state's lifecycle. Provide the ViewModel and executefetchArticle()withininitState():
接下来,初始化您的 ArticleViewModel 并将其映射到状态的生命周期。提供 ViewModel 并在 initState() 内执行 fetchArticle() :
class ArticleView extends StatefulWidget {
  const ArticleView({super.key});

  @override
  State<ArticleView> createState() => _ArticleViewState();
}

class _ArticleViewState extends State<ArticleView> {
  final ArticleViewModel viewModel = ArticleViewModel(ArticleModel());

  @override
  void initState() {
    super.initState();
    viewModel.fetchArticle(); // viewModel构造函数会执行一次fetchArticle, 这里又会执行一次
  }

  @override
  Widget build(BuildContext context) {
    return Scaffold(
      appBar: AppBar(title: const Text('Wikipedia Flutter')),
      body: const Center(child: Text('Loading...')),
    );
  }
}
加载文章视图 Update your app to include the article view
Connect everything together by updating your
MainAppto include your completedArticleView.
通过更新您的 MainApp 来包含您完成的 ArticleView ,将所有内容连接在一起
Replace your existing
MainAppwith this updated version:
替换您现有的 MainApp 为此更新版本:
class MainApp extends StatelessWidget {
  const MainApp({super.key});

  @override
  Widget build(BuildContext context) {
    return const MaterialApp(home: ArticleView());
  }
}
This change switches from the console-based test to the full UI experience with proper state management.
这一 基于控制台的测试切换到完整的 UI 更改 具备良好的状态管理经验
监听状态变化 Listen for state changes
Wrap your UI in a
ListenableBuilderto listen for state changes, and pass it aChangeNotifierobject. In this case, theArticleViewModelextendsChangeNotifier.
将您的 UI 包裹在一个 ListenableBuilder 中以监听状态变化,并将其传递一个 ChangeNotifier 对象。在这种情况下, ArticleViewModel 扩展了 ChangeNotifier
class ArticleView extends StatefulWidget {
  const ArticleView({super.key});

  @override
  State<ArticleView> createState() => _ArticleViewState();
}

class _ArticleViewState extends State<ArticleView> {
  final ArticleViewModel viewModel = ArticleViewModel(ArticleModel());

  @override
  void initState() {
    super.initState();
    viewModel.fetchArticle();
  }

  @override
  Widget build(BuildContext context) {
    return Scaffold(
      appBar: AppBar(title: const Text('Wikipedia Flutter')),
      body: ListenableBuilder(
        listenable: viewModel,
        builder: (context, child) {
          return const Center(child: Text('Loading...'));
        },
      ),
    );
  }
}
ListenableBuilderuses the builder pattern, which requires a callback rather than achildwidget to build the widget tree below it. These widgets are flexible because you can perform operations within the callback, building different widgets based on the state.
ListenableBuilder 使用了 构建模式 ,该模式需要回调函数而不是 child 组件来构建其下方的组件树。这些组件具有灵活性,因为您可以在回调函数中执行操作,根据状态构建不同的组件
处理可能的视图模型状态 Handle possible view model states
Recall the
ArticleViewModel, which has three properties that the UI is interested in:
回想 ArticleViewModel ,它有三个 UI 感兴趣的属性:
Summary? summarybool isLoadingException? error
Depending on the combined state of these properties, the UI can display different widgets. Use Dart's support for switch expressions to handle all possible combinations in a clean, readable way:
根据这些属性的组合状态,UI 可以显示不同的组件。使用 Dart 的 switch 表达式以干净、可读的方式处理所有可能的组合:
class ArticleView extends StatefulWidget {
  const ArticleView({super.key});

  @override
  State<ArticleView> createState() => _ArticleViewState();
}

class _ArticleViewState extends State<ArticleView> {
  final ArticleViewModel viewModel = ArticleViewModel(ArticleModel());

  @override
  void initState() {
    super.initState();
    viewModel.fetchArticle();
  }

  @override
  Widget build(BuildContext context) {
    return Scaffold(
      appBar: AppBar(title: const Text('Wikipedia Flutter')),
      body: Center(
        child: ListenableBuilder(
          listenable: viewModel,
          builder: (context, _) {
            return switch ((
              viewModel.isLoading,
              viewModel.summary,
              viewModel.error,
            )) {
              (true, _, _) => const CircularProgressIndicator(),
              (_, _, final Exception e) => Text('Error: $e'),
              (_, final summary?, _) => ArticlePage(
                summary: summary,
                nextArticleCallback: viewModel.fetchArticle,
              ),
              _ => const Text('Something went wrong!'),
            };
          },
        ),
      ),
    );
  }
}
This is an excellent example of how a declarative, reactive framework like Flutter and a pattern like MVVM work together: The UI is rendered based on the state and updates when a state changes demands it, but it doesn't manage any state or the process of updating itself. The business logic and rendering are completely separate from each other.
这是一个如何的绝佳示例 声明式、响应式框架,如 Flutter 和 类似 MVVM 这样的模式协同工作: UI 是基于状态进行渲染的,并在状态变化时更新 状态变化需要它,但是 不管理任何状态或更新自身的进程。 业务逻辑和渲染是完全分离的
注
builder: (context, _) {
  return switch ((
    viewModel.isLoading,
    viewModel.summary,
    viewModel.error,
  )) {
    (_, _, final Exception e) => Text("Error: $e"),
    (_, final summary?, _) => ArticlePage(
      summary: summary,
      nextArticleCallback: viewModel.fetchArticle,
    ),
    (true, _, _) => const Center(child: CircularProgressIndicator()),
    _ => Text("Something went wrong"),
  };
},这里final summary?使用了Dart的可空匹配技巧:
void handleValue(String? maybeString) {
 switch (maybeString) {
   // 1. Matches if not null and binds to a non-nullable 's'
   case var s?:
     print("Got a string: $s"); // 's' is type String here

   // 2. Matches specifically if the value is null
   case null:
     print("Value was null");

   // 3. Optional default case (wildcard)
   default:
     print("This should not be reached if cases above are exhaustive");
 }
}也支持使用s!的空断言匹配分支,只是如果s是null的话会在运行时抛出错误
完成UI Complete the UI
The only thing remaining is to use the properties and methods provided by the view model to build the UI.
剩下的唯一事情就是使用提供的属性和方法 由视图模型构建 UI
Now create a
ArticlePagewidget that displays the actual article content. This reusable widget takes summary data and a callback function:
现在创建一个 ArticlePage 小部件来显示实际的文章内容。这个可重用的小部件需要摘要数据和回调函数:
class ArticlePage extends StatelessWidget {
  const ArticlePage({
    super.key,
    required this.summary,
    required this.nextArticleCallback,
  });

  final Summary summary;
  final VoidCallback nextArticleCallback;

  @override
  Widget build(BuildContext context) {
    return const Center(
      child: Text('Article content will be displayed here...'),
    );
  }
}
添加滚动布局 Add a scrollable layout
Replace the placeholder with a scrollable column layout:
将占位符替换为可滚动的列布局:
class ArticlePage extends StatelessWidget {
  const ArticlePage({
    super.key,
    required this.summary,
    required this.nextArticleCallback,
  });

  final Summary summary;
  final VoidCallback nextArticleCallback;

  @override
  Widget build(BuildContext context) {
    return const SingleChildScrollView(
      child: Column(
        children: [Text('Article content will be displayed here...')],
      ),
    );
  }
}
添加文章内容和按钮 Add article and button
Complete the layout with an article widget and navigation button:
使用文章组件和导航按钮完成布局:
class ArticlePage extends StatelessWidget {
  const ArticlePage({
    super.key,
    required this.summary,
    required this.nextArticleCallback,
  });

  final Summary summary;
  final VoidCallback nextArticleCallback;

  @override
  Widget build(BuildContext context) {
    return SingleChildScrollView(
      child: Column(
        children: [
          ArticleWidget(summary: summary),
          ElevatedButton(
            onPressed: nextArticleCallback,
            child: const Text('Next random article'),
          ),
        ],
      ),
    );
  }
}
创建Article组件 Create the ArticleWidget
The
ArticleWidgethandles the display of the actual article content with proper styling and conditional rendering.
ArticleWidget 负责以正确的样式和条件渲染显示实际的文章内容
构建基本的文章结构 Set up the basic structure
Start with the widget that accepts a
summaryparameter:
从接受 summary 参数的组件开始:
class ArticleWidget extends StatelessWidget {
  const ArticleWidget({super.key, required this.summary});

  final Summary summary;

  @override
  Widget build(BuildContext context) {
    return const Text('Article content will be displayed here...');
  }
}
填充行列布局 Add padding and column layout
Wrap the content in proper padding and layout:
将内容包裹在适当的填充和布局中:
class ArticleWidget extends StatelessWidget {
  const ArticleWidget({super.key, required this.summary});

  final Summary summary;

  @override
  Widget build(BuildContext context) {
    return Padding(
      padding: const EdgeInsets.all(8),
      child: Column(
        spacing: 10,
        children: [const Text('Article content will be displayed here...')],
      ),
    );
  }
}
添加有条件图片显示 Add conditional image display
Add the article image that only shows when available:
添加仅在可用时显示的文章图片:
class ArticleWidget extends StatelessWidget {
  const ArticleWidget({super.key, required this.summary});

  final Summary summary;

  @override
  Widget build(BuildContext context) {
    return Padding(
      padding: const EdgeInsets.all(8),
      child: Column(
        spacing: 10,
        children: [
          if (summary.hasImage) Image.network(summary.originalImage!.source),
          const Text('Article content will be displayed here...'),
        ],
      ),
    );
  }
}
实现带样式文本内容 Complete with styled text content
Replace the placeholder text with a properly styled title, description, and extract:
替换占位符文本,使用适当样式的标题、描述和提取:
class ArticleWidget extends StatelessWidget {
  const ArticleWidget({super.key, required this.summary});

  final Summary summary;

  @override
  Widget build(BuildContext context) {
    return Padding(
      padding: const EdgeInsets.all(8),
      child: Column(
        spacing: 10,
        children: [
          if (summary.hasImage) Image.network(summary.originalImage!.source),
          Text(
            summary.titles.normalized,
            overflow: TextOverflow.ellipsis,
            style: Theme.of(context).textTheme.displaySmall,
          ),
          if (summary.description != null)
            Text(
              summary.description!,
              overflow: TextOverflow.ellipsis,
              style: Theme.of(context).textTheme.bodySmall,
            ),
          Text(summary.extract),
        ],
      ),
    );
  }
}
This widget demonstrates a few important UI concepts:
这个组件展示了几个重要的 UI 概念:
- Conditional rendering: The
ifstatements show content only when available.
条件渲染:if语句仅在可用时显示内容。 - Text styling: Different text styles create visual hierarchy using Flutter's theme system.
文本样式:使用 Flutter 的主题系统,不同的文本样式创建视觉层次结构。 - Proper spacing: The
spacingparameter provides consistent vertical spacing.
适当的间距:spacing参数提供一致的垂直间距。 - Overflow handling:
TextOverflow.ellipsisprevents text from breaking the layout.
溢出处理:TextOverflow.ellipsis防止文本破坏布局。
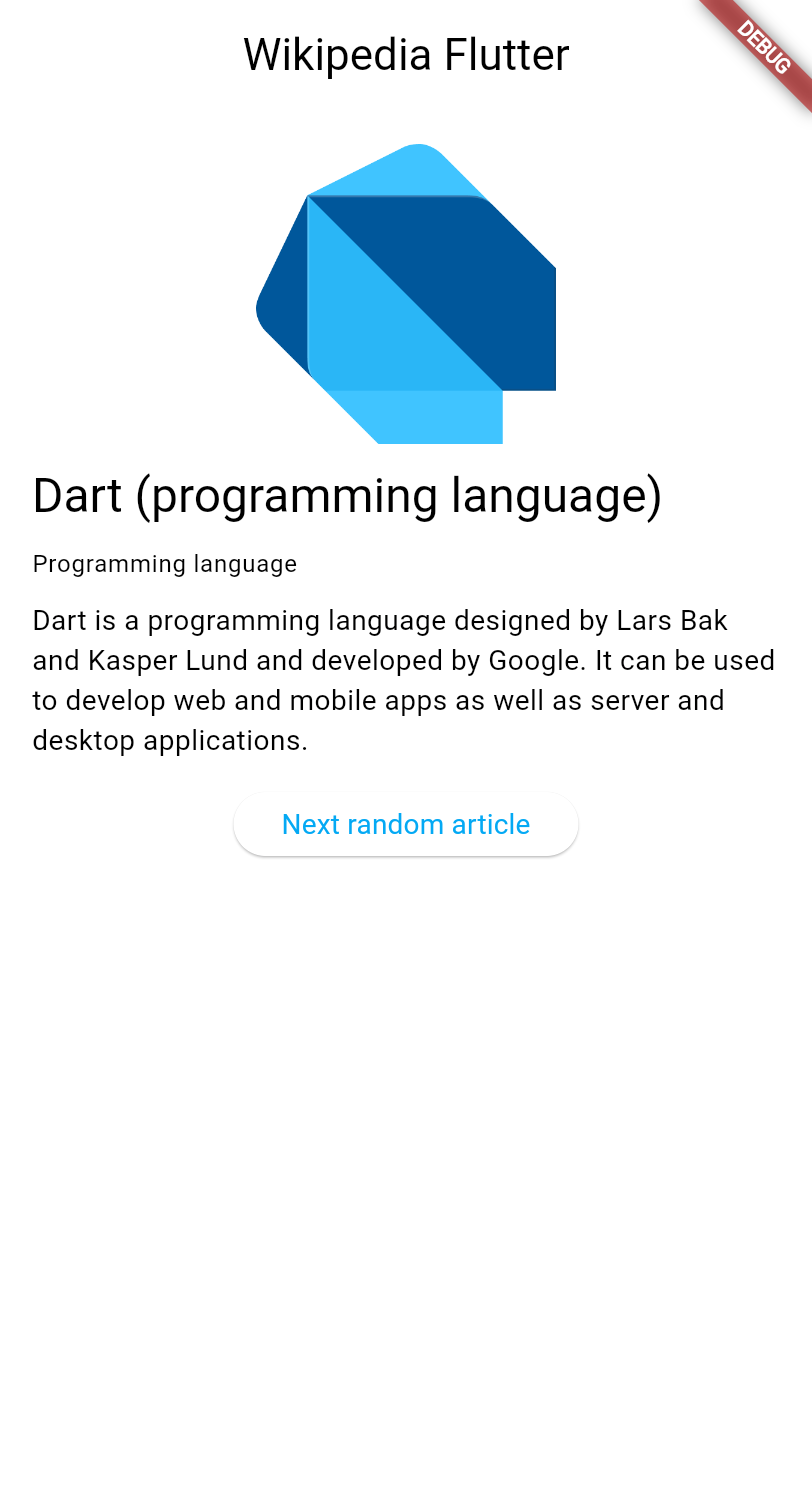
运行完整的程序 Run the complete app
Hot reload your app one final time. You should now see:
对应用进行最后一次热重载。您现在应该看到:
- A loading spinner while the initial article loads.
一个加载动画,在初始文章加载时显示。 - The article's title, description, and summary extract.
文章的标题、描述和摘要提取。 - An image (if the article has one).
一张图片(如果文章有的话)。 - A button to load another random article.
一个按钮,用于加载另一篇随机文章。
To see the reactive UI in action, click the Next random article button. The app shows a loading state, fetches new data, and updates the display automatically.
要查看响应式 UI 的效果,请点击“下一个随机文章”按钮。应用程序会显示加载状态,获取新数据,并自动更新显示。

自我测验
ListenableBuilder的作用是什么
What is the purpose of ListenableBuilder in Flutter?
To listen to a ChangeNotifier and automatically rebuild its child widgets when `notifyListeners()` is called.ListenableBuilder listens to a Listenable and rebuilds its builder function when notified.
ListenableBuilder何时重建子组件
When does ListenableBuilder rebuild its child widgets?
When the Listenable it's listening to calls notifyListeners().ListenableBuilder subscribes to the Listenable and rebuilds its builder function whenever
notifyListeners()is called.