Golang Gin框架(二):数据解析、渲染
参考资料
数据绑定与解析
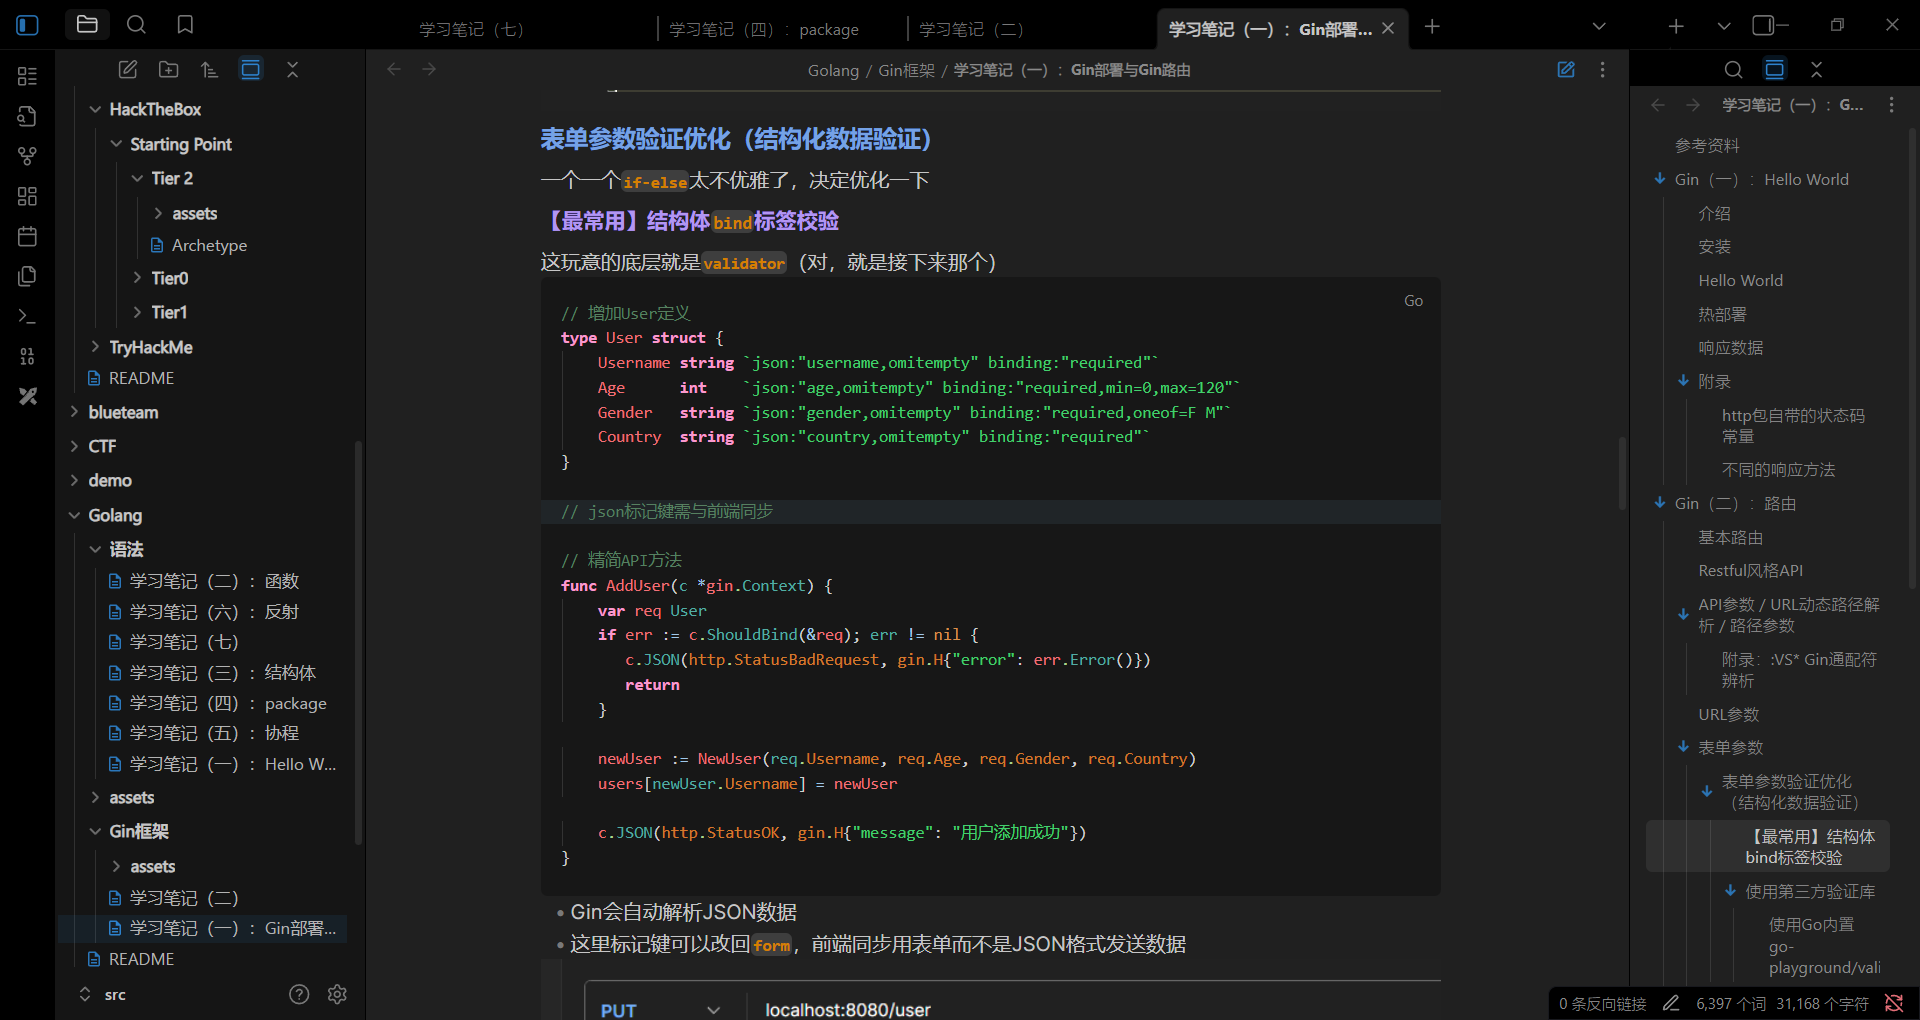
在前面的学习中,我们已经接触过结构体标签绑定——当时使用的是结构体binding标签,而binding标签底层正是go-playground/validator
现在我们将要具体接触下面三种数据绑定格式
仍然使用前面的user.go(和配套API)作为测试demo:
type User struct {
    Username string `validate:"required"`
    Age      int    `validate:"required,min=0,max=120"`
    Gender   string `validate:"required,oneof=F M"`
    Country  string `validate:"required"`
}
JSON数据绑定
type User struct {
    Username string `json:"user" validate:"required"`
    // 这里使用了user JSON标记, 则前端相应的字段应设置为user键, 后端才能拿到数据
    Age      int    `json:"age" validate:"required,min=0,max=120"`
    Gender   string `json:"gender" validate:"required,oneof=F M"`
    Country  string `json:"country" validate:"required"`
}
...
func AddUser(c *gin.Context) {
    var req User
    if err := c.ShouldBindJSON(&req); err != nil {
       // 这里可以直接用ShouldBind, 这个方法能根据Content-Type头自动解析数据格式
       c.JSON(http.StatusBadRequest, gin.H{"error": err.Error()})
       return
    }

    newUser := NewUser(req.Username, req.Age, req.Gender, req.Country)
    users[newUser.Username] = newUser

    slog.Info("用户添加成功", "用户名", newUser.Username)

    c.JSON(http.StatusOK, gin.H{"message": "用户添加成功"})
}
虽然少掉一个键居然也能跑……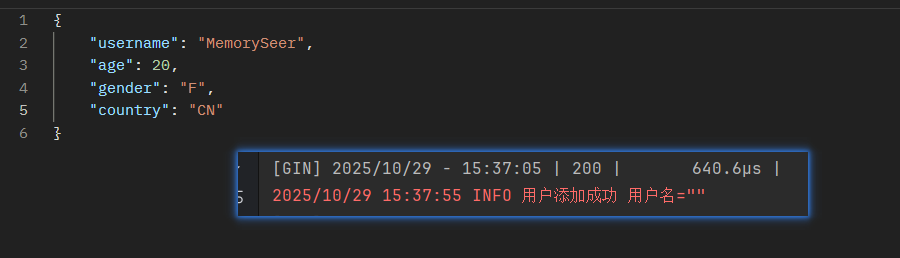
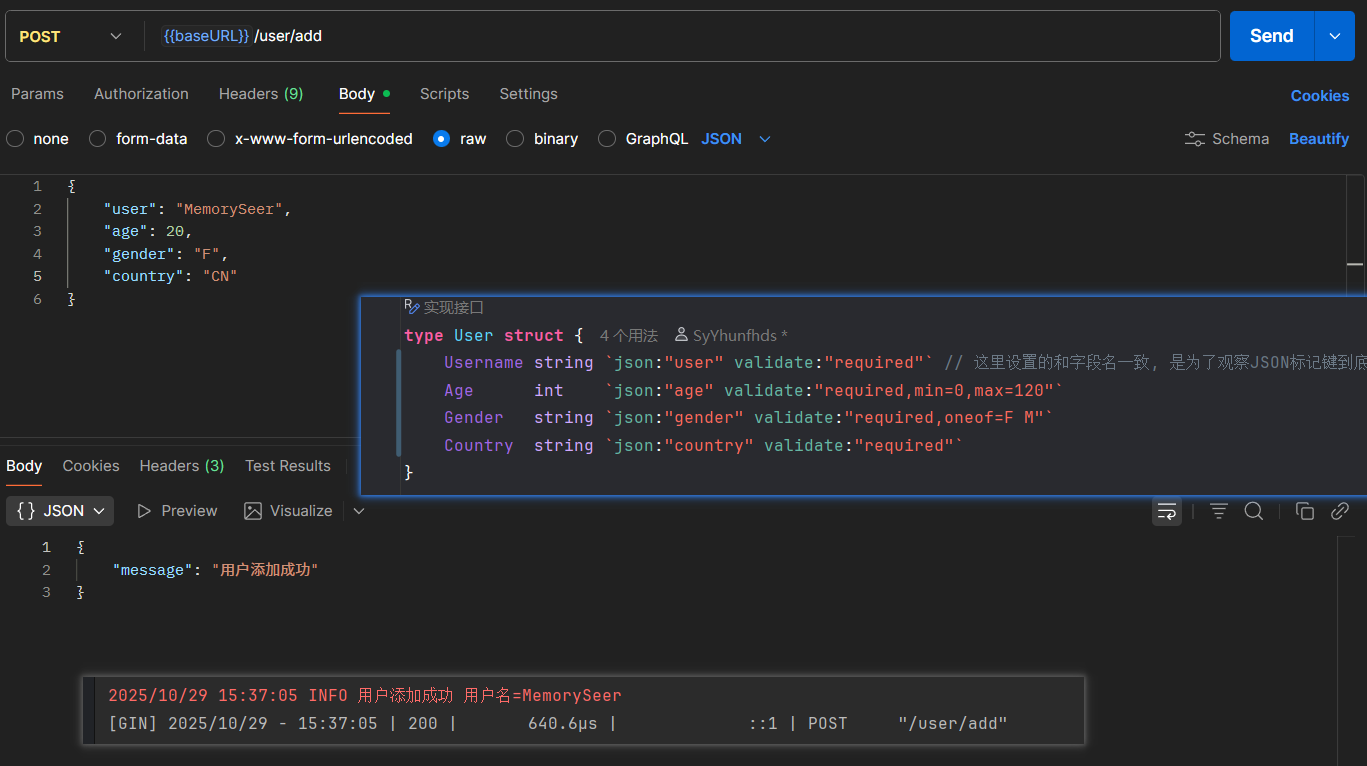
表单数据绑定
type User struct {
    Username string `json:"user" form:"username" validate:"required"`
    Age      int    `json:"age" form:"age" validate:"required,min=0,max=120"`
    Gender   string `json:"gender" form:"gender" validate:"required,oneof=F M"`
    Country  string `json:"country" form:"country" validate:"required"`
}
...
func AddUser(c *gin.Context) {
    var req User
    if err := c.Bind(&req); err != nil {
	    // Bind方法默认解析表单
       c.JSON(http.StatusBadRequest, gin.H{"error": err.Error()})
       return
    }

    newUser := NewUser(req.Username, req.Age, req.Gender, req.Country)
    users[newUser.Username] = newUser

    slog.Info("用户添加成功", "用户名", newUser.Username)

    c.JSON(http.StatusOK, gin.H{"message": "用户添加成功"})
}- 最好还是写一下标记键,不然和前端会对不上……
URL参数解析
转载自topgoer文档:
package main

import (
    "net/http"

    "github.com/gin-gonic/gin"
)

// 定义接收数据的结构体
type Login struct {
    // binding:"required"修饰的字段,若接收为空值,则报错,是必须字段
    User    string `form:"username" json:"user" uri:"user" xml:"user" binding:"required"`
    Pssword string `form:"password" json:"password" uri:"password" xml:"password" binding:"required"`
}

func main() {
    // 1.创建路由
    // 默认使用了2个中间件Logger(), Recovery()
    r := gin.Default()
    // JSON绑定
    r.GET("/:user/:password", func(c *gin.Context) {
        // 声明接收的变量
        var login Login
        // Bind()默认解析并绑定form格式
        // 根据请求头中content-type自动推断
        if err := c.ShouldBindUri(&login); err != nil {
            c.JSON(http.StatusBadRequest, gin.H{"error": err.Error()})
            return
        }
        // 判断用户名密码是否正确
        if login.User != "root" || login.Pssword != "admin" {
            c.JSON(http.StatusBadRequest, gin.H{"status": "304"})
            return
        }
        c.JSON(http.StatusOK, gin.H{"status": "200"})
    })
    r.Run(":8000")
}
其他绑定方法
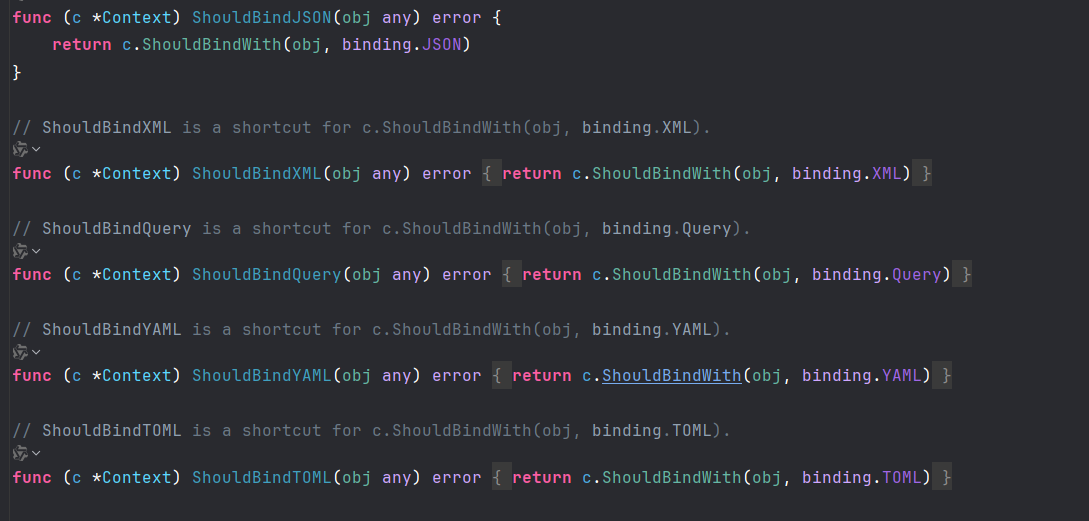
在context.go中,仅数据格式的绑定方法就有下面这些:
ShouldBindJSON与BindJSONShouldBindXML与BindXMLShouldBindQuery与BindQueryShouldBindYAML与BindYAMLShouldBindTOML与BindTOMLShouldBindBody与BindBody- ...
使用方法大同小异
底层分别调用ShouldBindWith和BindWith,都传入了与方法名功能相对应的binding变量:
var (
    JSON          BindingBody = jsonBinding{}
    XML           BindingBody = xmlBinding{}
    Form          Binding     = formBinding{}
    Query         Binding     = queryBinding{}
    FormPost      Binding     = formPostBinding{}
    FormMultipart Binding     = formMultipartBinding{}
    ProtoBuf      BindingBody = protobufBinding{}
    MsgPack       BindingBody = msgpackBinding{}
    YAML          BindingBody = yamlBinding{}
    Uri           BindingUri  = uriBinding{}
    Header        Binding     = headerBinding{}
    Plain         BindingBody = plainBinding{}
    TOML          BindingBody = tomlBinding{}
)在Content-Type设置正确的情形下,可以直接使用ShouldBind:
// ShouldBind checks the Method and Content-Type to select a binding engine automatically,// Depending on the "Content-Type" header different bindings are used, for example:
//
//  "application/json" --> JSON binding
//  "application/xml"  --> XML binding
//
// It parses the request's body as JSON if Content-Type == "application/json" using JSON or XML as a JSON input.// It decodes the json payload into the struct specified as a pointer.
// Like c.Bind() but this method does not set the response status code to 400 or abort if input is not valid.
func (c *Context) ShouldBind(obj any) error {
    b := binding.Default(c.Request.Method, c.ContentType())
    return c.ShouldBindWith(obj, b)
}ShouldBind方法会先检查Content-Type头,然后自动调用对应的解析引擎,十分地方便
至于Bind方法:
// Bind checks the Method and Content-Type to select a binding engine automatically,// Depending on the "Content-Type" header different bindings are used, for example:
//
//  "application/json" --> JSON binding
//  "application/xml"  --> XML binding
//
// It parses the request's body as JSON if Content-Type == "application/json" using JSON or XML as a JSON input.// It decodes the json payload into the struct specified as a pointer.
// It writes a 400 error and sets Content-Type header "text/plain" in the response if input is not valid.
func (c *Context) Bind(obj any) error {
    b := binding.Default(c.Request.Method, c.ContentType())
    return c.MustBindWith(obj, b)
}ShouldBind与Bind用法一样,但是Bind会在检测到输入无效时丢弃请求或直接返回400 BadRequest,而ShouldBind不会——它们的系列方法同理
渲染
各种数据格式的响应
// data.go
package api
import (
"net/http"
"github.com/gin-gonic/gin" "github.com/gin-gonic/gin/testdata/protoexample")
// 创建一些结构体用于测试数据格式
type user struct {
Username string
Age int
Hobby []string
}
type myBook = book // 来自book.go的类型
type article struct {
Title string
Author string
Description string
}
func JSONResponse(c *gin.Context) {
u := user{
Username: "张三",
Age: 18,
Hobby: []string{"看电影", "看小说"},
}
c.JSON(http.StatusOK, u)
}
func XMLResponse(c *gin.Context) {
b := myBook{
ID: 1,
Title: "《Go语言从入门到放弃》",
Author: "张三",
}
c.XML(http.StatusOK, b)
}
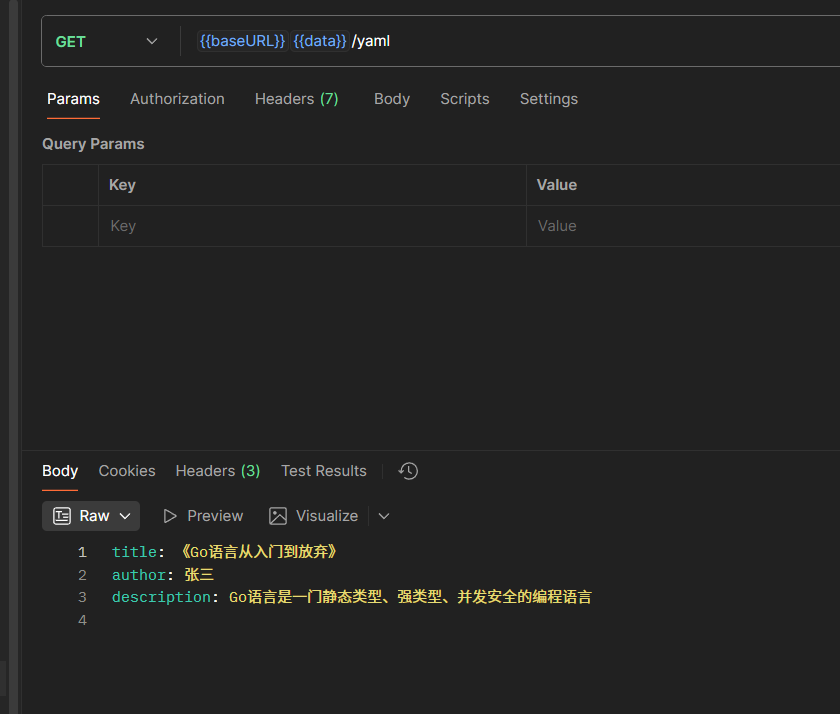
func YAMLResponse(c *gin.Context) {
a := article{
Title: "《Go语言从入门到放弃》",
Author: "张三",
Description: "Go语言是一门静态类型、强类型、并发安全的编程语言",
}
c.YAML(http.StatusOK, a)
}
func ProtobufResponse(c *gin.Context) {
reps := []int64{1, 2, 3}
label := "label"
data := &protoexample.Test{
Reps: reps,
Label: &label,
}
c.ProtoBuf(http.StatusOK, data)
}
// main.go
dataFormatApi := router.Group("/data-format")
{
dataFormatApi.GET("/json", api.JSONResponse)
dataFormatApi.GET("/xml", api.XMLResponse)
dataFormatApi.GET("/yaml", api.YAMLResponse)
dataFormatApi.GET("/protobuf", api.ProtobufResponse)
}
看看源码
HTML、JSON、IntendedJSON、SecureJSON、XML、YAML、TOML、String方法底层都调用了Render方法:
// SecureJSON serializes the given struct as Secure JSON into the response body.// Default prepends "while(1)," to response body if the given struct is array values.// It also sets the Content-Type as "application/json".
func (c *Context) SecureJSON(code int, obj any) {
    c.Render(code, render.SecureJSON{Prefix: c.engine.secureJSONPrefix, Data: obj})
}

// JSONP serializes the given struct as JSON into the response body.// It adds padding to response body to request data from a server residing in a different domain than the client.
// It also sets the Content-Type as "application/javascript".
func (c *Context) JSONP(code int, obj any) {
    callback := c.DefaultQuery("callback", "")  // 需要有个GET参数callback才能调用
    if callback == "" {
       c.Render(code, render.JSON{Data: obj})
       return
    }
    c.Render(code, render.JsonpJSON{Callback: callback, Data: obj})
}
// Render writes the response headers and calls render.Render to render data.func (c *Context) Render(code int, r render.Render) {
c.Status(code)
if !bodyAllowedForStatus(code) {
r.WriteContentType(c.Writer)
c.Writer.WriteHeaderNow()
return
}
if err := r.Render(c.Writer); err != nil {
// Pushing error to c.Errors
_ = c.Error(err)
c.Abort()
}
}……后面的就不懂了
简单过一下Protobuf类型
protobuf(Protocal Buffers)是google开发的一种用于序列化结构化数据(JSON、XML)的一种方式。你可以定义你的数据的结构,protobuf是语言中性的,可以使用C++、C#、GO、Java、Python来读写你的数据。
模板渲染(一):Hello World
HTML模板渲染
- gin支持加载HTML模板, 然后根据模板参数进行配置并返回相应的数据,本质上就是字符串替换
LoadHTMLGlob()方法可以加载模板文件templates/**/*:可以确保加载模板目录下的所有模板文件
HTML()方法会自动进行上下文引用和字符转义,极大程度上防御SSTI攻击
代码
// main.go
func main() {
    r := gin.Default()

    // 设置 HTML 模板
    r.LoadHTMLGlob("templates/*")  // 加载指定目录下的模板文件
    // r.Static("/assets") // 需要静态资源的话可以设置静态资源目录

    r.POST("/", api.Index)

    r.Run(":8080")
}
// index.go
type Banner struct {
    Title               string
    WelcomeTitle        string
    Message             string
    UserName            string
    PrimaryButtonText   string
    SecondaryButtonText string
    FooterText          string
    CurrentYear         string
}

func NewBannerWithUserName(username string) Banner {
    currentYear := strconv.Itoa(time.Now().Year())

    return Banner{
       Title:               "欢迎页面",
       WelcomeTitle:        "欢迎来到我们的网站",
       Message:             "这是一个使用Gin框架和渐变背景的欢迎页面示例",
       UserName:            username,
       PrimaryButtonText:   "开始体验",
       SecondaryButtonText: "查看更多",
       FooterText:          "版权所有",
       CurrentYear:         currentYear,
    }
}
func Index(c *gin.Context) {
    username := c.DefaultPostForm("username", "Coder")

    b := NewBannerWithUserName(username)

    c.HTML(http.StatusOK, "index.html", b) // 这里的obj可以是map, 总之可以是任意对象
}
摇AI写的前端
<!-- index.html -->
<!DOCTYPE html>
<html lang="zh-CN">
<head>
    <meta charset="UTF-8">
    <meta name="viewport" content="width=device-width, initial-scale=1.0">
    <title>{{ .Title }}</title>
    <style>
        body {
            margin: 0;
            padding: 0;
            min-height: 100vh;
            background: linear-gradient(135deg, #667eea 0%, #764ba2 100%);
            font-family: 'Arial', sans-serif;
            display: flex;
            justify-content: center;
            align-items: center;
        }

        .welcome-container {
            text-align: center;
            background: rgba(255, 255, 255, 0.1);
            backdrop-filter: blur(10px);
            border-radius: 20px;
            padding: 40px;
            box-shadow: 0 8px 32px rgba(0, 0, 0, 0.1);
            border: 1px solid rgba(255, 255, 255, 0.2);
            max-width: 500px;
            width: 80%;
        }

        .welcome-title {
            color: white;
            font-size: 2.5rem;
            margin-bottom: 20px;
            text-shadow: 0 2px 4px rgba(0, 0, 0, 0.2);
        }

        .welcome-message {
            color: rgba(255, 255, 255, 0.9);
            font-size: 1.2rem;
            line-height: 1.6;
            margin-bottom: 30px;
        }

        .user-name {
            color: #ffd700;
            font-weight: bold;
        }

        .btn {
            background: rgba(255, 255, 255, 0.2);
            color: white;
            border: none;
            padding: 12px 30px;
            font-size: 1rem;
            border-radius: 25px;
            cursor: pointer;
            transition: all 0.3s ease;
            margin: 10px;
        }

        .btn:hover {
            background: rgba(255, 255, 255, 0.3);
            transform: translateY(-2px);
            box-shadow: 0 4px 15px rgba(0, 0, 0, 0.2);
        }

        .btn-primary {
            background: linear-gradient(45deg, #ff6b6b, #ee5a24);
        }

        .btn-secondary {
            background: linear-gradient(45deg, #1dd1a1, #10ac84);
        }

        .footer {
            margin-top: 30px;
            color: rgba(255, 255, 255, 0.7);
            font-size: 0.9rem;
        }

        /* 响应式设计 */        @media (max-width: 768px) {
            .welcome-container {
                padding: 20px;
                width: 90%;
            }

            .welcome-title {
                font-size: 2rem;
            }

            .welcome-message {
                font-size: 1rem;
            }
        }
    </style>
</head>
<body>
    <div class="welcome-container">
        <h1 class="welcome-title">{{ .WelcomeTitle }}</h1>
        <p class="welcome-message">
            {{ .Message }}
        </p>
        <p class="welcome-message">
            欢迎您,<span class="user-name">{{ .UserName }}</span>!
        </p>
        <div>
            <button class="btn btn-primary">{{ .PrimaryButtonText }}</button>
            <button class="btn btn-secondary">{{ .SecondaryButtonText }}</button>
        </div>
        <div class="footer">
            <p>{{ .FooterText }} - {{ .CurrentYear }}</p>
        </div>
    </div>
</body>
</html>模板渲染(二):完整语法学习
上下文
使用$访问上下文:
.访问当前位置的上下文$引用当前模板根级的上下文$.引用模板中的根级上下文
那么问题来了,上下文是什么?如何知道现在是什么上下文?
在 Gin 模板语法中,"上下文"(context) 指的是传递给模板的数据对象。
- 主要特点:
- 数据来源
- 在
c.HTML()方法中通过第三个参数传递 - 可以是结构体实例、map、或其他任意对象
- 在
- 数据来源
- 模板中的引用方式
- 使用
{{ . }}语法访问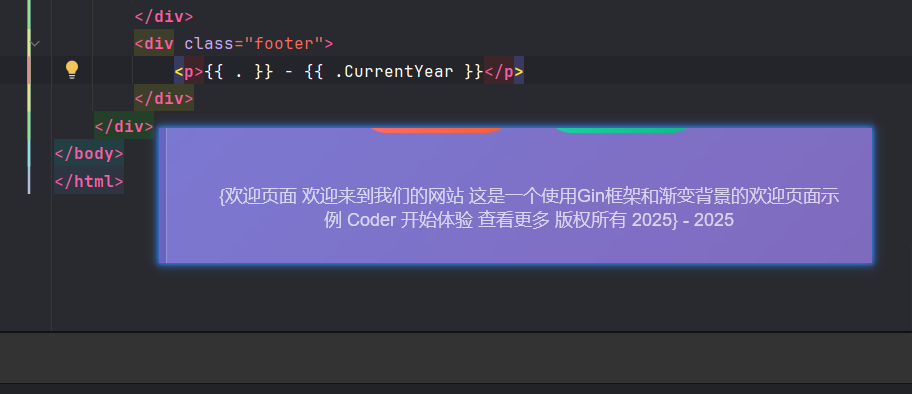
.代表当前上下文根对象(对于前面的代码,是传入模板的Banner结构体实例)- 通过字段名访问具体属性,如
{{ .Title }}
- 使用
那么,$又有什么用处呢?
在 Go 的 HTML 模板语法中,$ 有以下重要作用:
- 变量声明和引用
{{ $variable := . }}- 声明并赋值一个变量{{ $variable }} - 引用已声明的变量 - 在
range中的特殊用法
在range循环中,$主要用于:- 获取键值对:
{{ range $key, $value := .Items }} <p>Key: {{ $key }}, Value: {{ $value }}</p> {{ end }} - 保持外部变量引用:
{{ $outer := .Title }} {{ range .Users }} <p>{{ $outer }} - User: {{ .Name }}</p> {{ end }} - 根作用域访问
- 混合示例:
{{ $title := .PageTitle }}  <!-- 声明变量 -->
{{ range $index, $user := .Users }}
  <div>
    <h3>{{ $title }} - 用户 #{{ $index }}</h3>  <!-- 使用变量和索引 -->
    <p>姓名: {{ $user.Name }}</p>  <!-- 访问当前用户 -->
    <p>完整标题: {{ $ }} </p>  <!-- 访问根作用域 -->
  </div>
{{ end }}
- 获取键值对:
复合结构遍历
示例
// api/map.go
package api

import (
    "net/http"

    "github.com/gin-gonic/gin")

type User map[string]any
type Product map[string]any

var users []User

var products []Product

var namedProducts map[string]Product

func init() {
    users = []User{
       {"id": 1, "name": "Joe"},
       {"id": 2, "name": "Mike"},
       {"id": 3, "name": "Jane"},
    }
    products = []Product{
       {"id": 1, "name": "Apple"},
       {"id": 2, "name": "Banana"},
       {"id": 3, "name": "Orange"},
    }
    namedProducts = map[string]Product{
       "Apple":  {"id": 1, "name": "Apple"},
       "Banana": {"id": 2, "name": "Banana"},
       "Orange": {"id": 3, "name": "Orange"},
    }
}

func MapResponse(c *gin.Context) {
    data := map[string]any{
       "Users":         users,
       "Products":      products,
       "NamedProducts": namedProducts,
    }

    c.HTML(http.StatusOK, "slice.html", data)
}
<!-- map.html -->
<!DOCTYPE html>
<html lang="en">
<head>
<meta charset="UTF-8">
<title>在HTML模板中遍历切片上下文</title>
<style>
body {
font-family: Arial, sans-serif;
margin: 20px;
background-color: #f5f5f5;
}
.container {
max-width: 800px;
margin: 0 auto;
background-color: white;
padding: 20px;
border-radius: 8px;
box-shadow: 0 2px 10px rgba(0,0,0,0.1);
}
h1 {
color: #333;
text-align: center;
}
.item-card {
border: 1px solid #ddd;
border-radius: 5px;
padding: 15px;
margin: 10px 0;
background-color: #fafafa;
}
.item-title {
font-weight: bold;
color: #555;
margin-bottom: 10px;
font-size: 1.2em;
}
.key-value-pair {
display: flex;
margin: 5px 0;
}
.key {
font-weight: bold;
min-width: 120px;
color: #666;
}
.value {
color: #333;
}
.section {
margin: 20px 0;
}
.section-title {
font-size: 1.1em;
color: #444;
border-bottom: 2px solid #007bff;
padding-bottom: 5px;
margin-bottom: 15px;
}
</style>
</head>
<body>
<div class="container">
<h1>在HTML模板中遍历切片中的Map</h1>
<!-- 示例1:遍历用户列表 -->
<div class="section">
<div class="section-title">用户信息列表</div>
{{range .Users}}
<div class="item-card">
<div class="item-title">用户详情</div>
{{range $key, $value := .}}
<div class="key-value-pair">
<span class="key">{{$key}}:</span>
<span class="value">{{$value}}</span>
</div>
{{end}}
</div>
{{end}}
</div>
<!-- 示例2:遍历产品列表 -->
<div class="section">
<div class="section-title">产品信息列表</div>
{{range .Products}}
<div class="item-card">
<div class="item-title">产品详情</div>
{{range $key, $value := .}}
<div class="key-value-pair">
<span class="key">{{$key}}:</span>
<span class="value">{{$value}}</span>
</div>
{{end}}
</div>
{{end}}
</div>
<!-- 示例3:带索引的遍历 -->
<div class="section">
<div class="section-title">带索引的遍历</div>
{{range $index, $item := .NamedProducts}}
<div class="item-card">
<div class="item-title">带索引的产品列表 #{{$index}}</div>
{{range $key, $value := $item}}
<div class="key-value-pair">
<span class="key">{{$key}}:</span>
<span class="value">{{$value}}</span>
</div>
{{end}}
</div>
{{end}}
</div>
</div>
</body>
</html>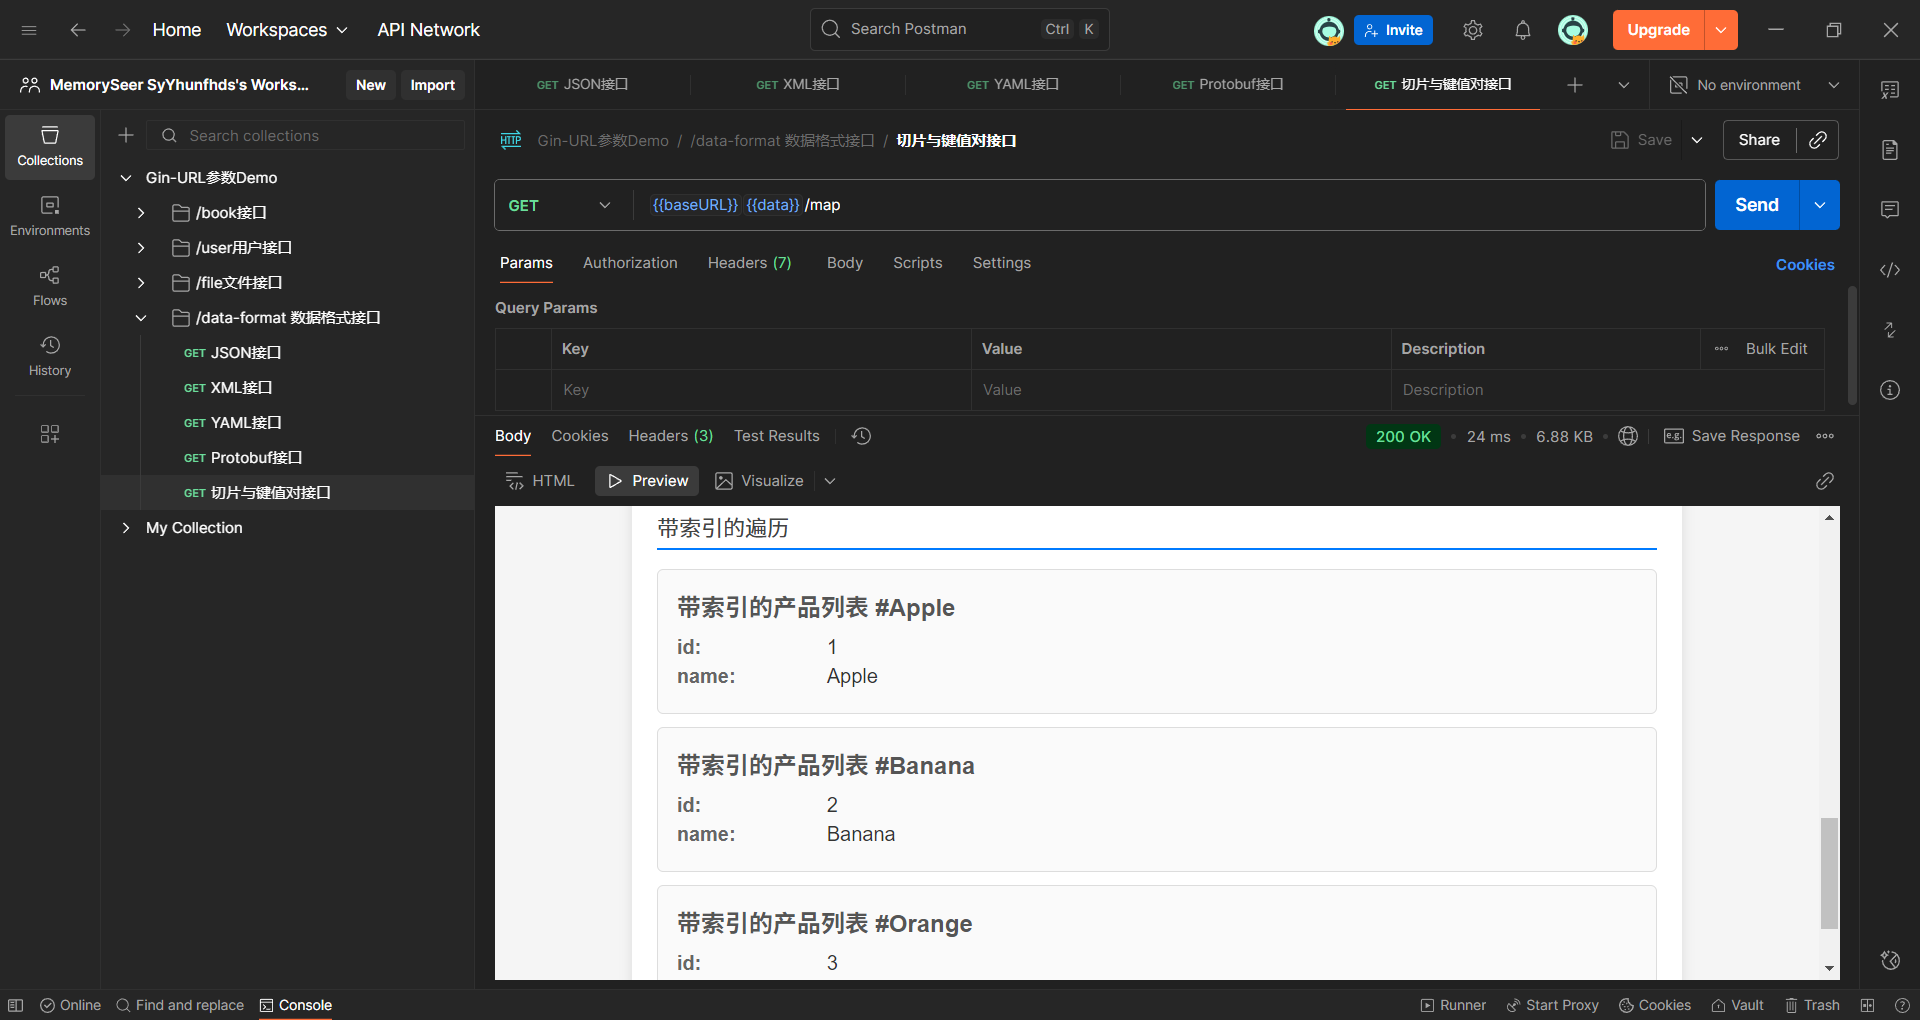
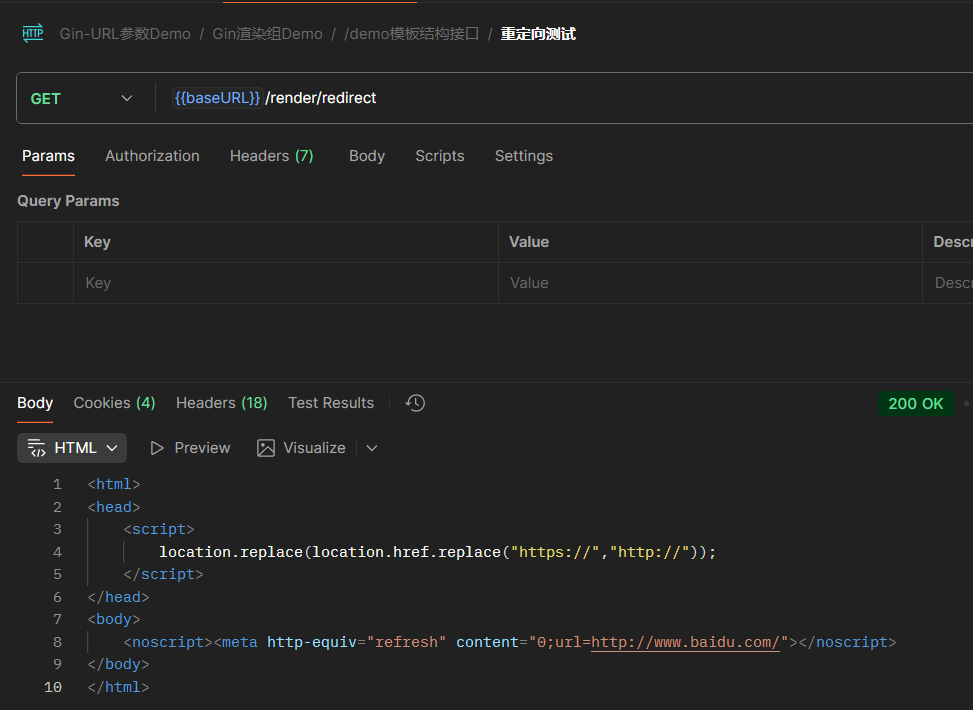
重定向
c.Redirect方法
func RedirectDemo(c *gin.Context) {
    // url := c.DefaultQuery("url", "www.baidu.com")
    // 不写协议头会被视作相对路径跳转
    url := c.DefaultQuery("url", "https://www.baidu.com")  // SSRF漏洞警告

    c.Redirect(http.StatusMovedPermanently, url)
}
同步与异步 (AI)
示例代码来自topgoer文档
首先需要明确一个核心概念:在 Gin(以及几乎所有的 Web 框架)的上下文中,“同步”与“异步”描述的是 HTTP 请求处理函数(Handler)的执行方式。
- 同步 (Synchronous):处理请求的逻辑阻塞了 HTTP 的响应。也就是说,服务器必须完成所有的处理工作,然后才能给客户端返回结果。
- 异步 (Asynchronous):处理请求的逻辑不阻塞 HTTP 的响应。服务器可以立即(或很快)返回一个响应给客户端,同时将耗时的任务放到后台去执行。
1. 同步执行 (Synchronous)
文档中的同步示例代码如下:
// 2.同步
r.GET("/long_sync", func(c *gin.Context) {
    time.Sleep(3 * time.Second) // 模拟一个耗时3秒的操作
    log.Println("同步执行:" + c.Request.URL.Path)
    // 注意:在这个例子中,它没有显式地返回响应,
    // 但 Gin 会在函数结束后默认返回 200 OK
})
执行流程解读:
- 客户端(例如浏览器)向
/long_sync发送一个 GET 请求。 - Gin 接收到请求,并调用这个处理函数。
- 函数开始执行
time.Sleep(3 * time.Second)。在这整整 3 秒内:- 这个处理函数会一直被阻塞,不会继续向下执行。
- 处理这个请求的 Go 协程(goroutine)会一直被占用。
- 客户端的连接会一直被挂起,浏览器会显示“正在加载”或“转圈”的状态。
- 3 秒结束后,
time.Sleep完成。 log.Println(...)被执行,在服务器控制台打印日志。- 处理函数执行完毕,Gin 向客户端发送一个 HTTP 200 OK 的响应。
- 客户端收到响应,停止“转圈”,请求完成。
核心特征:“先做完事,再给答复”。客户端必须等待所有工作(包括耗时的 time.Sleep)全部完成后,才能得到响应。
适用场景:绝大多数的 API 请求。例如,查询数据库、读取文件、返回 JSON 数据等。这些操作通常很快,客户端等待一个可以接受的时间(几十到几百毫秒)来直接获取结果。
2. 异步执行 (Asynchronous)
文档中的异步示例代码如下:
// 1.异步
r.GET("/long_async", func(c *gin.Context) {
    // 需要搞一个副本
    copyContext := c.Copy()
    // 异步处理
    go func() {
        time.Sleep(3 * time.Second) // 模拟一个耗时3秒的操作
        log.Println("异步执行:" + copyContext.Request.URL.Path)
    }()
    // 注意:这个处理函数在启动 goroutine 后,会立刻结束
})
执行流程解读:
- 客户端向
/long_async发送一个 GET 请求。 - Gin 调用这个处理函数。
- 关键点 1:
copyContext := c.Copy()。处理函数创建了gin.Context的一个只读副本。这一点至关重要,我们稍后解释。 - 关键点 2:
go func() { ... }()。处理函数启动了一个新的 goroutine 去执行耗时的操作。 - 主处理函数不会等待这个新的 goroutine 执行完毕。它会立刻向下执行。
- 由于下面没有其他代码,主处理函数立即返回。
- Gin 几乎在收到请求的瞬间就向客户端发送了一个 HTTP 200 OK 的响应。
- 客户端立即收到响应,请求完成。
- 与此同时,在服务器后台,那个新的 goroutine 仍在运行。大约 3 秒后,它内部的
time.Sleep结束,并打印出日志。这个后台任务的完成与否,客户端是完全不知道的。
核心特征:“先给答复,再去做事”。服务器迅速响应客户端,告诉它“我已经收到你的请求了”,然后把真正的重活、累活放到后台慢慢做。
适用场景:
- 长时间运行的任务:例如,生成一份复杂的报告、发送邮件或短信通知、处理一个大的视频文件等。你不能让用户在网页上干等几分钟。
- 削峰填谷:当瞬间有大量请求涌入时(例如秒杀活动),可以先把所有请求接下来,放到消息队列或后台任务池中慢慢处理,避免系统被瞬间流量冲垮。
为什么需要 c.Copy()?
这是文档中特别强调的一点,也是异步处理中一个非常容易出错的“坑”。
gin.Context 对象(通常变量名为 c)包含了与单个 HTTP 请求相关的所有信息(请求头、参数、响应写入器等)。在 Gin 的设计中,这个对象在一次请求-响应的生命周期结束后,会被回收并复用,以提高性能。
- 如果不复制:在你启动的
go func()还在后台time.Sleep的时候,主处理函数已经结束了,HTTP 响应也已经发送了。Gin 会认为这次请求处理完毕,然后就会把c这个Context对象回收。当你的后台 goroutine 在 3 秒后醒来,尝试访问c.Request.URL.Path时,它访问的可能是一个已经被重置、或者被下一个请求污染了的Context,这会导致程序崩溃或数据错乱。 - 复制的好处:
c.Copy()创建了一个与当前请求相关的、安全的数据副本。这个副本不会被 Gin 的回收机制影响,因此你可以在后台的 goroutine 中安全地使用它来获取请求数据。
总结一下:
| 特性 | 同步 | 异步 (通过 go 关键字) |
|---|---|---|
| 响应时机 | 所有任务处理完成后 | 启动后台任务后立即 |
| 客户端体验 | 需要等待,直到任务完成 | 几乎瞬间得到响应 |
| 资源占用 | 单次请求的处理 goroutine 会被长时间占用 | 主处理 goroutine 迅速释放,耗时任务由新 goroutine 接管 |
gin.Context 使用 | 直接使用 c | 必须使用 c.Copy() 的副本传入后台 goroutine |
| 适用场景 | 快速、需要立即返回结果的常规 API | 耗时任务、无需立即返回结果、批量处理 |