从零开始的Fyne(一)
快速开始
Using the Fyne toolkit to build cross platform applications is very simple but does require some tools to be installed before you can begin. If your computer is set up for development with Go then the following steps may not be required, but we advise reading the tips for your operating system just in case. If later steps in this tutorial fail then you should re-visit the prerequisites below.
使用Fyne框架开发跨平台软件非常容易,但在你真正开始之前仍然需要安装一些工具。如果你的工作站是用于Go开发的,那么你可能不需要阅读接下来的步骤,但我们仍然建议你阅读其中与系统依赖有关的条文,以防你需要。如果你在教程的后续步骤里卡住了,那么你应该回顾下面的依赖 章节
依赖
Fyne requires 3 basic elements to be present, the Go tools (at least version 1.19), a C compiler (to connect with system graphics drivers) and a system graphics driver. The instructions vary depending on your operating system, choose the appropriate tab below for installation instructions.
Note that these steps are just required for development - your Fyne applications will not require any setup or dependency installation for end users!
Fyne需要如下三个基本要素:
- Go > 1.19
- C编译器(与系统图形驱动通信)
- 图形驱动
你要做的事情取决于你的系统,请选择合适你的情况的指令
注
只是开发环境需要这些步骤——你的用户不需要这些配置步骤
Supported Platforms see: wiki/Supported-Platforms
点击维基链接查看Fyne支持的平台
Windows
The MSYS2 platform is the recommended approach for working on Windows. Proceed as follows:
- Install MSYS2 from msys2.org
- Once installed do not use the MSYS terminal that opens
- Open “MSYS2 MinGW 64-bit” from the start menu
- Execute the following commands (if asked for install options be sure to choose “all”):
$ pacman -Syu $ pacman -S git mingw-w64-x86_64-toolchain mingw-w64-x86_64-go - You will need to add ~/Go/bin to your $PATH, for MSYS2 you can paste the following command into your terminal:
$ echo "export PATH=\$PATH:~/Go/bin" >> ~/.bashrc - For the compiler to work on other terminals you will need to set up the windows %PATH% variable to find these tools. Go to the “Edit the system environment variables” control panel, tap “Advanced” and add “C:\msys64\mingw64\bin” to the Path list.
Fyne推荐你使用MSYS2平台,以开发适用于Windows桌面端的应用。请按照下面的步骤做:
- 从MSYS2.org下载并安装MSYS2
- 安装好之后不要使用MSYS2弹出来的终端
- 从开始菜单里打开 MSYS2 MinGW 64-bit
- 执行下面的指令(如果它询问安装选项,那就选择
all)(默认就是all)
pacman -Syu
pacman -S git mingw-w64-x86_64-toolchain mingw-w64-x86_64-go- 你还需要把
~/Go/bin加入到环境变量中,对于MSYS2你可以直接执行下面的指令:
echo "export PATH=\$PATH:~/Go/bin" >> ~/.bashrc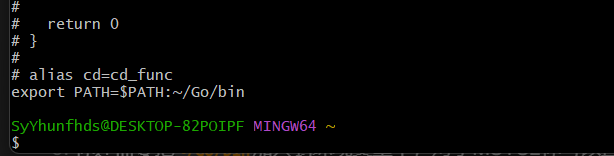
6. 为了让编译器在其他终端中也能使用,你需要编辑环境变量来让系统找到MSYS2工具。在 编辑系统环境变量->高级 选项卡里把 <MSYS2安装目录>\mingw64\bin 添加到列表里
在我的电脑上,配置的目录是F:\SoftWare\msys64\mingw64\bin
Linux
You will need to install Go, GCC and the graphics library header files using your package manager. Choose the command corresponding to your distribution:
- Debian, Ubuntu and Raspberry Pi OS:
sudo apt-get install golang gcc libgl1-mesa-dev xorg-dev libxkbcommon-dev - Fedora:
sudo dnf install golang golang-misc gcc libXcursor-devel libXrandr-devel mesa-libGL-devel libXi-devel libXinerama-devel libXxf86vm-devel libxkbcommon-devel wayland-devel - Arch Linux:
sudo pacman -S go xorg-server-devel libxcursor libxrandr libxinerama libxi libxkbcommon - Solus:
sudo eopkg it -c system.devel golang mesalib-devel libxrandr-devel libxcursor-devel libxi-devel libxinerama-devel libxkbcommon-devel - openSUSE:
sudo zypper install go gcc libXcursor-devel libXrandr-devel Mesa-libGL-devel libXi-devel libXinerama-devel libXxf86vm-devel libxkbcommon-devel - Void Linux:
sudo xbps-install -S go base-devel xorg-server-devel libXrandr-devel libXcursor-devel libXinerama-devel libXxf86vm-devel libxkbcommon-devel wayland-devel - Alpine Linux
sudo apk add go gcc libxcursor-dev libxrandr-dev libxinerama-dev libxi-dev linux-headers mesa-dev libxkbcommon-dev wayland-dev - NixOS
nix-shell -p libGL pkg-config xorg.libX11.dev xorg.libXcursor xorg.libXi xorg.libXinerama xorg.libXrandr xorg.libXxf86vm libxkbcommon wayland
macOS
BSD
Android
iOS
下载
Since Go 1.16 you will need to set up the module before you can use the package.
Run the following command and replace
MODULE_NAMEwith your preferred module name (this should be called in a new folder specific for your application).
$ mkdir myapp
$ cd myapp
$ go mod init MODULE_NAME
You now need to download the Fyne module and helper tool. This will be done using the following commands:
$ go get fyne.io/fyne/v2@latest
$ go install fyne.io/tools/cmd/fyne@latest
If you are unsure of how Go modules work, consider reading Tutorial: Create a Go module
从Go 1.16开始你需要在导包之前先新建一个module项目
新建项目:
$ mkdir myapp
$ cd myapp
$ go mod init MODULE_NAME
引入Fyne依赖:
$ go get fyne.io/fyne/v2@latest
$ go install fyne.io/tools/cmd/fyne@latest如果你搞不清楚Go的包管理机制,请考虑阅读教程:创建一个Go Module
检查依赖
在真正开始写代码之前,你可以通过Fyne Setup工具检查你的开发环境。只需要下载下来,然后运行它,你应该能看到下面的页面: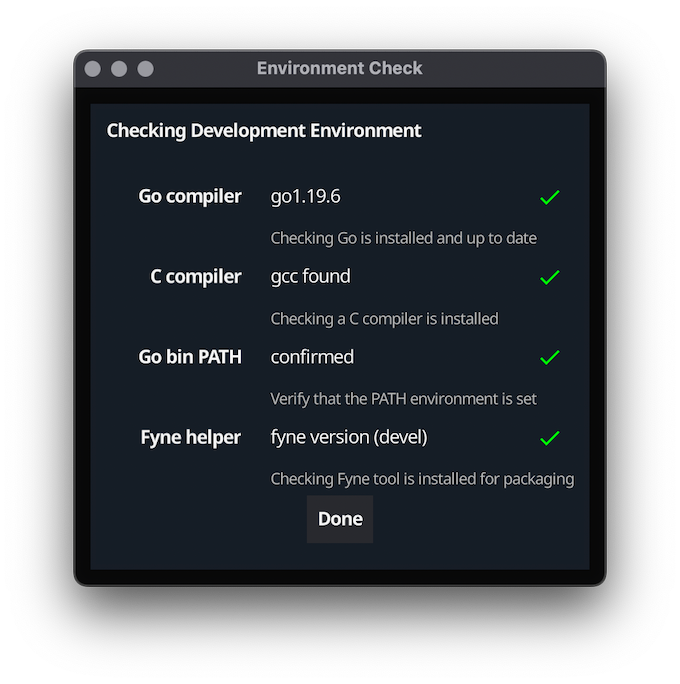
如果你遇到了问题,请查看troubleshooting这一节寻找帮助
(我自己测试的)
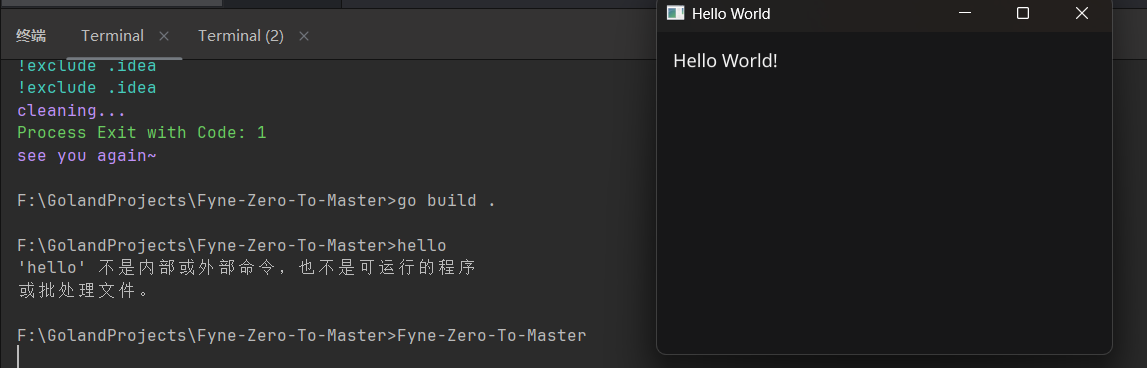
运行Demo
如果你想在开始写代码前先看看效果,你可以先跑跑demo app看看:
go run fyne.io/demo@latest
写下你的第一个程序
A simple app starts by creating an app instance with app.New() and then opening a window with app.NewWindow(). Then a widget tree is defined that is set as the main content with SetContent() on a window. The app UI is then shown by calling ShowAndRun() on the window.
app.New()创建一个APP实例app.NewWindow()打开一个窗口.SetContent()创建 组件树ShowAndRun()在窗口内渲染UI
package main

import (
    "fyne.io/fyne/v2/app"
    "fyne.io/fyne/v2/widget")

func main() {
    a := app.New()
    w := a.NewWindow("Hello World")

    w.SetContent(widget.NewLabel("Hello World!"))
    w.ShowAndRun()
}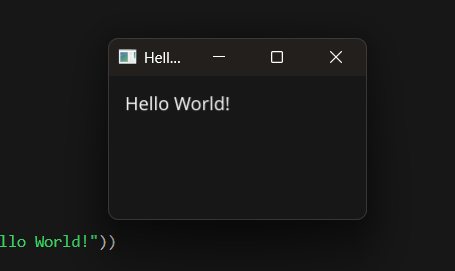
可以直接go run .执行文件,也可以先编译再执行

如果需要浅色背景,可以设置FYNE_THEME=light
应用程序与轮询循环
For a GUI application to work it needs to run an event loop (sometimes called a runloop) that processes user interactions and drawing events. In Fyne this is started using the
App.Run()orWindow.ShowAndRun()functions. One of these must be called from the end of your setup code in themain()function.
GUI程序需要跑在一个事件循环(runloop)里,以便程序处理用户交互和图形绘制。在Fyne里执行这件事的是App.Run()或Windows.ShowAndRun()函数。你需要在main函数末尾执行这两个中的一个
An application should only have one runloop and so you should only call
Run()once in your code. Calling it a second time will cause errors
一个APP只能有一个事件循环,并且只能执行一次Run方法。二次调用这个方法将抛出错误
package main

import (
    "log"
    "os"
    "fyne.io/fyne/v2/app"    "fyne.io/fyne/v2/widget")

func main() {
    _ = os.Setenv("FYNE_THEME", "light")

    a := app.New()
    w := a.NewWindow("Hello World")

    w.SetContent(widget.NewLabel("Hello World!"))

    w.Show()
    a.Run()

    log.Printf("程序退出")
}
For desktop runtimes an app can be quit directly by calling
App.Quit()(mobile apps do not support this) - normally not needed in developer code. An application will also quit once all the windows are closed. See also that functions executed afterRun()will not be called until the application exits.
在桌面运行时,可以通过App.Quit()方法直接退出程序(移动端APP不支持这个)——通常来说开发时不需要写这个,当窗口关闭时APP也会自行退出。示例代码里的log语句会在APP退出后才执行。
更新Content
The first step is to assign the widget you want to update to a variable. In the hello world tutorial we passed
widget.NewLabeldirectly intoSetContent(), to update it we change that to two different lines, such as:
第一步是声明并赋值一个你想更新的组件(widget )。在上一章中,我们直接把widget.NewLabel传递给了SetContent方法,我们可以把这个过程拆开来,比如说:
message := widget.NewLabel("Welcome!")
myWindow.SetContent(message)
Once the content has been assigned to a variable we can call functions like
SetText("new text"). For our example we will set the content of our label to the current time, with the help ofTime.Format.
我们可以调用SetText("new text")之类的函数来声明一个组件。在接下来的例子中我们将更新messasge组件的内容为当前时间:
formatted := time.Now().Format("2006-01-02 15:04:05")
message.SetText(formatted)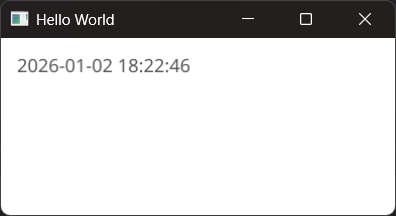
That is all we need to do to change content of a visible item (see below for the full code). In the following example we put that code into a button tap - now each time the button is tapped the time will be displayed in the Label widget.
这样我们就更新了一个content的可见部分(下面是完整的代码)。在接下来的例子中我们将把这部分代码放到按钮里——每次点击按钮都会更新Label组件中的内容:
package main

import (
    "log"
    "os"    "time"
    "fyne.io/fyne/v2/app"    "fyne.io/fyne/v2/container"    "fyne.io/fyne/v2/widget")

func main() {
    _ = os.Setenv("FYNE_THEME", "light")

    myApp := app.New()
    myWindow := myApp.NewWindow("Hello World")

    message := widget.NewLabel("Welcome")
    button := widget.NewButton("Update", func() {
       formatted := time.Now().Format("15:04:05")
       message.SetText(formatted)
    })
    // 垂直容器, 由上到下排列组件
    myWindow.SetContent(container.NewVBox(message, button))

    myWindow.Show()
    myApp.Run()

    log.Printf("程序退出")
}
窗口处理
Windows are created using
App.NewWindow()and need to be shown using theShow()function. The helper methodShowAndRun()onfyne.Windowallows you to show your window and run the application at the same time.
Fyne使用App.NewWindows()创建窗口,并需要使用Show()函数使窗口可见。fyne.Windows的ShowAndRun方法允许你同时渲染窗口和运行APP实例
By default a window will be the right size to show its content by checking the
MinSize()function (more on that in later examples). You can set a larger size by calling theWindow.Resize()method. Into this is passed afyne.Sizewhich contains a width and height using device independent pixels (meaning that it will be the same across different devices), for example to make a window square by default we could:
一般来说,窗口会检查MinSize()返回值,调整到合适的大小以刚好容纳其内容(我们会在之后的例子中详细讲到这个函数)。可以通过Window.Resize()调大窗口尺寸。Window.Resize函数接受一个fyne.Size参数(其中的宽高字段基于与设备无关的像素,意味着它在不同设备上看起来都是一样的大小)。
type Size struct {
    Width  float32
    Height float32
}
例如,我们可以像下面这样创建一个正方形窗口:
myWindow.Resize(fyne.NewSize(200, 200))Be aware that the desktop environment may have constraints that cause windows to be smaller than requested. Mobile devices will typically ignore this as they are only displayed at full-screen.
重要
不同的桌面端环境对窗口尺寸可能有不同限制,导致窗口比开发者所请求的要小。移动端通常会忽略窗口尺寸请求,因为程序默认就是全屏显示的
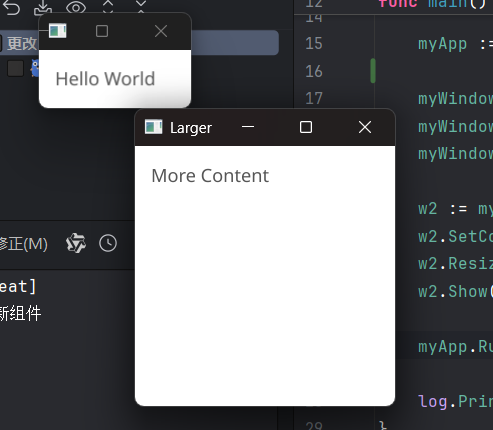
If you wish to show a second window you must only call the
Show()function. It can also be helpful to splitWindow.Show()fromApp.Run()if you want to open multiple windows when your application starts. The example below shows how to load two windows when starting.
如果你想打开第二个窗口,那么你只能调用Show()函数。当你想要在APP启动之后打开多个窗口时,着有助于你分离Window.Show()和App.Run()。下面的例子演示了如何在APP启动时打开两个窗口:
package main

import (
    "log"
    "os"
    "fyne.io/fyne/v2"    "fyne.io/fyne/v2/app"    "fyne.io/fyne/v2/widget")

func main() {
    _ = os.Setenv("FYNE_THEME", "light")

    myApp := app.New()

    myWindow := myApp.NewWindow("Hello World")
    myWindow.SetContent(widget.NewLabel("Hello World"))
    myWindow.Show()

    w2 := myApp.NewWindow("Larger")
    w2.SetContent(widget.NewLabel("More Content"))
    w2.Resize(fyne.NewSize(200, 200))
    w2.Show()

    myApp.Run()

    log.Printf("程序退出")
}
The above application will exit when both windows are closed. If your app is arranged so one window is main and the others are accessory views you can set one window to be “master” so that the app exits if that window is closed. To do this use the
SetMaster()function onWindow.
两个窗口都被关闭后程序才会退出。如果你希望一个窗口是主窗口,另一个窗口是附属窗口,你可以把其中一个窗口设置为主窗口,这样那个窗口被关闭后程序就会立即退出。你需要调用Window.SetMaster
窗口可以随时打开,我们可以给上面的w2窗口加一个按钮,点击一下就打开一个新的窗口。你还可以从其他更复杂的工作流中导入窗口,但要注意新的窗口通常来说会叠在已有的内容上
w2.SetContent(widget.NewButton("Open New Window", func() {
    w3 := myApp.NewWindow("Third")
    w3.SetContent(widget.NewLabel("Third"))
    w3.Show()
}))

该你了,协程
Since Fyne v2.6.0 all Fyne events and callbacks happen on the same goroutine - this allows for higher performance and much better thread safety than any previous version.
With this change applications that wish to use goroutines (to do background updates for example) have a little more work to do to get the same safety and performance as internal widgets.
Fyne 2.6.0+将所有事件和回调都放在一个协程中跑——相比以前的版本,这能带来更好的性能和更安全的线程隔离。也是因为这项改动,那些想要使用协程的开发者就得费点心来还原内部组件的性能和安全性了
在协程里更新内容
Any time your app invokes Fyne APIs from a goroutine your code created, you should use the
fyne.Dofunction. This tells Fyne that you want to queue changes to the application interface. For example with acanvas.Textcalledoutputyou may want to update the time each second. The key code there would be:
不论什么时候你想调用Fyne API,你都需要使用fyne.Do函数。 Fyne会知道你想在把事件更新排进队列里。比如说你想每秒更新一次一个叫output的canvas.Text组件,你需要下面的核心代码:
	fyne.Do(func() {
		output.Text = time.Now().Format(time.TimeOnly)
		output.Refresh()
	})
Such an update would occur in a goroutine that may be started from your main func. You can see a complete clock example app below:
Fyne会在程序的子协程里处理这次更新。你会在示例程序底部看到一个计时器:
package main

import (
    "image/color"
    "log"    "time"
    "fyne.io/fyne/v2"    "fyne.io/fyne/v2/app"    "fyne.io/fyne/v2/canvas")

func main() {
    // _ = os.Setenv("FYNE_THEME", "light")

    myApp := app.New()
    myWindow := myApp.NewWindow("Hello")

    output := canvas.NewText(
       time.Now().Format("2006-01-02 15:04:05"), color.NRGBA{G: 0xFF, A: 0xFF}, // 256色通道
    )
    output.TextStyle.Monospace = true
    output.TextSize = 32
    myWindow.SetContent(output)

    go func() {
       ticker := time.NewTicker(1 * time.Second)
       defer ticker.Stop()

       for range ticker.C {
          fyne.Do(func() {
             output.Text = time.Now().Format("2006-01-02 15:04:05")
             output.Refresh()
          })
       }
    }()

    myWindow.Show()
    myApp.Run()

    log.Printf("程序退出")
}
等待代码跑起来
When calling
fyne.Dothe code will execute between when you request it and the next frame to draw - which could be up to 15ms later. Some times it is necessary to know when that process has finished. For example if you are updating an image buffer and do not want to start again until after it is processed for the next visual update.
Fyne会在你请求函数之后,绘制下一帧之前处理fyne.Do中的代码——这可能会有至多15毫秒的延迟。有时候你得知道这个流程什么时候会跑完。比如当你想更新一张图片缓冲,但不想看到函数在下一帧绘制完后又立即被执行(???什么绕口令)
To do this another function,
fyne.DoAndWaitis useful. This takes the same parameter as theDoversion above, but it will not return until the update is complete. This means the next line in your app will happen after the user interface is updated - very useful if you want to avoid potential issues with accessing shared resources concurrently.
fyne.DoAndWait在这时会很有用。它也是只接受一个闭包函数作为参数(和fyne.Do一样),但会在下一帧绘制完成后才退出。这意味着程序会在更新完UI之后再执行下一次Do协程——很有用,特别是当你在并发访问共享资源时,你想避免一些潜在BUG
单元测试
Part of a good test suite is being able to quickly write tests and run them on a regular basis. Fyne’s API is designed to make testing applications easy. By separating component logic from its rendering definition we can load applications without actually displaying them and test the functionality completely.
优秀的测试套具应该是能够快速编写测试样例,并在正常环境中运行它们的。Fyne API从设计之初就是便于编写测试程序的。通过从其渲染定义中分离组件逻辑,我们可以在不实际显示APP的前提下加载APP并全面地测试其功能
We can demonstrate unit testing by extending our Hello World app to include space for users to input their name to be greeted. We start by updating the user interface to have two elements, a
Labelfor the greeting and anEntryfor the name input. We display them, one above another, usingcontainer.NewVBox(a vertical box container). The updated user interface code will look as follows:
我们可以从之前的Demo中抽离出测试样例,容纳一个用户问候界面。我们需要加入两个元素,一个是用来显示问候语的Label组件,另一个是输入名字的Entry组件。我们使用container.NewVBox(一个垂直容器)来摆放它们。新的代码如下所示:
func makeUI() (label *widget.Label, entry *widget.Entry) {
    return widget.NewLabel("Hello World"), widget.NewEntry()
}

func main() {
    // _ = os.Setenv("FYNE_THEME", "light")

    myApp := app.New()
    myWindow := myApp.NewWindow("Hello")

    myWindow.SetContent(container.NewVBox(makeUI()))

    myWindow.Show()
    myApp.Run()

    log.Printf("程序退出")
}
To test this input behaviour we create a new file (with a name ending
_test.goto mark it as tests) that defines aTestGreeterfunction.
为了测试输入行为,我们需要另起一个可被testing库识别的文件(文件名以_test.go结尾,函数名以Test开头,函数参数必须为且仅能为t *testing.T),在文件里定义TestGreeter函数
We can add an initial test that verifies the initial state, to do this we test the
Textfield of theLabelthat is returned frommakeUIand error the test if it is not correct. Add the following code to your test method:
我们可以先加入一个简单的测试样例,检查组件的初始状态——我们通过检查makeUI返回的Label组件的Text字段来判断函数行为是否符合预期:
package main

import "testing"

func TestGreeter(t *testing.T) {
    out, _ := makeUI()

    if out.Text != "Hello World" {
       t.Errorf("Expected 'Hello World', got %v", out.Text)
    }
}
This test will pass - next we add to the test to validate the greeter. We use the Fyne
fyne.io/fyne/v2/testpackage which assists in test scenarios, callingtest.Typeto simulate user input. The following test code will check that the output updates when the user’s name is input (be sure to add the import as well):
正常来说这个测试样例不会有问题。接下来我们将加入对问候语程序的校验。我们使用fyne.io/fyne/v2/test模块(集成了常见测试逻辑),调用test.Type来模拟用户输入。下面的测试代码将检查用户输入名字后Label组件是否发生变化(记得补上依赖):
test.Type(in, "SyYhunfhds")
if out.Text != "Hello SyYhunfhds" {
    t.Errorf("Expected 'Hello SyYhunfhds', got %v", out.Text)
}
You can run all of these tests using
go test .- just like any other tests. Doing so you will now see a failure - because we did not add the greeter logic. Update themakeUIfunction to the following code:
你现在可以通过go test .运行当前目录所有测试文件中的所有测试函数。这么做你会看到有一个样例不通过——这是因为我们还没有加入问候逻辑。请像下面这样更新makeUI函数:
func makeUI() (label *widget.Label, entry *widget.Entry) {
    label = widget.NewLabel("Hello World")
    entry = widget.NewEntry()

    entry.OnChanged = func(input string) {
       label.SetText(fmt.Sprintf("Hello %v", input))
    }

    return label, entry
}
牛逼,还是响应式的
Doing so you will see that the tests now pass. You can also run the full application (using
go run .) and see the greeting update as you enter a name in theEntryfield. Notice also that these tests all run without displaying a window or stealing your mouse - this is another benefit of the Fyne unit testing setup.
桌面端打包
Packaging a graphical app for distribution can be complex. Graphical applications typically have icons and metadata associated with them as well as specific formats required to integrate with each environment. Windows executables need embedded icons, macOS apps are bundles and with Linux there are various metadata files that should get installed. What a hassle!
碎碎念……
Thankfully the “fyne” app has a “package” command that can handle this automatically. Just specifying the target OS and any required metadata (such as icon) will generate the appropriate package. The icon conversion will be done automatically for .icns or .ico so just provide a .png file 😃. All you need is to have the application already built for the target platform…
谢天谢地,fyne提供了package指令来自动完成上面的流程,只需要指定目标系统,提供任何必要的元数据(比如说图标),fyne就可以自动生成合适的包。图标会被自动转换为.icns或.ico,所以只需要提供一张PNG图片即可😀你需要做的只有把编译好的文件放到目标系统上执行
go install fyne.io/tools/cmd/fyne@latest
fyne package -os darwin -icon myapp.png
fyne package -os linux -icon myapp.png
fyne package -os windows -icon myapp.png
这两行指令则会分别创建:
<package_name>.tar.gz:包含起始自/usr/local的目录结构,这样Linux用户可以直接在根目录中解压打包文件<package_name>.exe:自带图标和打包进去的元数据
If you want to reduce the memory footprint of your application and you don’t need debug symbols, you can add
-releaseto the packge command
如果你想降低构建体积,并且你也不需要调试符号,你可以加上package指令的-release参数:
fyne package -os windows -icon myapp.png -release(这可能会报错:缺少app-id参数 )
If you just want to install the desktop app on your computer then you can make use of the helpful install subcommand. For example to install your current application system wide you could simply execute the following:
如果你只是想把程序安装到自己的电脑上,你可以充分利用install指令:
fyne install -icon myapp.pngAll of these commands also support a default icon file of
Icon.pngso that you can avoid typing the parameter for each execution. Since Fyne 2.1 there is also a metadata file where you can set default options for your project.
所有这些指令都支持默认图标文件Icon.png这样你就不用每次都打一遍参数了。Fyne 2.1以后提供了元数据文件,你可以用于设置项目的默认打包参数
当然如果你想的话你也可以直接用Go原生套具来运行你的程序
移动端打包【略过】
在浏览器里运行
Fyne applications can also be run over the web using a standard web browser! A web app created with Fyne will bundle a WebAssembly binary which will run in most modern browsers
Fyne程序也可以跑在标准浏览器里。由Fyne创建的web程序会自带一个可以跑在大多数现代浏览器上的WASM构建文件
To prepare your app to be used over the web we use the “fyne” cli app again, which has a “serve” command for quick testing
这一次我们使用fyne CLI工具的serve指令来进行快速测试:
go install fyne.io/tools/cmd/fyne@latest
fyne serve
F:\GolandProjects\Fyne-Zero-To-Master>fyne serve -icon ./assets/myapp.png --http-port 7980
Serving at: http://localhost:7980fyne需要指定图标文件作为WASM构建文件的 icon
如果默认8080端口被占用还要使用http-port参数来设置端口
打包web发行版
The
fyne servecommand is great for local testing, but just like other platforms you’ll want to be able to distribute your app as well. To prepare the files for upload just use thefyne packagecommand like with regular Packaging.
fyne serve对于本地测试来说足够了,但对版本分发来说不够。打包web版和打包别的系统分发版本一样:
fyne package -os webDemo
You can see a Fyne app in action to test on any of your devices by visiting demo.fyne.io.
局限
As of release v2.5.0 the web driver is fully supported but is not yet 100% complete, so your app may not be able to use the following features:
fyne 2.5.0的web驱动已完全支持,但还是有些小特性,所以你的APP可能用不了下面的功能:
- 文件打开/保存对话
- 文档/记录存储
These issues are being worked on and will be resolved in a future release.
APP元数据
Since release v2.1.0 of the
fynecommand we support a metadata file that allows you to store information about your application in the repository. This file is optional, but can help to avoid having to remember specific build parameters for each package and release command.
fyne 2.1.0之后提供元数据文件,允许你在仓库里储存APP的一些信息。这个文件是可选的,但它确实能让你少写点CLI参数
基础配置
The file should be named
FyneApp.tomlin the directory where you run thefynecommand (this is normally themainpackage). The contents of the file are as follows:
文件应该命名为FyneApp.toml,放在你跑fyne指令的目录下(一般来说就是main包目录)。文件内容如下所示:
Website = "https://example.com"

[Details]
Icon = "Icon.png"
Name = "My App"
ID = "com.example.app"
Version = "1.0.0"
Build = 1 # 编译计数器; 编译一次就加一
The top portion of the file is metadata that will be used if you upload your app to the Apps listing page, so it is optional.
如果你要把你的程序上传到apps.fyne.io/,那么你会用到文件顶上那部分——所以它现在对你来说是可选的
The
Detailstable contains data about your application that are used in the release process by other app stores and operating systems.
Details段落包含你的APP在发行阶段会被APP商店和OS所要引用的信息
The
fynetool will use this file if it is found, many mandatory command parameters are not required if the metadata is present. You can still override these values by using command line parameters.
如果该文件存在,那么fyne工具会读取其中的参数。如果这一元数据文件存在的话,很多需要手写的参数也就不需要再写了。CLI参数的优先级比TOML配置文件里的要高
Linux和BSD环境下的配置
For Linux and BSD builds there is an optional table called
LinuxAndBSD. This table contains additional parameters for a “desktop entry” configuration file of the Fyne app. All parameters are optional, but when present they will be used by thefynetool (in addition to parameters from theDetailstable).
The contents of this section is as follows (with example data):
[LinuxAndBSD]
  GenericName = "Web Browser"
  Categories = ["Network"]
  Comment = "View sites on the Internet"
  Keywords = ["browser", "web"]
  ExecParams = "-x 42"
提示
Hint: For instructions on how to define these parameters correctly, please see the Desktop Entry Specification from freedesktop.org.
发布到应用商店 【略过】
编译跨平台发行版
Cross compiling with Go is designed to be simple - we just set the environment variable
GOOSfor the target Operating System (andGOARCHif targeting a different architecture). Unfortunately when using native graphics calls the use of CGo in Fyne makes this a little harder.
Go本身的跨平台便捷性是很强的,但由于fyne要和图形驱动通讯,需要使用CGO,所以跨平台分发这事会有点难
在实机上编译
To cross-compile a Fyne application you will also have to set
CGO_ENABLED=1which tells go to enable the C compiler (this is normally turned off when the target platform is different to the current system). Doing so unfortunately means that you must have a C compiler for the target platform that you are going to compile for. After installing the appropriate compilers you will also need to set theCCenvironment variable to tell Go which compiler to use.
为了编译跨平台APP,你仍然需要设置CGO_ENABLED=1,告诉Go启用C编译器;然后你还最好要真的有C编译器;装好编译器之后你还要设置CC环境变量,告诉GO应该使用哪个编译器
There are many ways to install the required tools - and different tools that can be used. The configuration recommended by the Fyne developers is:
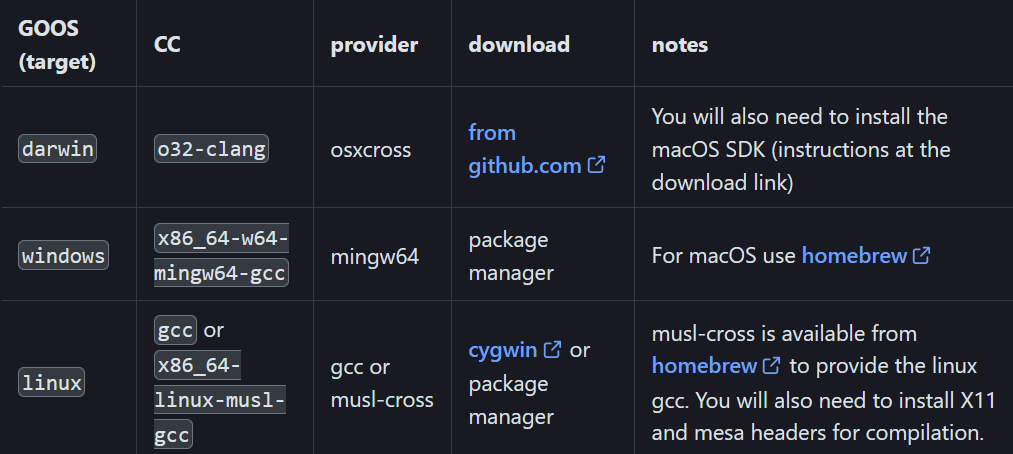
With the environment variables above set you should be able to compile in the usual manner. If further errors occur it is likely to be due to missing packages. Some target platforms require additional libraries or headers to be installed for the compilation to succeed.