从零开始的Fyne(五):主题图标、快捷键与API偏好设置
主题图标
- 官方文档
列表中的每个图标都可以通过theme包的函数访问,比如theme.InfoIcon()
这些图标也可以通过使用实现了fyne.Theme的结构体的Icon方法访问其源图标名称来得到,如theme.Icon(theme.IconNameInfo)
使用其他色彩集合
每个图标都可以通过下面的公共辅助方法设置一个特定的主题颜色:
NewDisabledThemedResourceNewErrorThemedResourceNewInvertedThemedResourceNewPrimaryThemedResource
所有图标默认使用NewThemedResource作为其主题前景色。所有图标均为SVG图像width="24",height="24"
添加快捷键
Shortcuts are common tasks that can be triggered by keyboard combinations or context menus. Shortcuts, much like keyboard events, can be attached to a focused element or registered on the
Canvasto always be available in aWindow.
快捷键是可被键盘组合键或菜单触发的常规事件。类似键盘事件,快捷键也可以附加到焦点所在的元素,或直接注册到Canvas上,使其在整个Window内均可用
注册到Canvas上
There are many standard shortcuts defined (such as
fyne.ShortcutCopy) which are connected to standard keyboard shortcuts and right-click menus. The first step to adding a newShortcutis to define the shortcut. For most uses this will be a keyboard triggered shortcut, which is a desktop extension. To do this we usedesktop.CustomShortcut, for example to use the Tab key and Control modifier you might do the following:
fyne已经实现了很多标准快捷键并将其附加到标准键盘组合键和右键菜单上(比如fyne.ShorcutCopy)。要添加一个新的Shortcut,第一步便是定义这个快捷键。快捷键的多数用途就是作为一个键盘触发事件(这是桌面端扩展)。要做到这一点我们需要desktop.CustomShortcut,例如,如果想使用Tab键和Ctrl键生成一个组合键,你可以像下面这样做:
	ctrlTab    := &desktop.CustomShortcut{KeyName: fyne.KeyTab, Modifier: fyne.KeyModifierControl}
	ctrlAltTab := &desktop.CustomShortcut{KeyName: fyne.KeyTab, Modifier: fyne.KeyModifierControl | fyne.KeyModifierAlt}
提示
在 GUI 开发和操作系统术语中,Modifier Keys(修饰键) 指的是那些单独按下没有反应,但配合其他键可以改变其功能的特殊按键。
Notice that this shortcut can be re-used so you could attach it to menus or other items as well. For this example we want it to be always available, so we register it with our window’s
Canvasas follows:
注意到这些快捷键可被复用,所以你可以将其添加到菜单或其他元素上。比如,我们希望这些快捷键在整个窗口内均可用,就可以将其注册到窗口的Canvas上:
	ctrlTab := &desktop.CustomShortcut{KeyName: fyne.KeyTab, Modifier: fyne.KeyModifierControl}
	w.Canvas().AddShortcut(ctrlTab, func(shortcut fyne.Shortcut) {
		log.Println("We tapped Ctrl+Tab")
	})
	w.Canvas().AddShortcut(ctrlAltTab, func(shortcut fyne.Shortcut) {
		log.Println("We tapped Ctrl+Alt+Tab")
	})
As you can see there are two parts to registering a shortcut in this way - passing the shortcut definition and also a callback function. If the user types the keyboard shortcut then the function will be called and the output printed.
你看,要注册一个快捷键要分两步——第一步,传递快捷键定义;第二步,传递一个回调函数。如果用户按下了指定快捷键,回调函数将会被调用,打印日志语句
Shortcuts only work in combination with modifier keys. In order to react to keyboard input without modifiers use
canvas.OnTypedRuneorcanvas.OnTypedKey.
快捷键仅当与键盘修饰符一起工作时才有效。如果需要响应单个按键的键盘输入,请使用canvas.OnTypedRune或canvas.OnTypedKey
代码示例与演示
func SetContentToCanvasKeyModifier(win fyne.Window, app fyne.App) {
quit := tools.CreateQuitButtonWithConfirm(win, app)
ctrlTab := &desktop.CustomShortcut{
KeyName: fyne.KeyTab, //
Modifier: fyne.KeyModifierControl, // 修饰键, 需要按住这个的同时按下KeyName指示的那个键才能触发事件
}
win.Canvas().AddShortcut(ctrlTab, func(shortcut fyne.Shortcut) {
dialog.ShowInformation("Ctrl+Tab", "Ctrl+Tab is pressed", win)
})
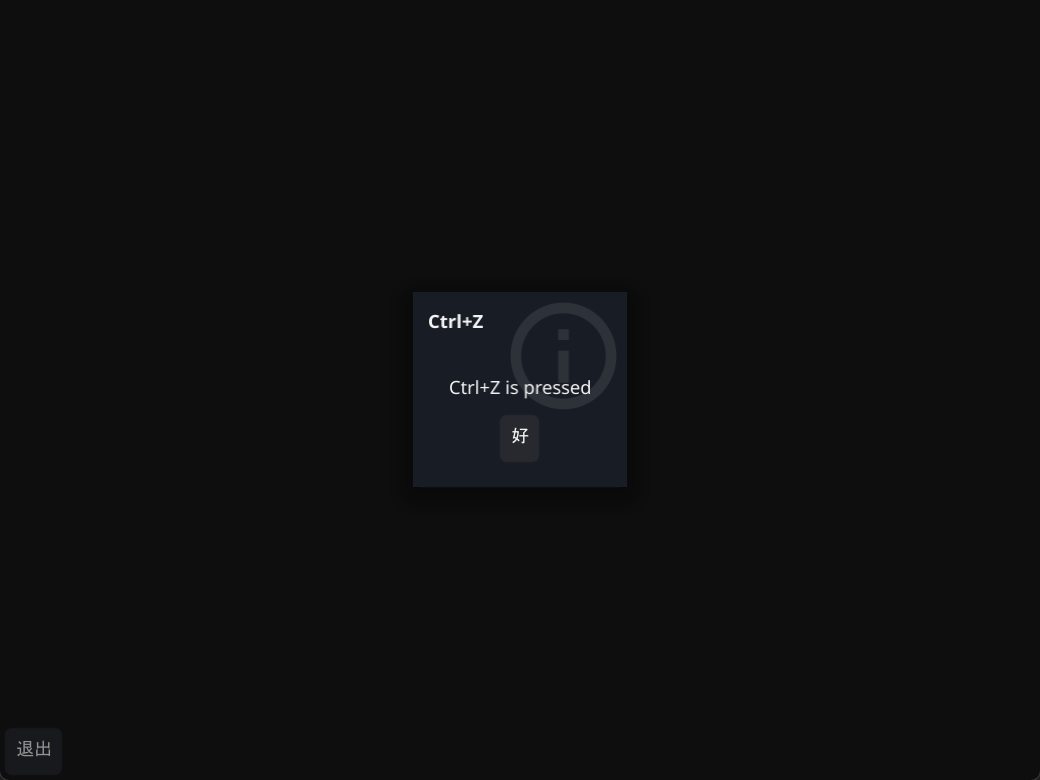
win.Canvas().AddShortcut(&fyne.ShortcutUndo{}, func(shortcut fyne.Shortcut) {
dialog.ShowInformation("Ctrl+Z", "Ctrl+Z is pressed", win)
})
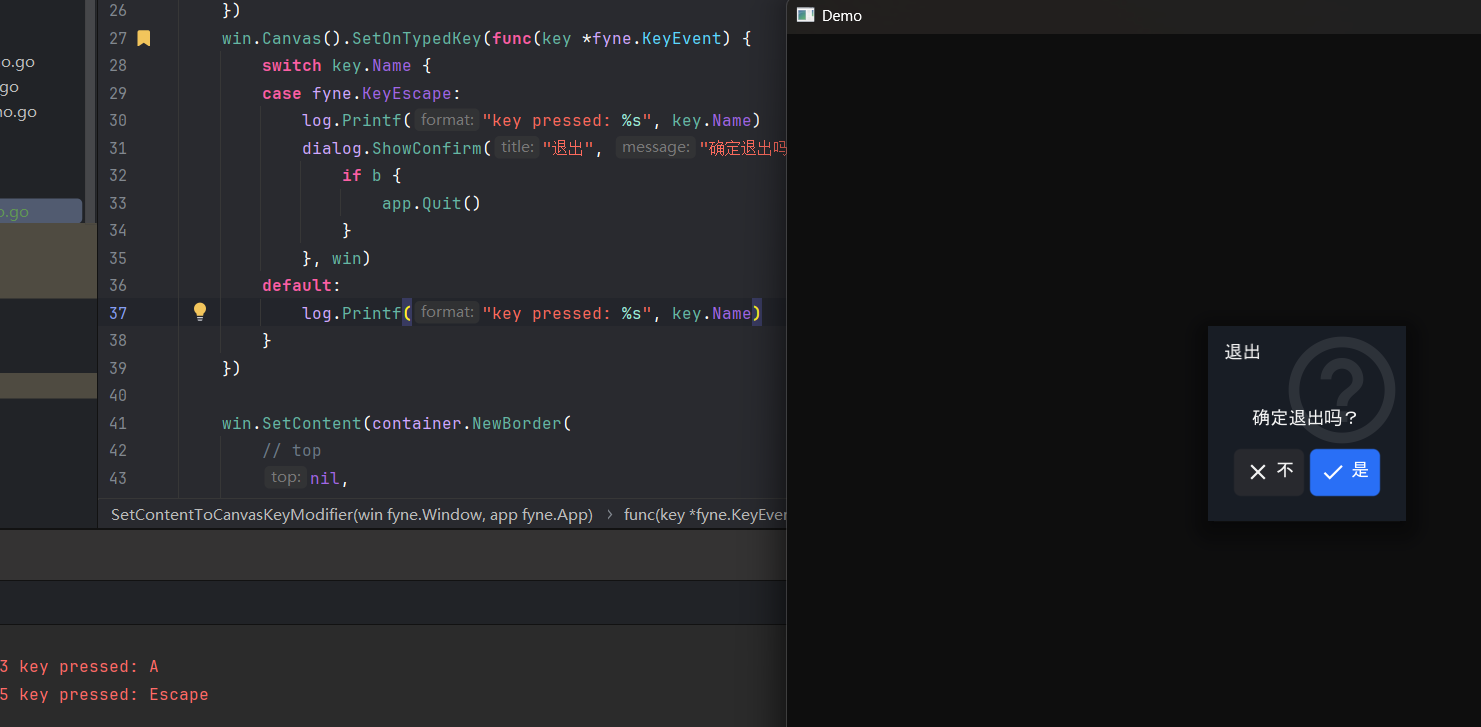
win.Canvas().SetOnTypedKey(func(key *fyne.KeyEvent) {
switch key.Name {
case fyne.KeyEscape:
log.Printf("key pressed: %s", key.Name)
dialog.ShowConfirm("退出", "确定退出吗?", func(b bool) {
if b {
app.Quit()
}
}, win)
default:
log.Printf("key pressed: %s", key.Name)
}
})
win.SetContent(container.NewBorder(
// top
nil,
// bottom
container.NewHBox(quit),
// left
nil,
// right
nil,
// center
nil,
))
}
给输入框添加快捷键
It can also be helpful to have a shortcut apply only when the current item is focused. This approach can be used for any focusable widget, and is managed by extending that widget and adding a
TypedShortcuthandler. This is much like adding key handlers, except the value passed in will be afyne.Shortcut.
当元素被注视时如果有一个快捷键用来简化操作的话也是很不错的。任何可被注视的widget都支持快捷键监听器,也可以通过给一个widget加上TypedShortcut监听器方法来实现这一点。这很像添加键盘监听器,只是传参将会是一个fyne.Shortcut类型的值
type myEntry struct {
	widget.Entry
}

func (m *myEntry) TypedShortcut(s fyne.Shortcut) {
	if _, ok := s.(*desktop.CustomShortcut); !ok {
		m.Entry.TypedShortcut(s)
		return
	}

	log.Println("Shortcut typed:", s)
}
From the excerpt above you can see how a
TypedShortcuthandler might be implemented. Inside this function you should check whether the shortcut is of the custom type used earlier. If the shortcut is a standard one it’s a good idea to call the original shortcut handler (if the widget had one). With those checks done you can compare the shortcut with the various types you are handling (if there are multiple).
上面的代码演示了如何实现一个TypedShortcut监听器。在函数内你应该检查输入的快捷键是否为你预期的类型。如果快捷键已包含在fyne库中,你应该直接调用原本的快捷键监听器(如果widget组件本身就有一个)。做完这些检查后你就可以判断快捷键是你正在处理的哪一个组合了(如果有很多个组合键的话)
应用API偏好
Storing user configurations and values is a common task for application developers, but implementing it across multiple platforms can be tedious and time-consuming. To make it easier, Fyne has an API for storing values on the filesystem in a clean and understandable way while the complex parts are handled for you.
对于开发者来说,存储用户配置是再正常不过的事情,但要在不同平台上确保其行为一致是既繁琐又浪费时间的。为了保住程序员的头发,fyne拥有一套干净易读的API,用于将配置值存储到文件系统中;fyne帮你把脏活累活都做完了。
Lets start with the setup of the API. It is part of the Preferences interface where storage and loading functions exist for values of
bool,float64,int, andstringtypes, and for lists of each type as well. For each type there are three different functions, one for loading, one loading with a fallback value and lastly, one for storing values. An example of the three functions and their behaviour can be seen below for thestringtype:
让我们先从API的搭建开始。API就是用于管理配置值(包括bool、float64、int和string等基本类型,以及列表等复合数据类型)的存储与加载方法的设置接口的一部分。
// String looks up a string value for the key
String(key string) string
// StringWithFallback looks up a string value and returns the given fallback if not found
StringWithFallback(key, fallback string) string
// SetString saves a string value for the given key
SetString(key string, value string)
These functions can be accessed through the created application variable and calling the
Preferences()method on. Please note that it is necessary to create the apps with a unique ID (usually like a reversed url). This means that the application will need to be created usingapp.NewWithID()(or have ID specified inFyneApp.toml) to have its own place to store values. It can roughly be used like the example below:
a := app.NewWithID("com.example.tutorial.preferences")
[...]
a.Preferences().SetBool("Boolean", true)
a.Preferences().SetFloatList("Constants", []float64{3.142, 2.718})
number := a.Preferences().IntWithFallback("ApplicationLuckyNumber", 21)
expression := a.Preferences().String("RegularExpression")
[...]
To show this, we are going to build a simple little app that always closes after a set amount of time. This timeout should be user changeable and applied on the next start of the application.
Let us start by creating a variable called
timeoutthat will be used to store time in the form oftime.Duration.
var timeout time.DurationThen we could create a select widget to let the user select the timeout from a couple pre-defined strings and then multiplying the timeout by the number of seconds that the string relates to. Lastly, the
"AppTimeout"key is used to set the string value to the selected one.
timeoutSelector := widget.NewSelect([]string{"10 seconds", "30 seconds", "1 minute"}, func(selected string) {
    switch selected {
    case "10 seconds":
        timeout = 10 * time.Second
    case "30 seconds":
        timeout = 30 * time.Second
    case "1 minute":
        timeout = time.Minute
    }

    a.Preferences().SetString("AppTimeout", selected)
})
Now we want to grab the set value and if none exists, we want to have a fallback that sets the timeout to the shortest one possible to save the user time when waiting. This can be done by setting the selected value of
timeoutSelectorto the loaded value or the fallback if that happens to be the case. By doing it this way, the code inside the select widget will run for that specific value.
timeoutSelector.SetSelected(a.Preferences().StringWithFallback("AppTimeout", "10 seconds"))The last part will just be to have a function that starts in a separate goroutine and tells the application to quit after the selected timeout.
go func() {
    time.Sleep(timeout)
    a.Quit()
}()
代码示例与演示
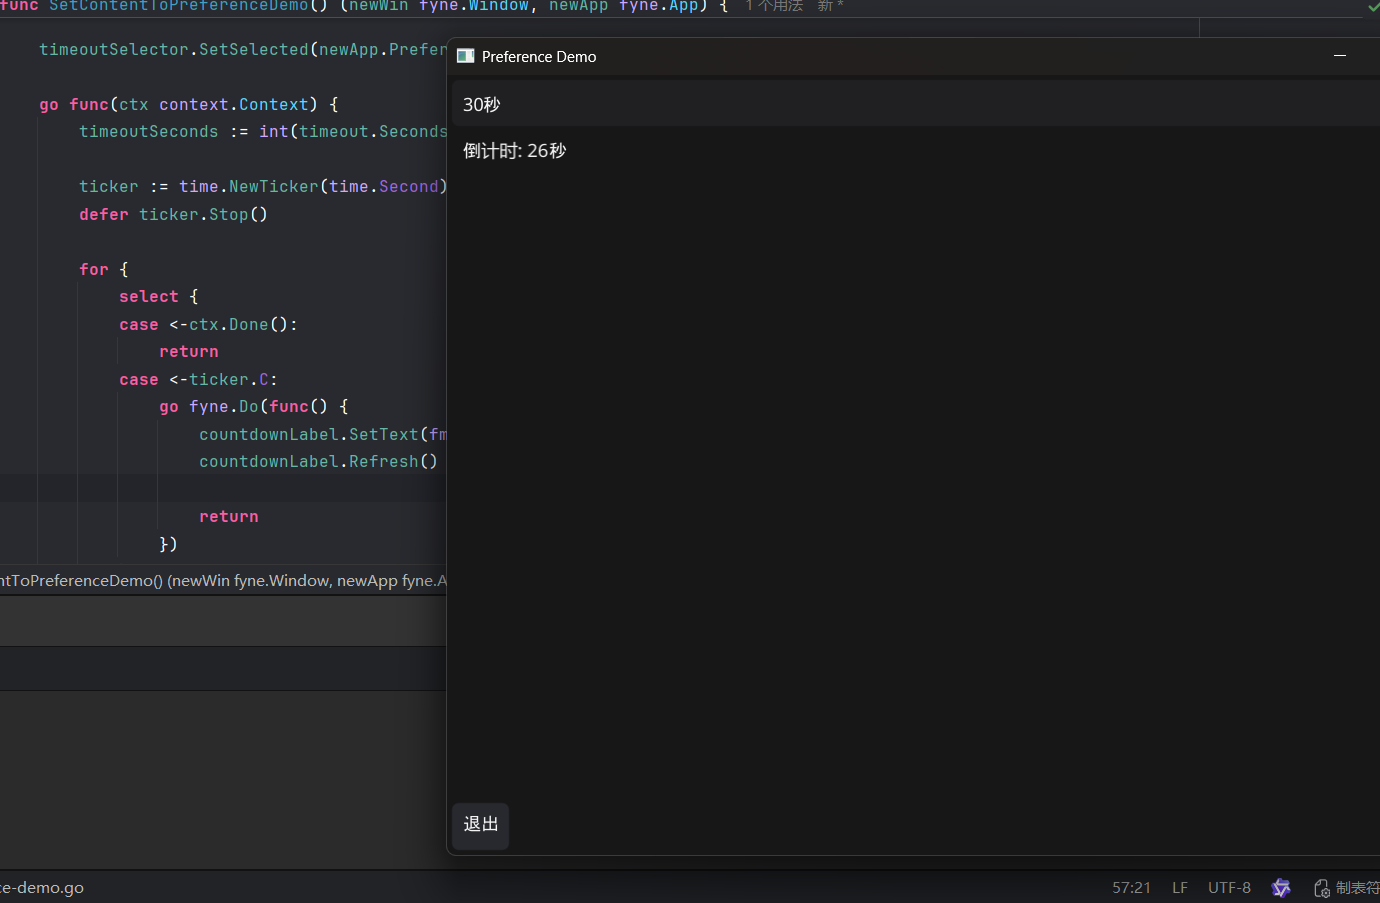
func SetContentToPreferenceDemo() (newWin fyne.Window, newApp fyne.App) {
    newApp = app.NewWithID("com.example.demo.preference")
    newWin = newApp.NewWindow("Preference Demo")

    quit := tools.CreateQuitButtonWithConfirm(newWin, newApp)

    var timeout time.Duration

    timeoutSelector := widget.NewSelect([]string{"10秒", "30秒", "1分钟"}, func(s string) {
       switch s {
       case "10秒":
          timeout = time.Second * 10
       case "30秒":
          timeout = time.Second * 30
       case "1分钟":
          timeout = time.Minute * 1
       }

       newApp.Preferences().SetString("AppTimeout", s) // 下次启动程序时自动读取保存的值
       dialog.ShowInformation("提示", "新配置将在下次启动后生效", newWin)  // 首次启动也会触发, 无所谓了的说
    })
    countdownLabel := widget.NewLabel("")
    countdownCtx := context.Background()

    timeoutSelector.SetSelected(newApp.Preferences().StringWithFallback("AppTimeout", "10秒"))

    go func(ctx context.Context) {
       timeoutSeconds := int(timeout.Seconds())

       ticker := time.NewTicker(time.Second)
       defer ticker.Stop()

       for {
          select {
          case <-ctx.Done():
             return
          case <-ticker.C:
             go fyne.Do(func() {
                countdownLabel.SetText(fmt.Sprintf("倒计时: %v秒", timeoutSeconds))
                countdownLabel.Refresh()

                return
             })
          }

          timeoutSeconds--
       }
    }(countdownCtx)

    go func() {
       log.Printf("%v秒后退出程序", timeout.Seconds())
       time.Sleep(timeout)
       fyne.Do(func() {
          countdownCtx.Done() // 关闭标签更新协程
          newApp.Quit()
       })
    }()

    newWin.SetContent(container.NewBorder(
       // top
       timeoutSelector,
       //  bottom
       container.NewHBox(quit),
       // left
       nil,
       // right
       nil,
       // center
       container.NewHBox(countdownLabel),
    ))
    return newWin, newApp
}
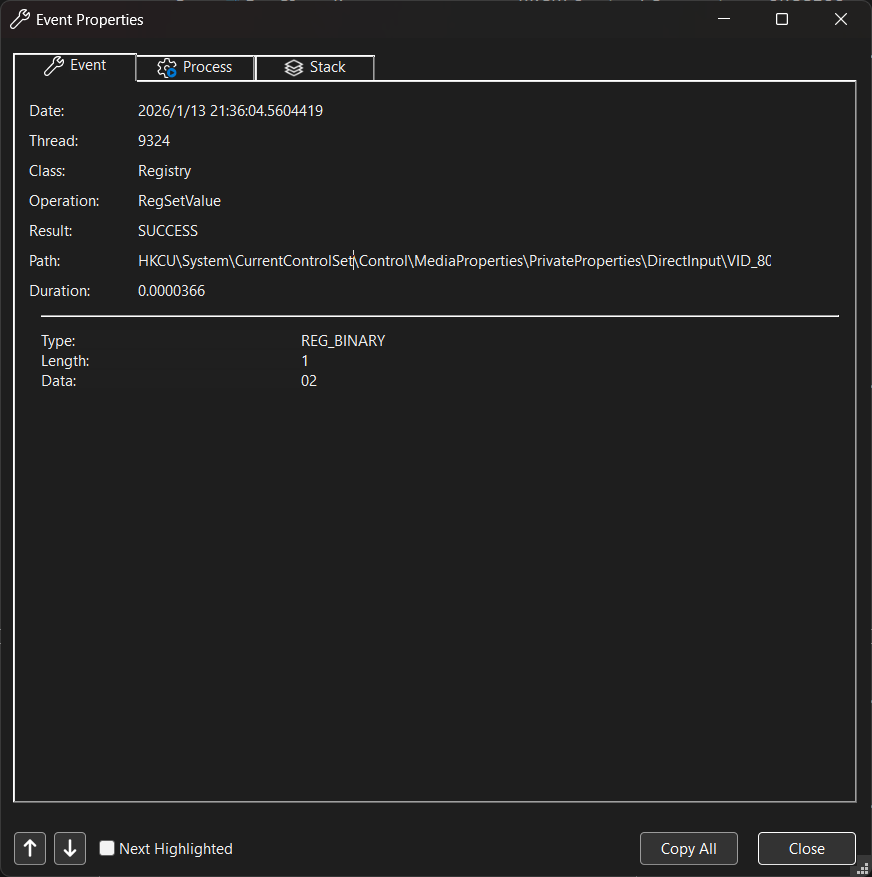
写在注册表里的
国际化
Most apps will want to add translations at some point, and since v2.5.0 Fyne helps to make this really simple. The translation features simply sit in your project as
.jsonfiles and the content can be crowd-sourced by popular platforms like Weblate.
初始化
The Fyne toolkit is already translated and will replace recognised strings in standard locations. To make use of this functionality for your own app strings you make use of the
fyne.io/fyne/v2/langpackage and the helper functions it provides.
The simplest way to prepare for translations is to use the
LorLocalizefunction to mark a string as translatable - if the translation is not found then the string will be used as a fallback.
title := widget.NewLabel(lang.L("My App Title"))In some cases it may be desirable to label a string with a unique ID instead of using the default value - for disambiguation or other reason. In this case you would use
LocalizeKeyor theXalias.
title := widget.NewLabel(lang.X("window.title", "My App Window Title"))That may be all you need to know to get started - read on to learn how to create your translation files.
译文文件
Each translation file is a simple JSON file, if you use the
Lform all you need to do is insert the string with it’s translation for each language - 1 per file. For example, this may be your appen.json:
{
  "My App Title": "My App Title"
}
Then your French translation could look like:
{
  "My App Title": "Titre de mon application"
}
Each file can be most easily loaded using the Go
embedfeature - place each of the files in a directory calledtranslationand then define them simply as:
//go:embed translation
var translations embed.FS
Finally you can tell Fyne to load these translations with a single function call between
app.NewandRun()in yourmainfunction:
lang.AddTranslationsFS(translations, "translation")This uses the embedded filesystem and specifies the name of the directory that the files are stored in.
The naming of these translation files should follow the format
[prefix]{{[language subtag](https://en.wikipedia.org/wiki/IETF_language_tag#List_of_common_primary_language_subtags)}}.json
注
这里的 {{language subtag}} 并不是指 Go 的 text/template 运行时渲染,而是在定义文件命名规范。
占位符含义:它要求你将该部分替换为标准的 BCP 47 语言标签。
具体格式:如果你在代码中设置的
prefix是my-lang-,那么具体的文件名应该是:中文简体:
my-lang-zh-Hans.json英文(美国):
my-lang-en-US.json日语:
my-lang-ja.json
For example:
$ tree # at tranlations
.
|-- de.json
|-- en.json
|-- zh.json
When your app starts it will display using the translations for the current user’s language configuration.
带参译文/Plurals
In more complex cases the string will change based on the number of items it refers to. For this the
lang.LocalizePluralfunction (aliased tolang.N) is available.
age := widget.NewLabel(lang.N("{% raw %}{{.Years}}{% endraw %} years old", years, map[string]any{"Years": years}))You can pass data in this way to any of the calls, using template syntax to insert the value. A struct with exported fields, or a map as illustrated above, can be used to insert data.
The translation file will look a little more complex for this - the key has two sub-values called “one” and “other” (some languages may use more keys).
{
  "Age": {
    "one": "1 year old",
    "other": "{% raw %}{{.Years}}{% endraw %} years old"
  }
}